


What ROAS is
ROAS (Return on Ad Spend) = Revenue Generated ÷ Ad Spend. It tells you, in money terms, what each unit of ad budget brought back.
| Ad spend | Revenue generated | ROAS |
|---|---|---|
| ₹1,00,000 | ₹5,00,000 | 5.0 |
A ROAS of 5.0 means every ₹1 spent on advertising produced ₹5 in revenue. Above 1.0 you're making money on a campaign; below 1.0 you're paying to lose it.
Why measure ROAS at all
Visibility, clicks, and impressions feel like progress, but they don't tell you whether advertising is actually making money. ROAS turns ad activity into a profit-and-loss question, which is what lets you:
- Find the winners and the leaks. See exactly which campaigns and creatives return more than they cost — and which quietly drain budget — instead of judging by clicks or gut feel.
- Allocate budget with evidence. Pour more into high-ROAS campaigns, pause or rework low-ROAS ones, and justify every shift with revenue, not opinion.
- Compare channels fairly. If Google returns more per rupee than Meta (or vice-versa), you can move spend to the stronger platform with confidence.
- Tie marketing to the bottom line. ROAS connects the marketing team's work to revenue the business actually recognises — the metric leadership and finance care about.
In short, ROAS is the strategic compass for ad spend: it points budget toward what works and away from what doesn't.
Why run ROAS through NVECTA (the advantage)
You can read ROAS-style numbers inside Google Ads or Meta — but each platform only sees its own activity and reports conversions in its own, self-favouring way. Run inside both, those numbers double-count, disagree, and overstate. NVECTA exists to give you one honest, complete picture and then act on it:
- One source of truth across every channel. Google, Meta, and DV360 land in a single report so you compare them side by side, in the same definitions, on one screen — no stitching together three dashboards that each measure differently.
- Real revenue from your own data, not platform estimates. Because NVECTA is your CDP, ROAS is built on the transactions and revenue you actually track — not the ad platforms' modelled, often-inflated conversion counts.
- Attribution you control. Ad platforms grade their own homework with last-click models that maximise their apparent contribution. NVECTA lets you choose First Touch, Last Touch, Linear, or Participation and re-read the same data through whichever lens fits your funnel (see Step 7).
- Campaign- and creative-level clarity. Break results down by ad partner, campaign, and individual creative — across channels at once — so you know whether a campaign or a single creative is driving performance.
- Measurement that closes the loop. This is the part a standalone analytics tool can't do: NVECTA is also an engagement platform, so the same data that proves a campaign works can immediately act — sync high-value audiences back to Google/Meta, exclude poor segments from spend, and trigger campaigns. Insight doesn't sit in a dead report; it feeds the next campaign.
- Self-service and ready-made. Prebuilt ROAS templates, one-time integrations, and no agency or developer dependency for the standard setup — which is exactly what this recipe walks you through.
How this recipe works
The pipeline you're building:
Connect Ads → Sync spend, clicks & impressions → Tag ad URLs → (App) attribution → Track users & events → Open & tune the ROAS report → Choose the attribution model
| # | Step | What it achieves | Roughly how long |
|---|---|---|---|
| 1 | Connect ad platforms | Links Google / Meta accounts to NVECTA | 5–10 min |
| 2 | Turn on ROAS metrics sync | Pulls impressions, clicks, spend | 2 min |
| 3 | Add tracking macros to ad URLs | Lets NVECTA attribute clicks to campaigns/creatives | 15–20 min |
| 4 | Mobile app attribution | Adds in-app conversions to ROAS | Varies |
| 5 | Track users and events on your website and app | Ties anonymous ad sessions to known users so revenue maps | Varies |
| 6 | Open, read & tune the ROAS reports | Get ROAS by campaign / creative and as a daily trend | Ongoing |
| 7 | Choose the attribution model | Decide how credit is split across touchpoints | 2 min |
Before you begin (prerequisites)
Make sure you have these ready, otherwise later steps will stall:
Access
- An NVECTA account with access to Settings (to connect ad platforms) and Analytics → Reports (to open the ROAS templates).
- The NVECTA SDK / tracking script installed on your site — this records the sessions and events that user tracking (Step 5) and revenue mapping depend on.
- Your purchase/conversion events must be tracked in NVECTA.
For Google Ads
- A Google account with direct admin permission on the specific Google Ads account you want to connect.
- Manager (MCC) account access is not supported — you must log in with an account that has admin rights on the actual ads account.
For Meta (Facebook)
- A Facebook Business Manager account.
- A Facebook Business Page.
- A Facebook Ad Account.
- (Helpful) at least one Audience list.
- Full details: Prerequisites of Facebook integration.
Step 1 — Connect your ad platforms
NVECTA currently supports Google Ads, Meta / Facebook Ads, and Google DV360. Connect every platform you advertise on.
Navigate to Settings → Channels → Remarketing Ads. You'll see separate tabs for Google and Facebook.
1A. Connect Google Ads
- In Settings, open the Google Ads tab and click "Connect to Google Ads."
- You'll be redirected to Google. Choose the Google account you want to connect (or log in to a new one). It must have direct admin permission on the target ads account — MCC/manager access won't work.
- A data-sharing permission screen appears. Click "Allow."
- You're returned to NVECTA and the Google Ads account is now connected.
1B. Connect Meta (Facebook)
- In Settings → Channels, select "Facebook."
- Click "Connect to Facebook advertising." A permission pop-up shows your Facebook Business name — click "Continue."
- Your Facebook Pages appear. Select the Page you want to connect and click "Next."
- A permissions window lists the data NVECTA will access. Do not turn off any permissions — disabling them causes errors later. Review and click "Done."
- Click "OK" to close the window. Your account is connected.
Reference: Sync NVECTA with Facebook Audience
1C. DV360
DV360 connects through the same Google tab. Once your Google account is linked, DV360 accounts associated with it become selectable in Step 2.
Step 2 — Turn on ROAS metrics sync
Connecting the account (Step 1) is just the handshake. To actually pull spend, clicks, and impressions, switch on ROAS sync.
Still in Settings → Channels → Remarketing Ads:
-
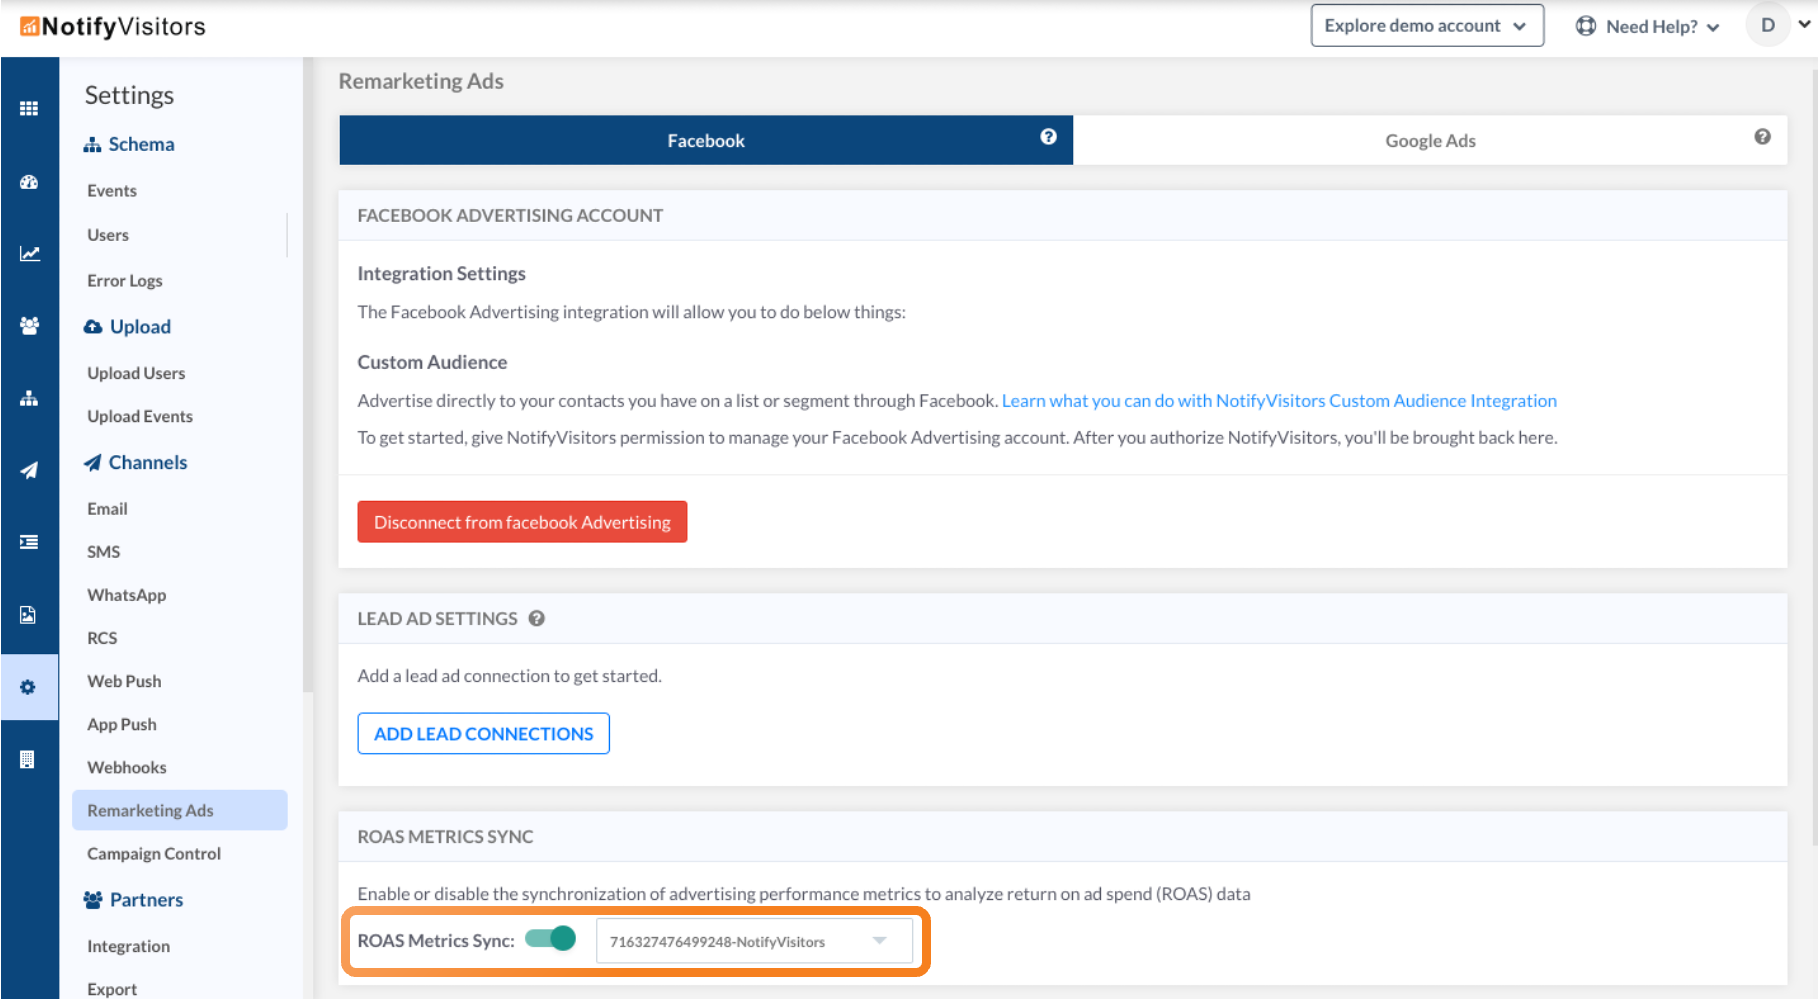
Facebook: Toggle ROAS sync ON, then choose the Facebook ad account you want metrics from.
-
Google Ads & DV360: In the Google tab, toggle the ROAS sync switch ON and select the desired account for Google Ads / DV360.
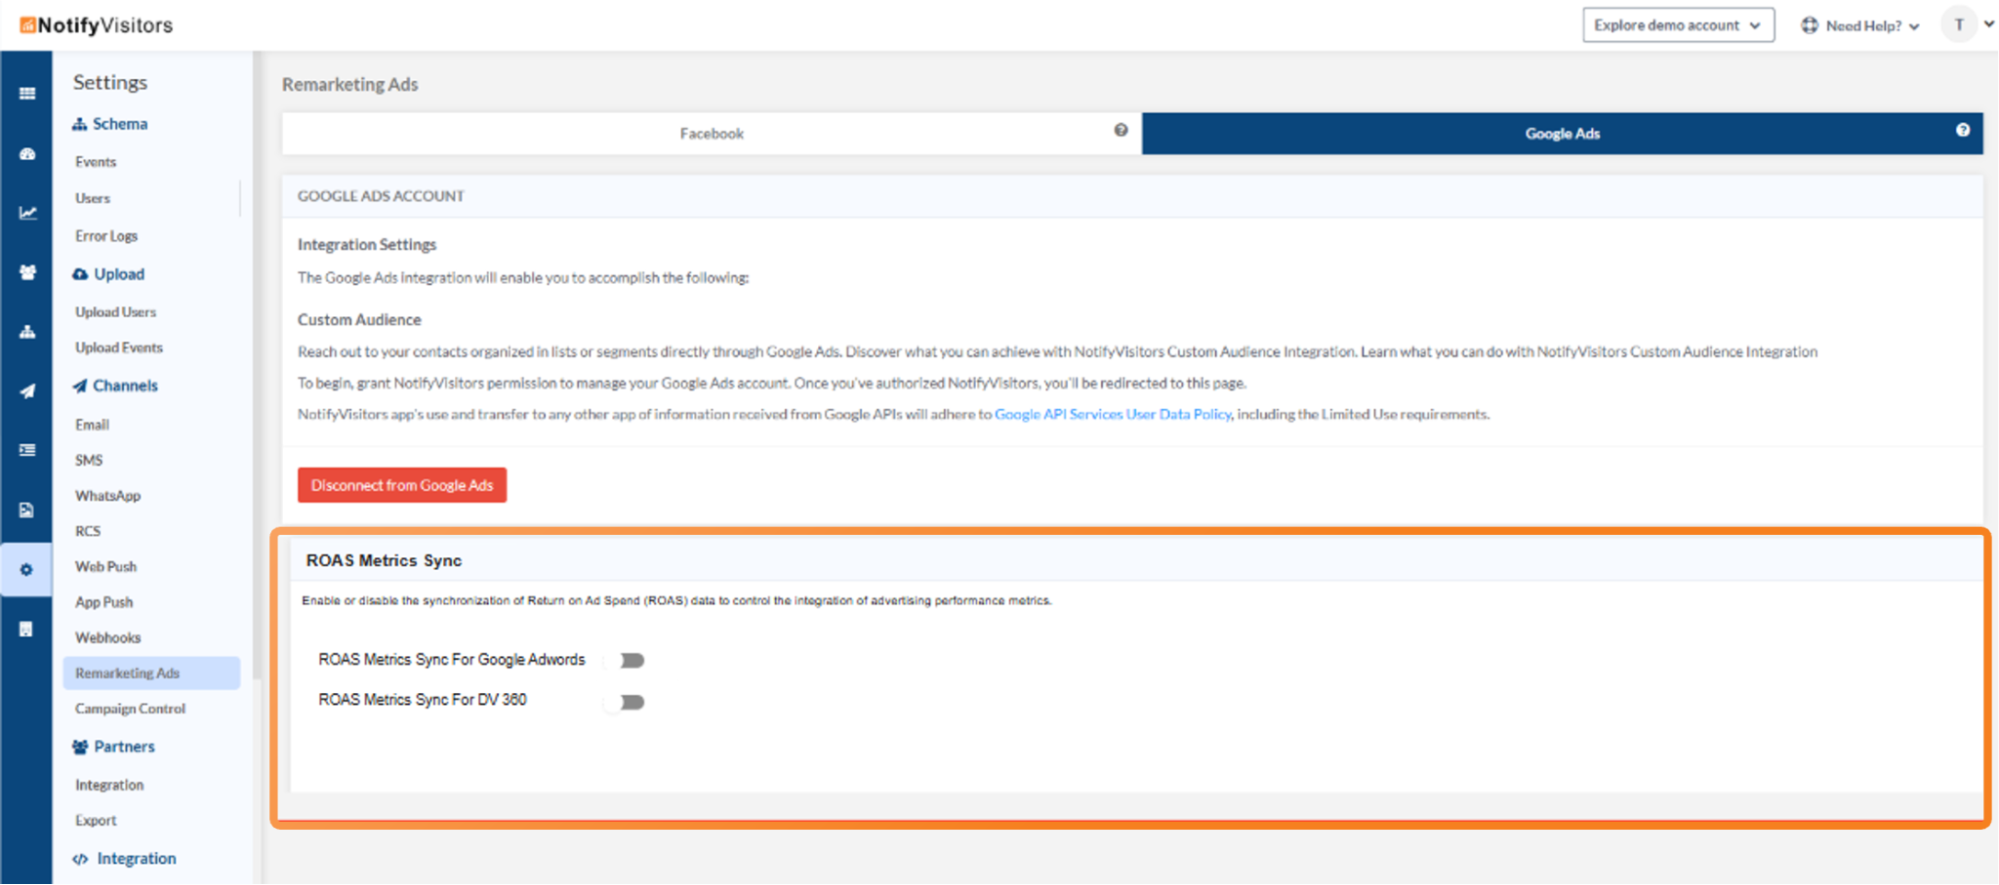
To switch the source account later, just reopen the dropdown and pick a different account — NVECTA automatically starts fetching metrics for the newly selected account.
What NVECTA receives after this step:
- Impressions — total times your ad was shown.
- Clicks — total clicks on your ad.
- Spend — total cost for the selected period.
⏱️ T-1 (previous-day) data — important. The ROAS report always shows data up to the previous day. If today is 5 June, the report shows data through 4 June. Current-day data is not available. This delay lets Google and Meta fully process and attribute interactions before they appear, which keeps the numbers accurate. Don't treat a "missing today" as a bug.
Steps 1 and 2 are one-time setup. Once done, metrics keep syncing automatically.
Step 3 — Add tracking macros to your ad URLs
Why it's needed: When someone clicks your ad and lands on your site, NVECTA has to know which campaign and creative sent them. Macros (dynamic parameters) inject that campaign-level info into the landing-page URL automatically, so each visit carries its origin. Without these, clicks can't be attributed and your ROAS report can't break down by campaign or creative.
The key parameters are the three nv_ IDs — they're what NVECTA reads to attribute a click and break the report down by campaign, ad group/ad set, and creative.
Each block below is shown on multiple lines for readability, but paste it as one continuous string (no spaces, no line breaks) into the platform's field.
3A. Google Ads — Final URL Suffix
Where to configure: Google Ads → Settings → Additional Settings → Final URL Suffix. Set it at Account level so it applies universally to every campaign.
Paste this into the Final URL Suffix field:
utm_source=google
&utm_medium=cpc
&utm_campaign=Summer_Sale_2024
&utm_content=Banner_V2_Blue
&utm_adgroup=Retargeting_US
&nv_adcampaign_id={campaignid}
&nv_adgroup_id={adgroupid}
&nv_ad_id={creative}
Why some values are hardcoded: Google ValueTrack has no {campaignname}, {adgroupname}, or {adname} macros — only ID macros exist.
Auto-appended by Google (you don't add these): gclid (whenever auto-tagging is on), gad_source (campaign-type code), gad_campaignid (campaign ID).
ValueTrack macro reference:
| Macro | Resolves to |
|---|---|
| {campaignid} | Numeric campaign ID |
| {adgroupid} | Numeric ad group ID |
| {creative} | Numeric ad / creative ID |
Example resulting landing-page URL:
https://yoursite.com/landing?utm_source=google&utm_medium=cpc&utm_campaign=Summer_Sale_2024&utm_content=Banner_V2_Blue&utm_adgroup=Retargeting_US&nv_campaign_id=23625092609&nv_adgroup_id=8273649102&nv_ad_id=194487035472&gclid=EAIaIQobChMI...&gad_source=1&gad_campaignid=23625092609
UAC / App Campaigns: Do not configure a URL suffix for Universal App Campaigns. These go directly to the Play Store / App Store, so there's no landing page in the journey — attribution is handled via SRN instead.
3B. Meta (Facebook / Instagram) — URL Parameters
Where to configure: Meta Ads Manager → Ad level → Website URL → URL Parameters field.
Paste this into the URL Parameters field:
utm_source=facebook
&utm_medium=paid_social
&utm_campaign={{campaign.name}}
&utm_content={{ad.name}}
&utm_adgroup={{adset.name}}
&nv_adcampaign_id={{campaign.id}}
&nv_adgroup_id={{adset.id}}
&nv_ad_id={{ad.id}}
Unlike Google, Meta does provide name macros, so campaign / ad set / ad names populate dynamically — nothing to hardcode.
Auto-appended by Meta (you don't add this): fbclid (on every ad click).
Meta dynamic parameter reference:
| Parameter | Resolves to |
|---|---|
| {{campaign.id}} | Numeric campaign ID |
| {{campaign.name}} | Campaign name |
| {{adset.id}} | Numeric ad set ID |
| {{adset.name}} | Ad set name |
| {{ad.id}} | Numeric ad ID |
| {{ad.name}} | Ad name |
Example resulting landing-page URL:
https://yoursite.com/landing?utm_source=facebook&utm_medium=paid_social&utm_campaign=Summer+Sale+2024&utm_content=Banner+V2+Blue&utm_adgroup=Retargeting+US&nv_campaign_id=120210123456789&nv_adgroup_id=120210987654321&nv_ad_id=120210111222333&fbclid=IwAR2x...
Advantage+ App Campaigns: Same as Google's UAC — traffic goes directly to the store with SRN attribution, so URL parameters are not applicable.
Step 4 — Mobile app attribution tracking
If you run app-install or in-app campaigns, add mobile attribution so in-app conversions feed ROAS alongside web.
- NVECTA offers a mobile app attribution add-on you can enable.
- Already using a Mobile Measurement Partner (MMP) — AppsFlyer, Branch, Adjust, etc.? Integrate it and route its attributed in-app events (installs, purchases) into NVECTA so they appear in the ROAS report.
- Note: Google UAC and Meta Advantage+ App campaigns send traffic straight to the Play Store / App Store with SRN attribution and no landing page (see the Step 3 notes), so they're measured through the MMP / app SDK rather than URL macros.
Skip this step entirely if you only advertise to web destinations.
Step 5 — Track users and events on your website and app
Why it's needed: A click from Step 3 lands an anonymous session that carries the campaign/creative data in its URL. For the conversion and revenue that follow to count toward that campaign, the session has to be tied to a known user — which happens when you identify the user at lead submission, sign-up, login, or checkout. This completes the chain: ad click → session → user → conversion → revenue. Without it, sessions stay anonymous and the report's Transactions and Revenue read 0 even though spend syncs correctly.
What to set up:
- Install the NVECTA SDK / tracking script on every page that can receive ad traffic (landing pages, forms, checkout). This is what records sessions and events.
- Identify the user on lead/form submit (or sign-up / login). Pass an identifier — email, phone, or your internal user ID — so the anonymous session becomes a known user, and fire the relevant event. For the exact setup, see Tracking web users in NVECTA.
- Send the revenue/transaction event for that user (from your backend). Because the user is now identified, the event attributes back through the session to the original campaign and creative.
Missing or incomplete user tracking is the single most common cause of a "0 revenue" ROAS report — spend looks right, but no conversion can be matched to an ad click.
Step 6 — Open, read, and tune the ROAS reports
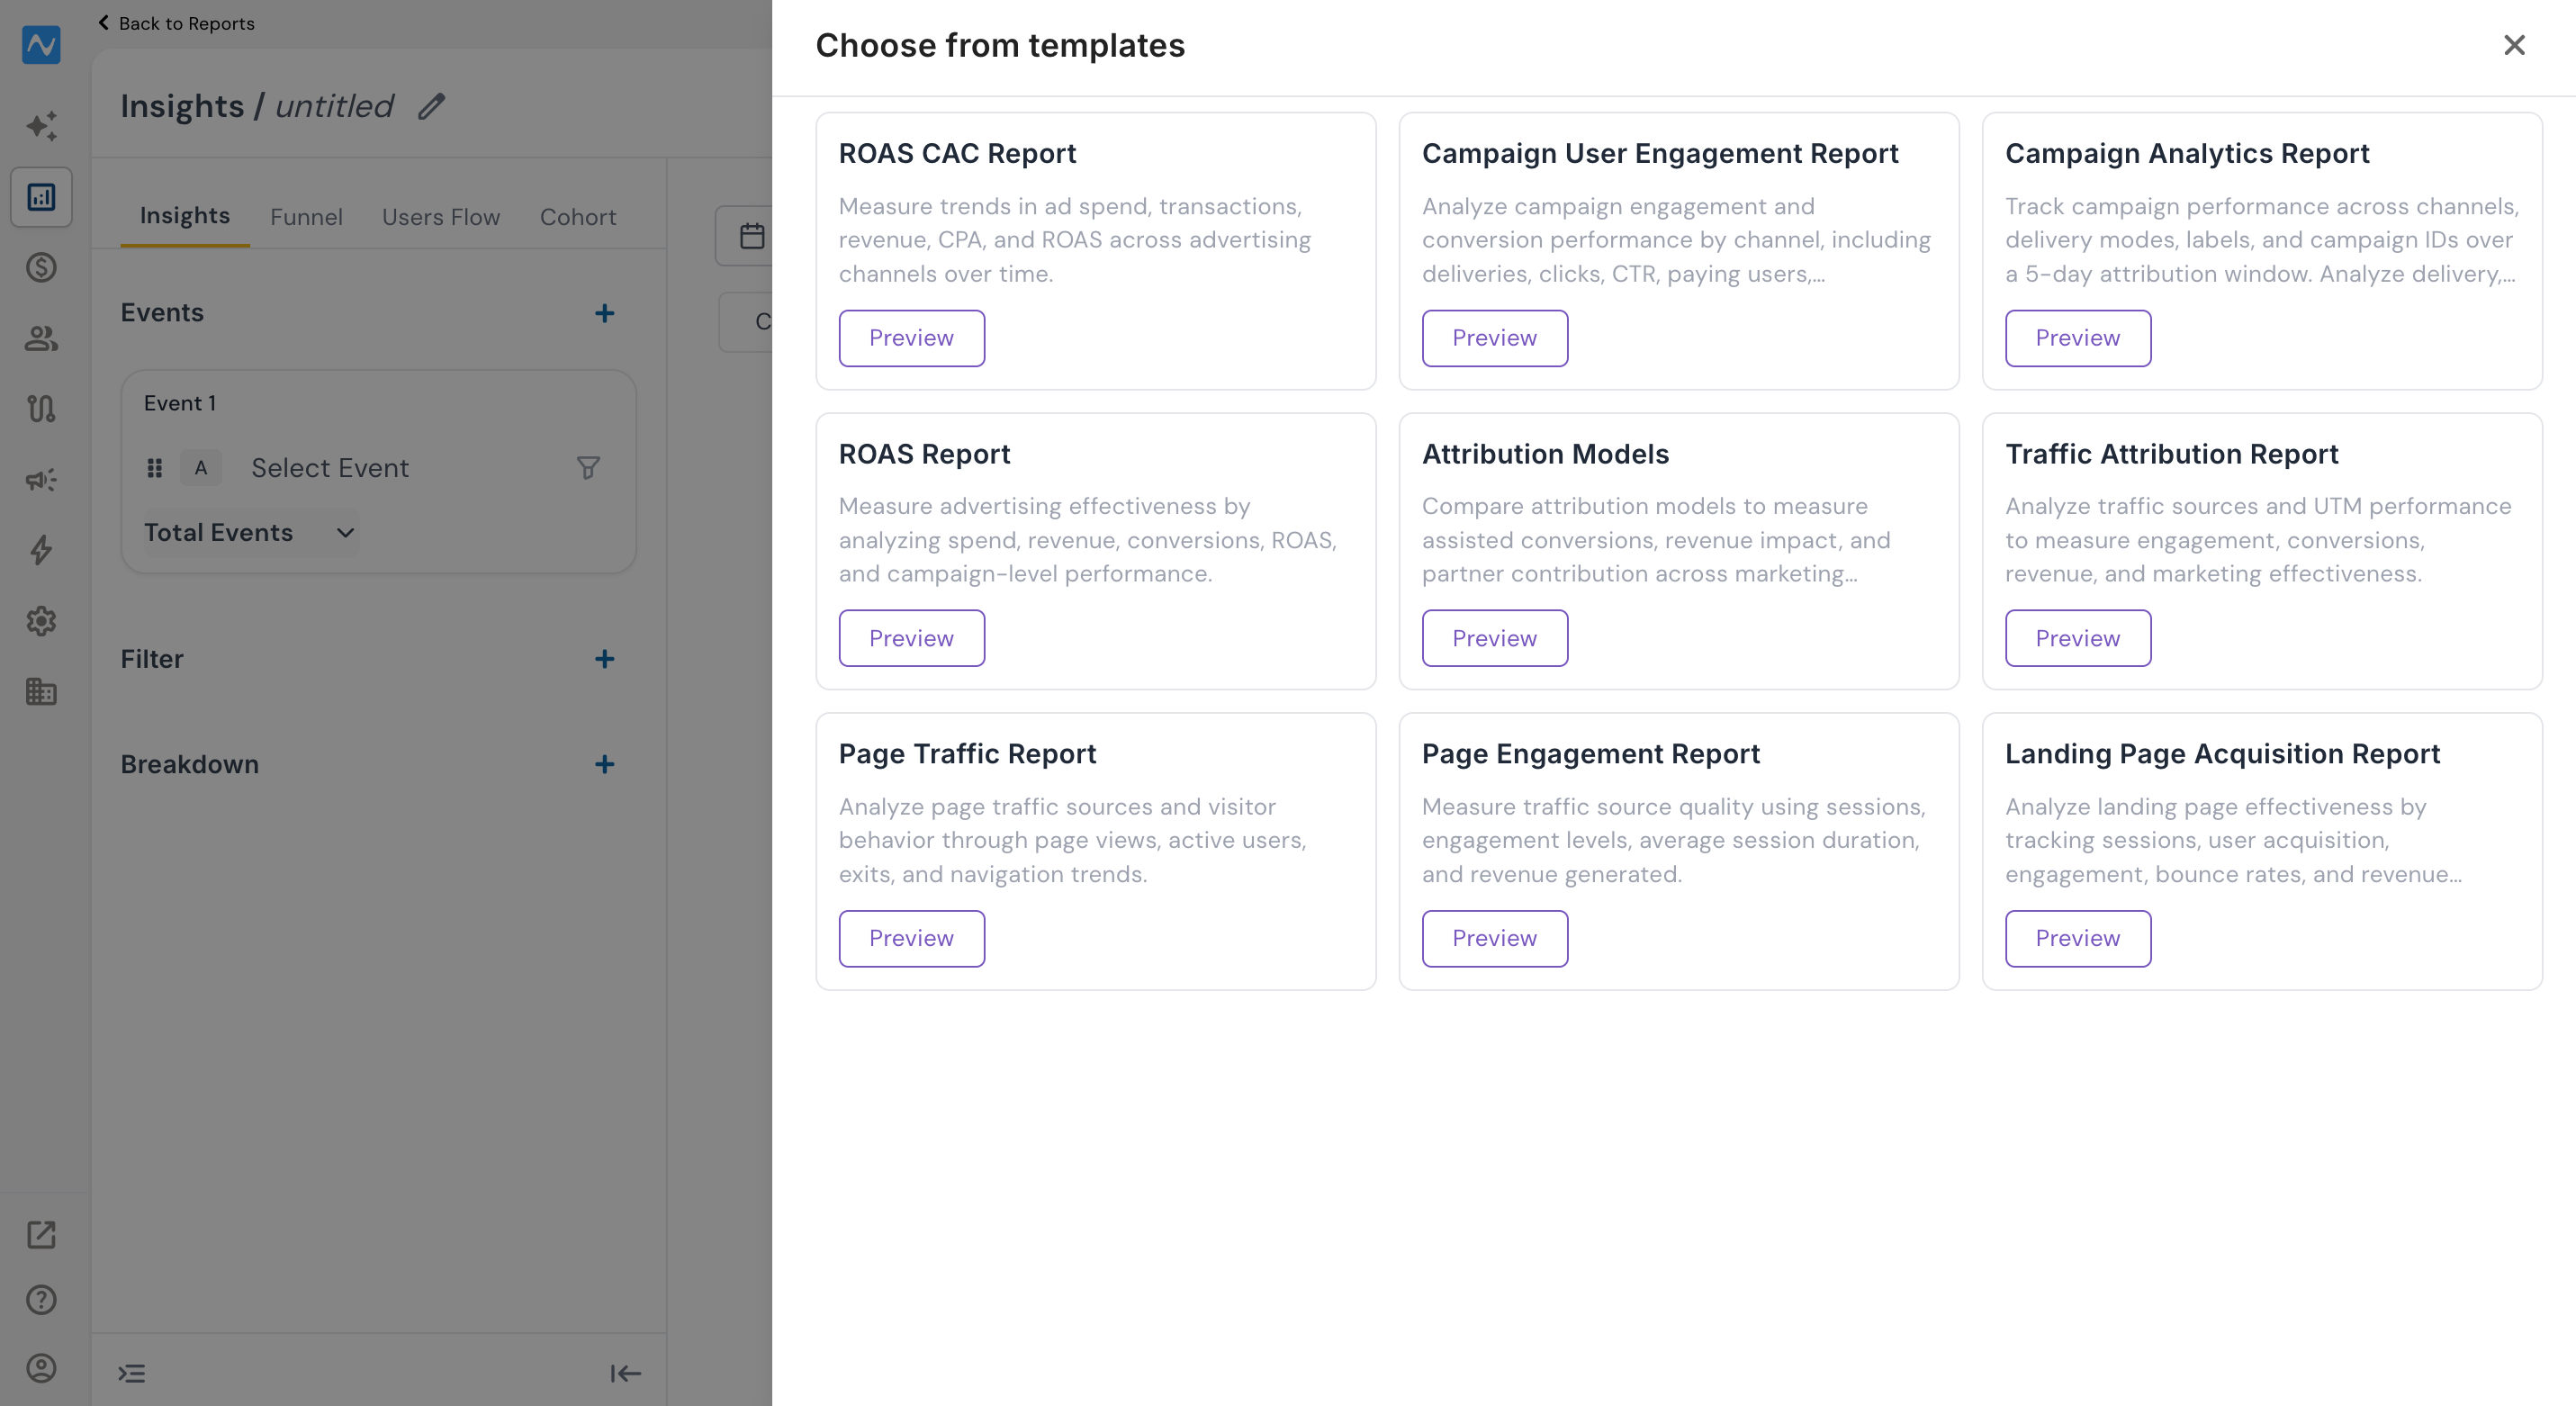
NVECTA offers two prebuilt ROAS templates — ROAS Report and ROAS CAC Report — so you don't have to build the report from scratch.
6A. How to open a ROAS report
Analytics → Reports → Create new report → select Insights → Templates → choose ROAS Report or ROAS CAC Report.
The template opens in the Insights report builder, with the metric definitions on the left (Events panel) and the output (table or chart) on the right. From here, you tune it to your requirements.
6B. Tune the template to your requirements
After you select a template, don't treat it as fixed — adjust it to match how your business measures ROAS. The four things you'll most often change:
- Revenue event — the template ships with events on the Transactions and Revenue metrics. Click those metrics and switch them to your relevant revenue event (e.g. Purchase, Order Completed, Paid Signup), and point Revenue's Sum of property at the field that holds the monetary value (e.g. amount). This is what makes the revenue numbers real for your account.
- Attribution — on the same Transactions and Revenue metrics, use the attribution dropdown to set the model that fits your funnel. See Step 7 for what each model means and when to use it.
- Filters — change filters to narrow the report to exactly what you want to see (a single ad partner, a specific campaign, a country, a device, etc.).
- Breakdowns — change or add breakdown attributes (e.g. Ad Partner → Ad Campaign ID → creative/ad ID) to slice the report the way you need. Adding the ad/creative ID lets you drill from a campaign down to individual creatives once nv_ad_id is flowing.
You can also change the date range, granularity (Daily/Weekly/Monthly), and view (Table/Line/Bar) from the controls along the top — covered in 6E.
6C. The "ROAS Report" template — campaign KPI table
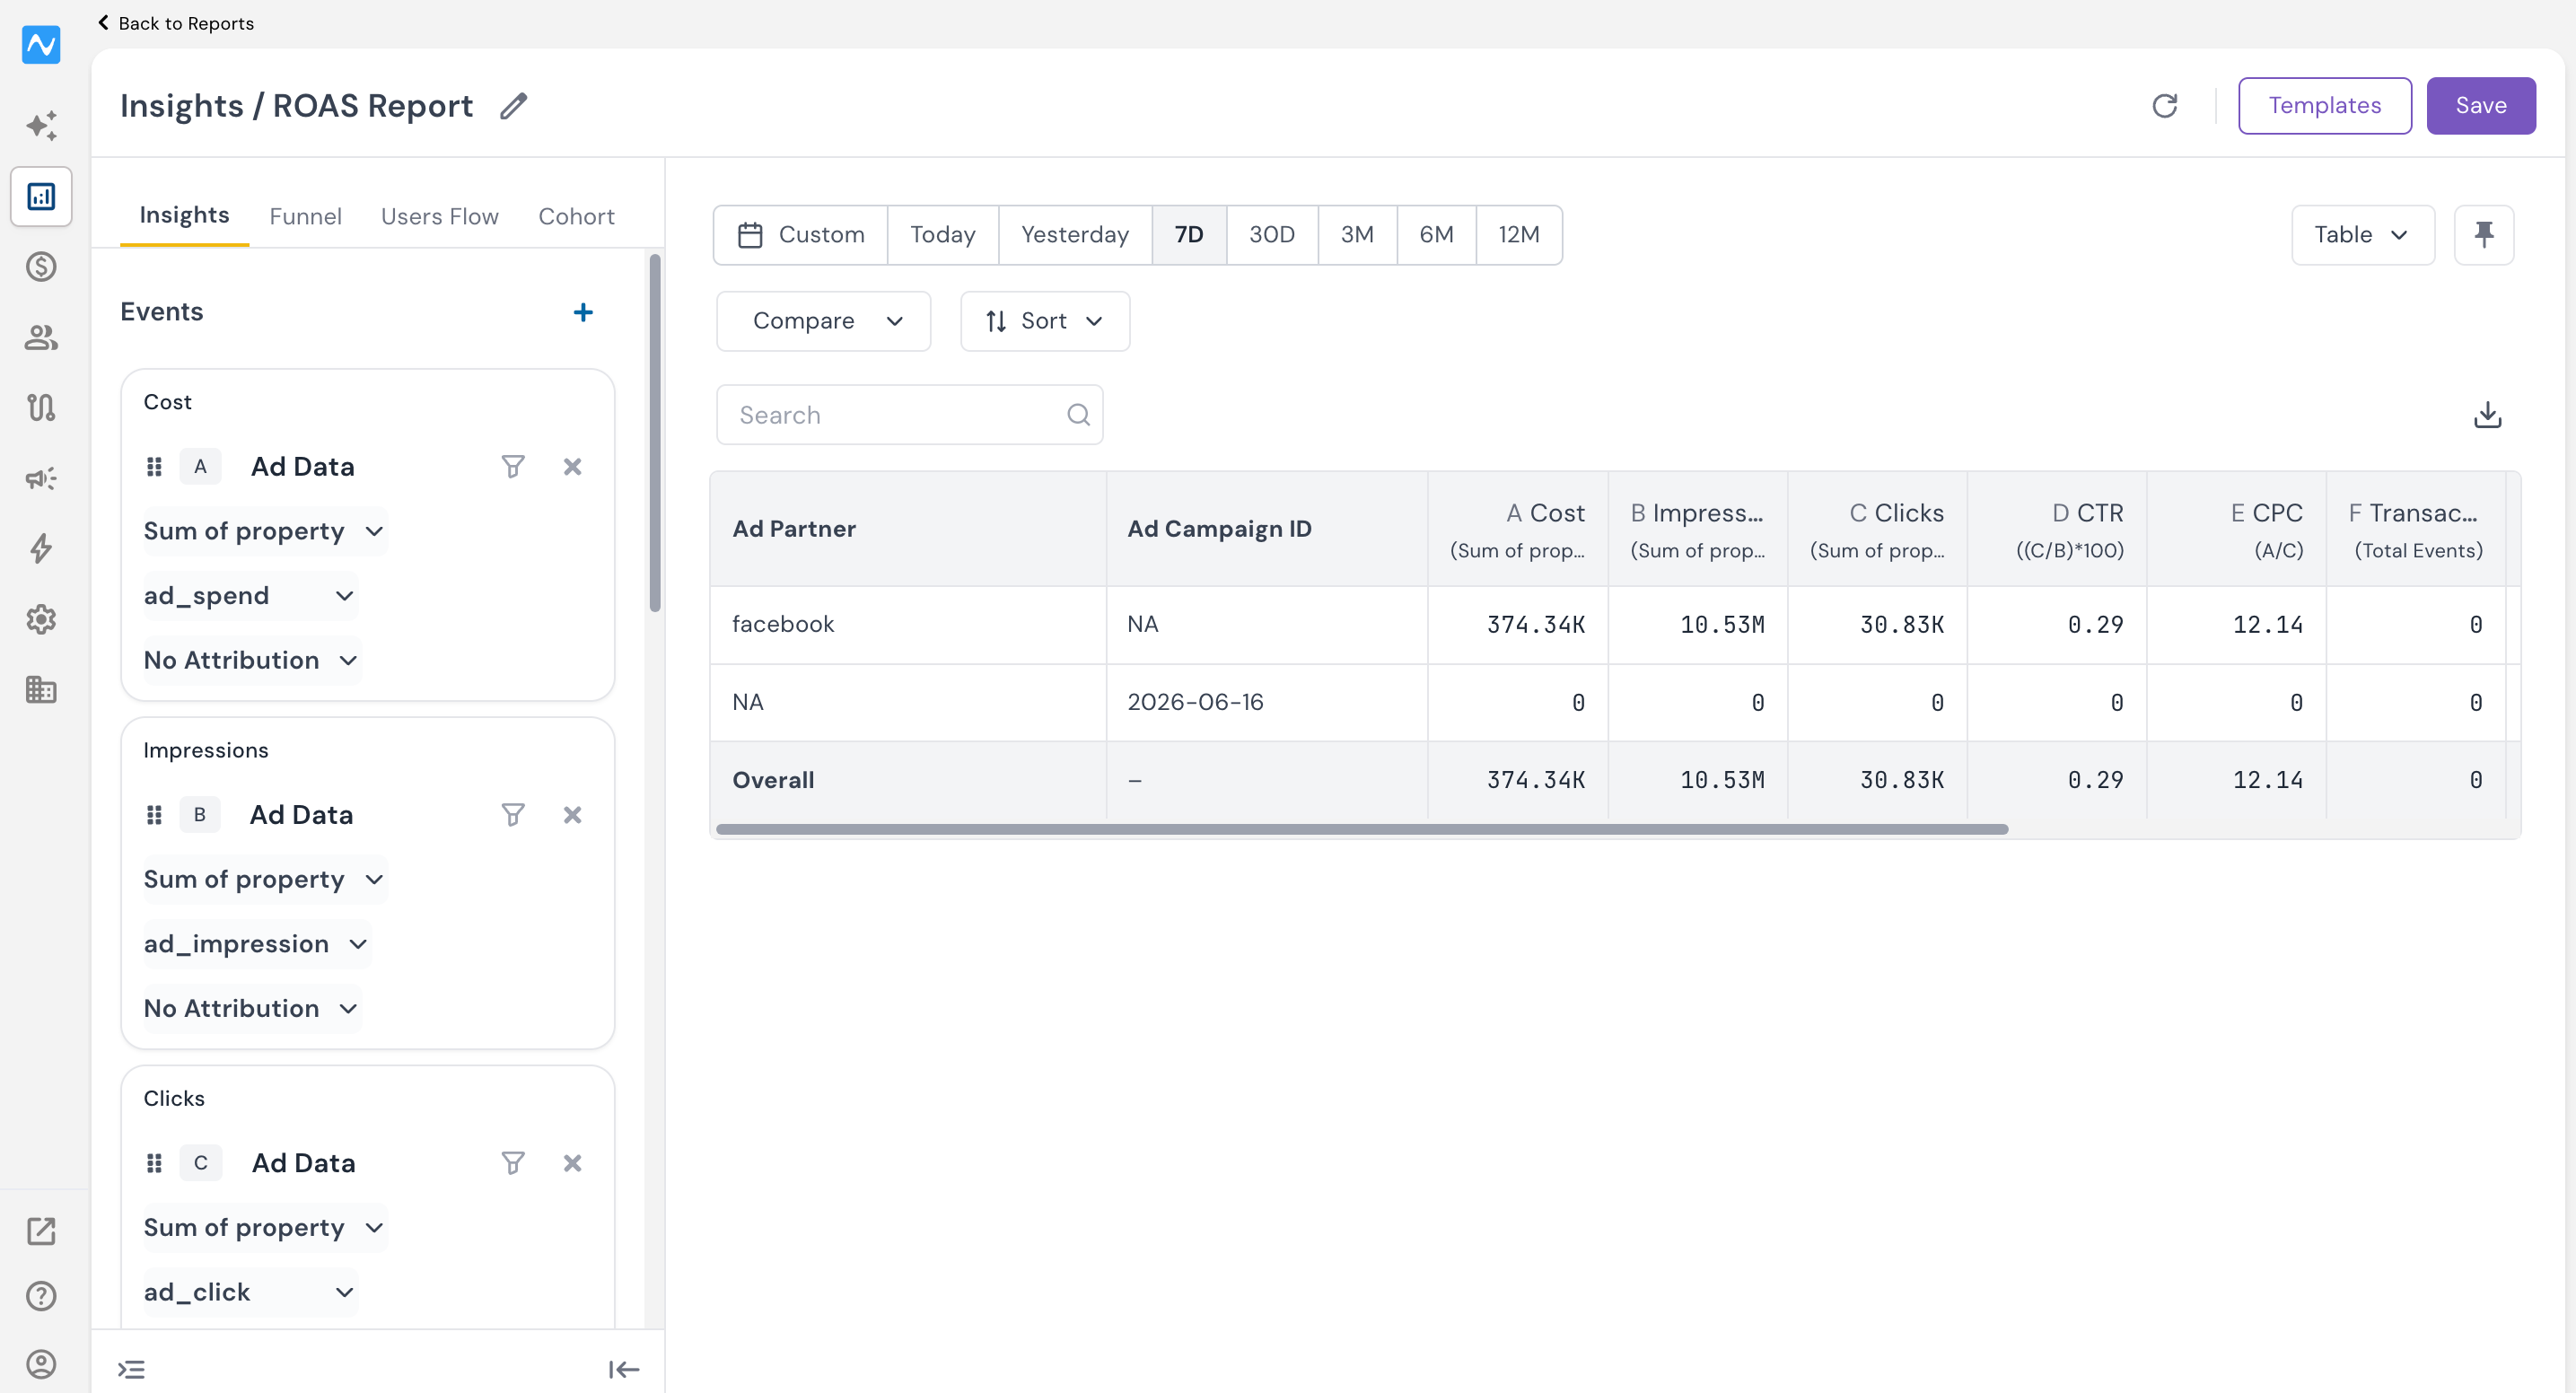
This template answers: "Which campaigns and channels are profitable right now?" Each lettered metric in the left Events panel becomes a table column. Here's exactly how each one is built, so you can verify or change it:
| Col | Metric | How it's defined in the builder | Formula |
|---|---|---|---|
| A | Cost | Ad Data → Sum of property ad_spend · No Attribution | — |
| B | Impressions | Ad Data → Sum of property ad_impression · No Attribution | — |
| C | Clicks | Ad Data → Sum of property ad_click · No Attribution | — |
| D | CTR | Formula | (C/B)*100 |
| E | CPC | Formula | A/C |
| F | Transactions | Your conversion event → Total Events · Last Touch | — |
| G | Revenue | Same event → Sum of property amount · Last Touch | — |
| H | Conversion Rate | Formula | (F/C)*100 |
| I | Cost Per Transaction (CPA / CAC) | Formula | A/F |
| J | ROAS | Formula | G/A |
Breakdown: the report is grouped by Ad Partner, then by Ad Campaign ID, with a 30-day attribution lookback. The Overall row aggregates everything.
Why Cost/Impressions/Clicks use "No Attribution": those come straight from the ad platform as raw spend data — they aren't tied to a user journey, so no attribution model applies. Transactions and Revenue use Last Touch (within the 30-day lookback) — the conversion is credited to the last ad touch before it happened. You can change this in the template (see Step 7).
How to analyse it:
- ROAS (J): Anything below 1.0 is losing money on a last-touch basis.
- Cross-read efficiency with CPC (E) and Cost Per Transaction (I). A campaign can have decent ROAS but a painful CPA — watch both.
- Diagnose the funnel with CTR (D) and Conversion Rate (H):
- High CTR + low Conversion Rate → the ad works but the landing page/offer doesn't.
- Low CTR → weak creative or targeting; fix the ad before the page.
- Compare channels using the Ad Partner rows (facebook vs google) to decide where the next budget unit should go.
6D. The "ROAS CAC Report" template — daily trend of CAC and ROAS
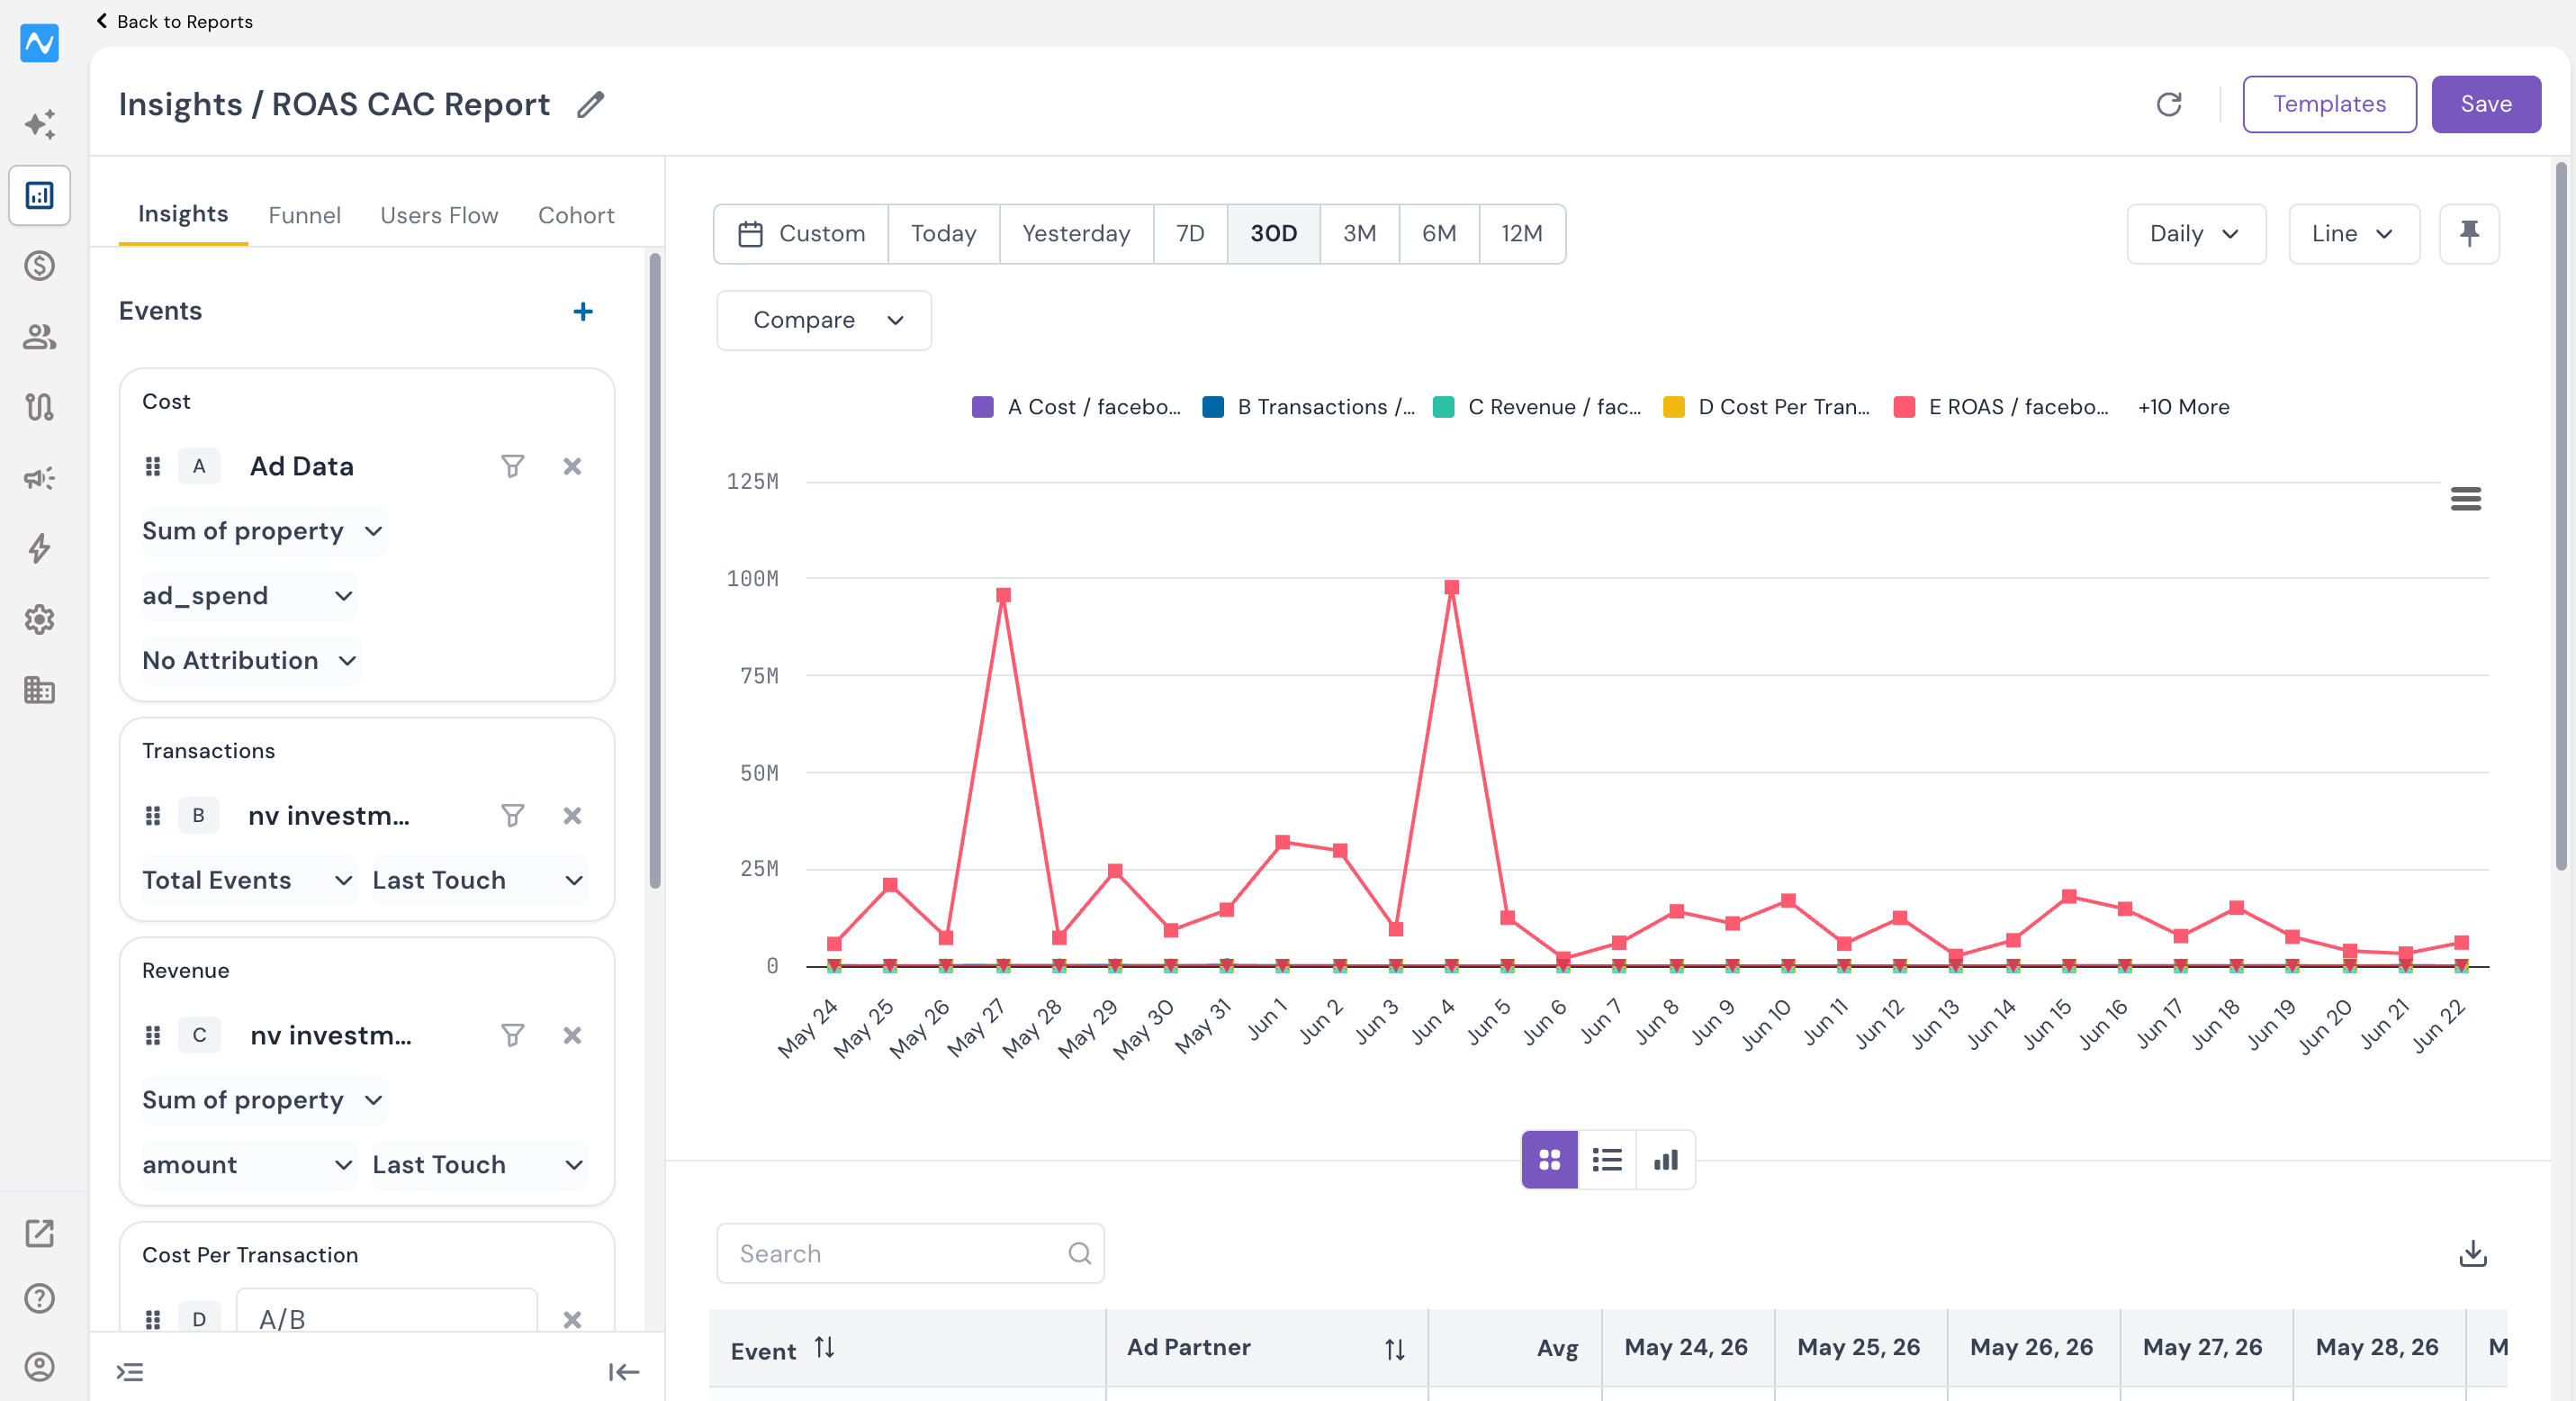
This template answers: "How are my acquisition cost (CAC) and ROAS trending day by day, per channel?" It's the time-series companion, with a simpler metric set:
| Col | Metric | How it's defined | Formula |
|---|---|---|---|
| A | Cost | Ad Data → Sum ad_spend · No Attribution | — |
| B | Transactions | Conversion event → Total Events · Last Touch | — |
| C | Revenue | Same event → Sum amount · Last Touch | — |
| D | Cost Per Transaction (CAC) | Formula | A/B |
| E | ROAS | Formula | C/A |
Breakdown: by Ad Partner, 30-day lookback, Daily granularity, shown as a Line chart over a 30-day window (toggle Daily/Weekly/Monthly and Line/Bar/Table top-right).
Here, Cost Per Transaction = CAC (Customer Acquisition Cost). Pairing CAC with ROAS over time is the whole point of this report.
How to read the chart and table:
- The line chart plots each metric per ad partner over time. Click legend items to isolate the lines you care about (e.g. just E ROAS / google).
- Spend spikes tell you when budget or revenue surged — check whether ROAS held up on those days or collapsed.
- The table below lists each Event (A–E) split by Ad Partner with an Average column and one column per day; paginate for the full range.
- Watch the CAC (D) trend: rising CAC with flat or falling ROAS is the early-warning sign of creative fatigue, auction-price inflation, or audience saturation — investigate before the trend compounds.
- Use the Compare button to put this period next to the previous one and confirm whether CAC/ROAS are genuinely improving or just seasonal.
6E. Date ranges & view controls (both templates)
- Date range: Custom · Today · Yesterday · 7D · 30D · 3M · 6M · 12M across the top. (T-1 rule still applies — newest point is yesterday.)
- Granularity & view: switch Daily/Weekly/Monthly and Table/Line/Bar from the controls top-right.
- Compare: use the Compare button to put the selected period next to the previous one.
Step 7 — Choose your attribution model
You set this inside the template (Step 6B): on the Transactions and Revenue metrics, use the attribution dropdown — it defaults to Last Touch. A customer rarely converts on a single touch, so the model decides how conversion credit is split across the touchpoints in their journey. Pick the one that matches how you think about your funnel:
- First Touch — 100% of credit to the first ad/interaction. Good for measuring what creates demand at the top of the funnel.
- Last Touch — 100% to the final interaction before conversion. Good for measuring what closes.
- Linear — credit split equally across every touchpoint in the journey. Balanced view when many touches matter.
- Participation (1:1) — every touchpoint that participated gets full credit (1:1). Useful for seeing each channel's total involvement.
Change the model when you want to view the same data through a different lens — e.g. switch from Last Touch to First Touch to see which campaigns initiate high-value journeys rather than just finishing them. Save the report after changing the template so your view persists.
Troubleshooting
| Symptom | Likely cause | Fix |
|---|---|---|
| Spend shows but Revenue = 0 | Users aren't being identified (Step 5), the Transactions/Revenue metrics aren't on your real revenue event, or no conversions in range | Check Step 5 user tracking; in the template (6B) set those metrics to your purchase/conversion event; widen the date range |
| Today's data missing | Expected behavior | T-1 reporting — latest data is always yesterday |
| Google account won't appear / connect | Logged in with an MCC/manager account, or no admin rights | Reconnect with an account that has direct admin permission on the ads account |
| No source in the Source filter | ROAS sync not toggled on for that platform | Step 2 — enable ROAS sync and select the ad account |
| Can't break down by campaign/creative | Macros missing | Step 3 — add campaign ID and creative ID parameters, then test a live click |
| Meta connection errors later | Permissions were turned off during connect | Reconnect and leave all permissions enabled (Step 1B) |