Quick summary
This article explains what ad macros are, how to add them to your Meta and Google ad URLs so that every click carries its own campaign details, and how to confirm on the NVECTA dashboard that those values are arriving and traceable.
What ad macros are
NVECTA connects with your Google Ads and Meta ad accounts and already receives your campaign data from them, such as spend, impressions and clicks, for ROAS analytics. Ad macros solve a different problem: acquisition source. When you add ad macros and UTM parameters to your ad URLs, every click carries the name and ID of the campaign, ad set (ad group in Google Ads) and ad it came from, so NVECTA can show which ad and campaign brought each user to your website or landing page.
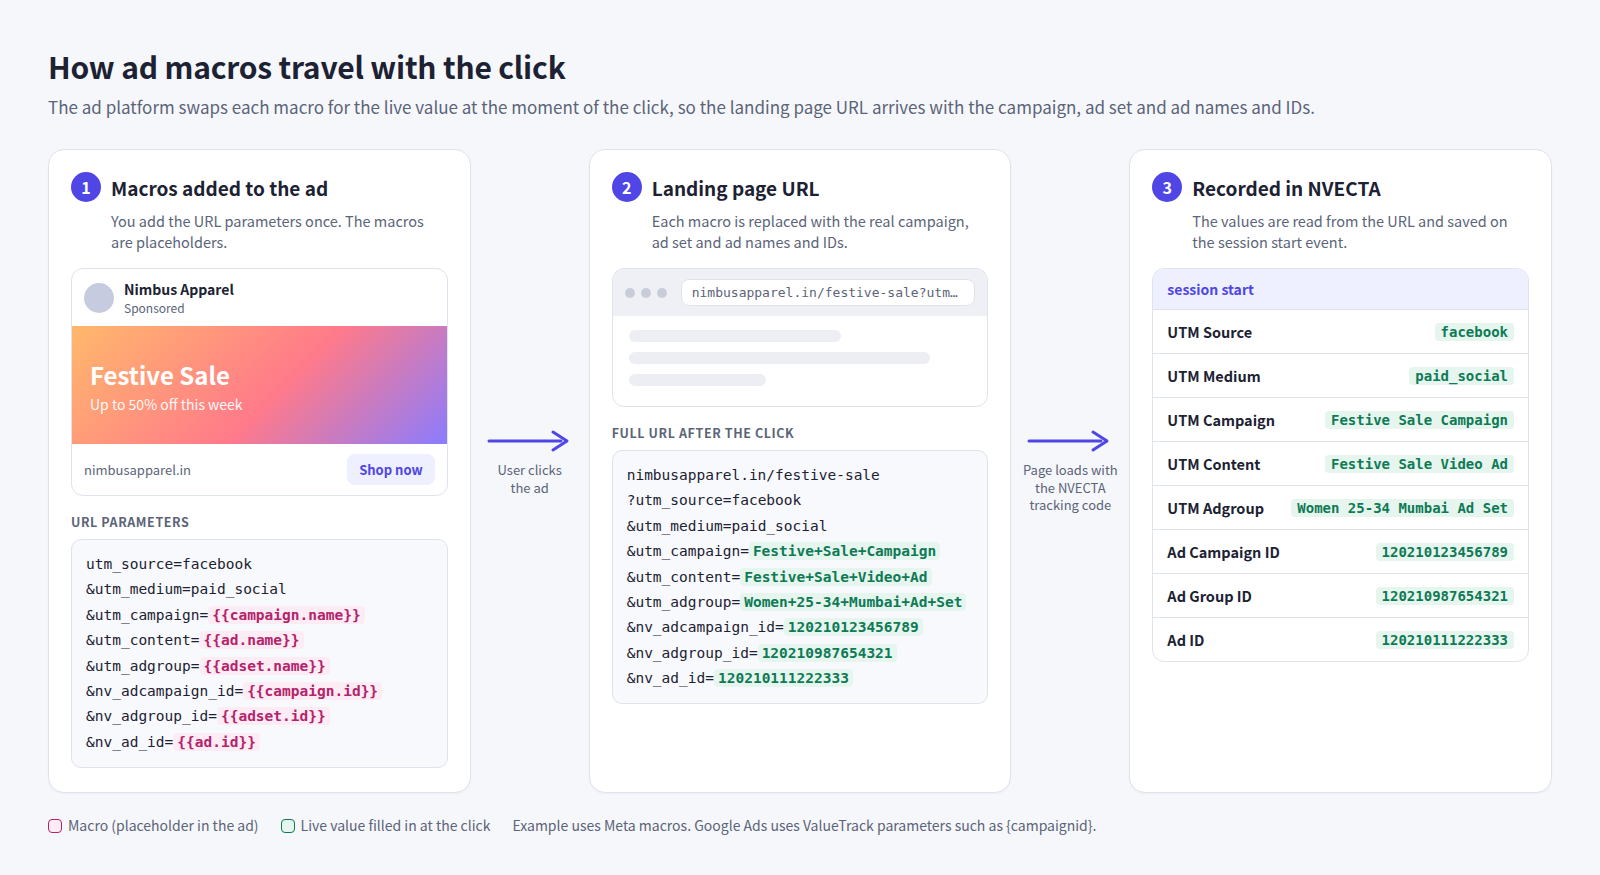
An ad macro is a placeholder that the ad platform replaces with a real value at the moment of the click. You write the macro once and the platform fills in the details of the campaign, ad set (ad group in Google Ads) and ad that actually served. Meta can fill in both names and IDs. Google Ads fills in IDs only, so you type the names yourself (see Part 2).
- Ad macro: a platform token, such as {{campaign.name}} on Meta or {campaignid} on Google Ads, that is swapped for the live value when the ad is clicked.
- Static parameter: a value you type yourself and that never changes, for example utm_source=google.
- Dynamic parameter: the same UTM key with a macro as its value, for example utm_campaign={{campaign.name}}, so the value updates on its own for every campaign.
- Why it matters: macros remove manual tagging mistakes and give NVECTA the campaign detail it needs to show which ad and campaign each visitor came from.
NVECTA reads the UTM and nv_ parameters in the landing page URL and uses them to set the traffic source of the session and the ad it came from. For how NVECTA classifies traffic, see Understanding traffic sources and UTM parameters.
Note
Ad macros vs auto tagging: auto tagging means the ad platform adds its own parameters to your ad URL automatically: gclid, gad_source and gad_campaignid for Google Ads, and fbclid for Meta. These are codes rather than readable campaign names, and you never add them yourself. The parameters in this article add the campaign, ad set (ad group in Google Ads) and ad names and IDs, so you can see and filter them in NVECTA. You can keep auto tagging on and use them alongside it.
Before you begin
- Ad accounts connected: your Facebook Ads and Google Ads accounts are already connected to NVECTA. Where: Settings > Channels > Remarketing Ads
- Tracking code live: the NVECTA tracking code is firing on the landing pages your ads point to. Integration code, event and user validation covers how to confirm that.
- Parameters as defined: enter the parameters exactly as defined below, in Part 1 for Meta and Part 2 for Google Ads, so that NVECTA can read them.
Part 1: Add ad macros in Meta
› Where: Ads Manager > ad level > Tracking > URL parameters
- In Ads Manager, create a campaign or open a saved draft and continue to the ad level.
- Under Tracking, type your parameters into the URL parameters field,
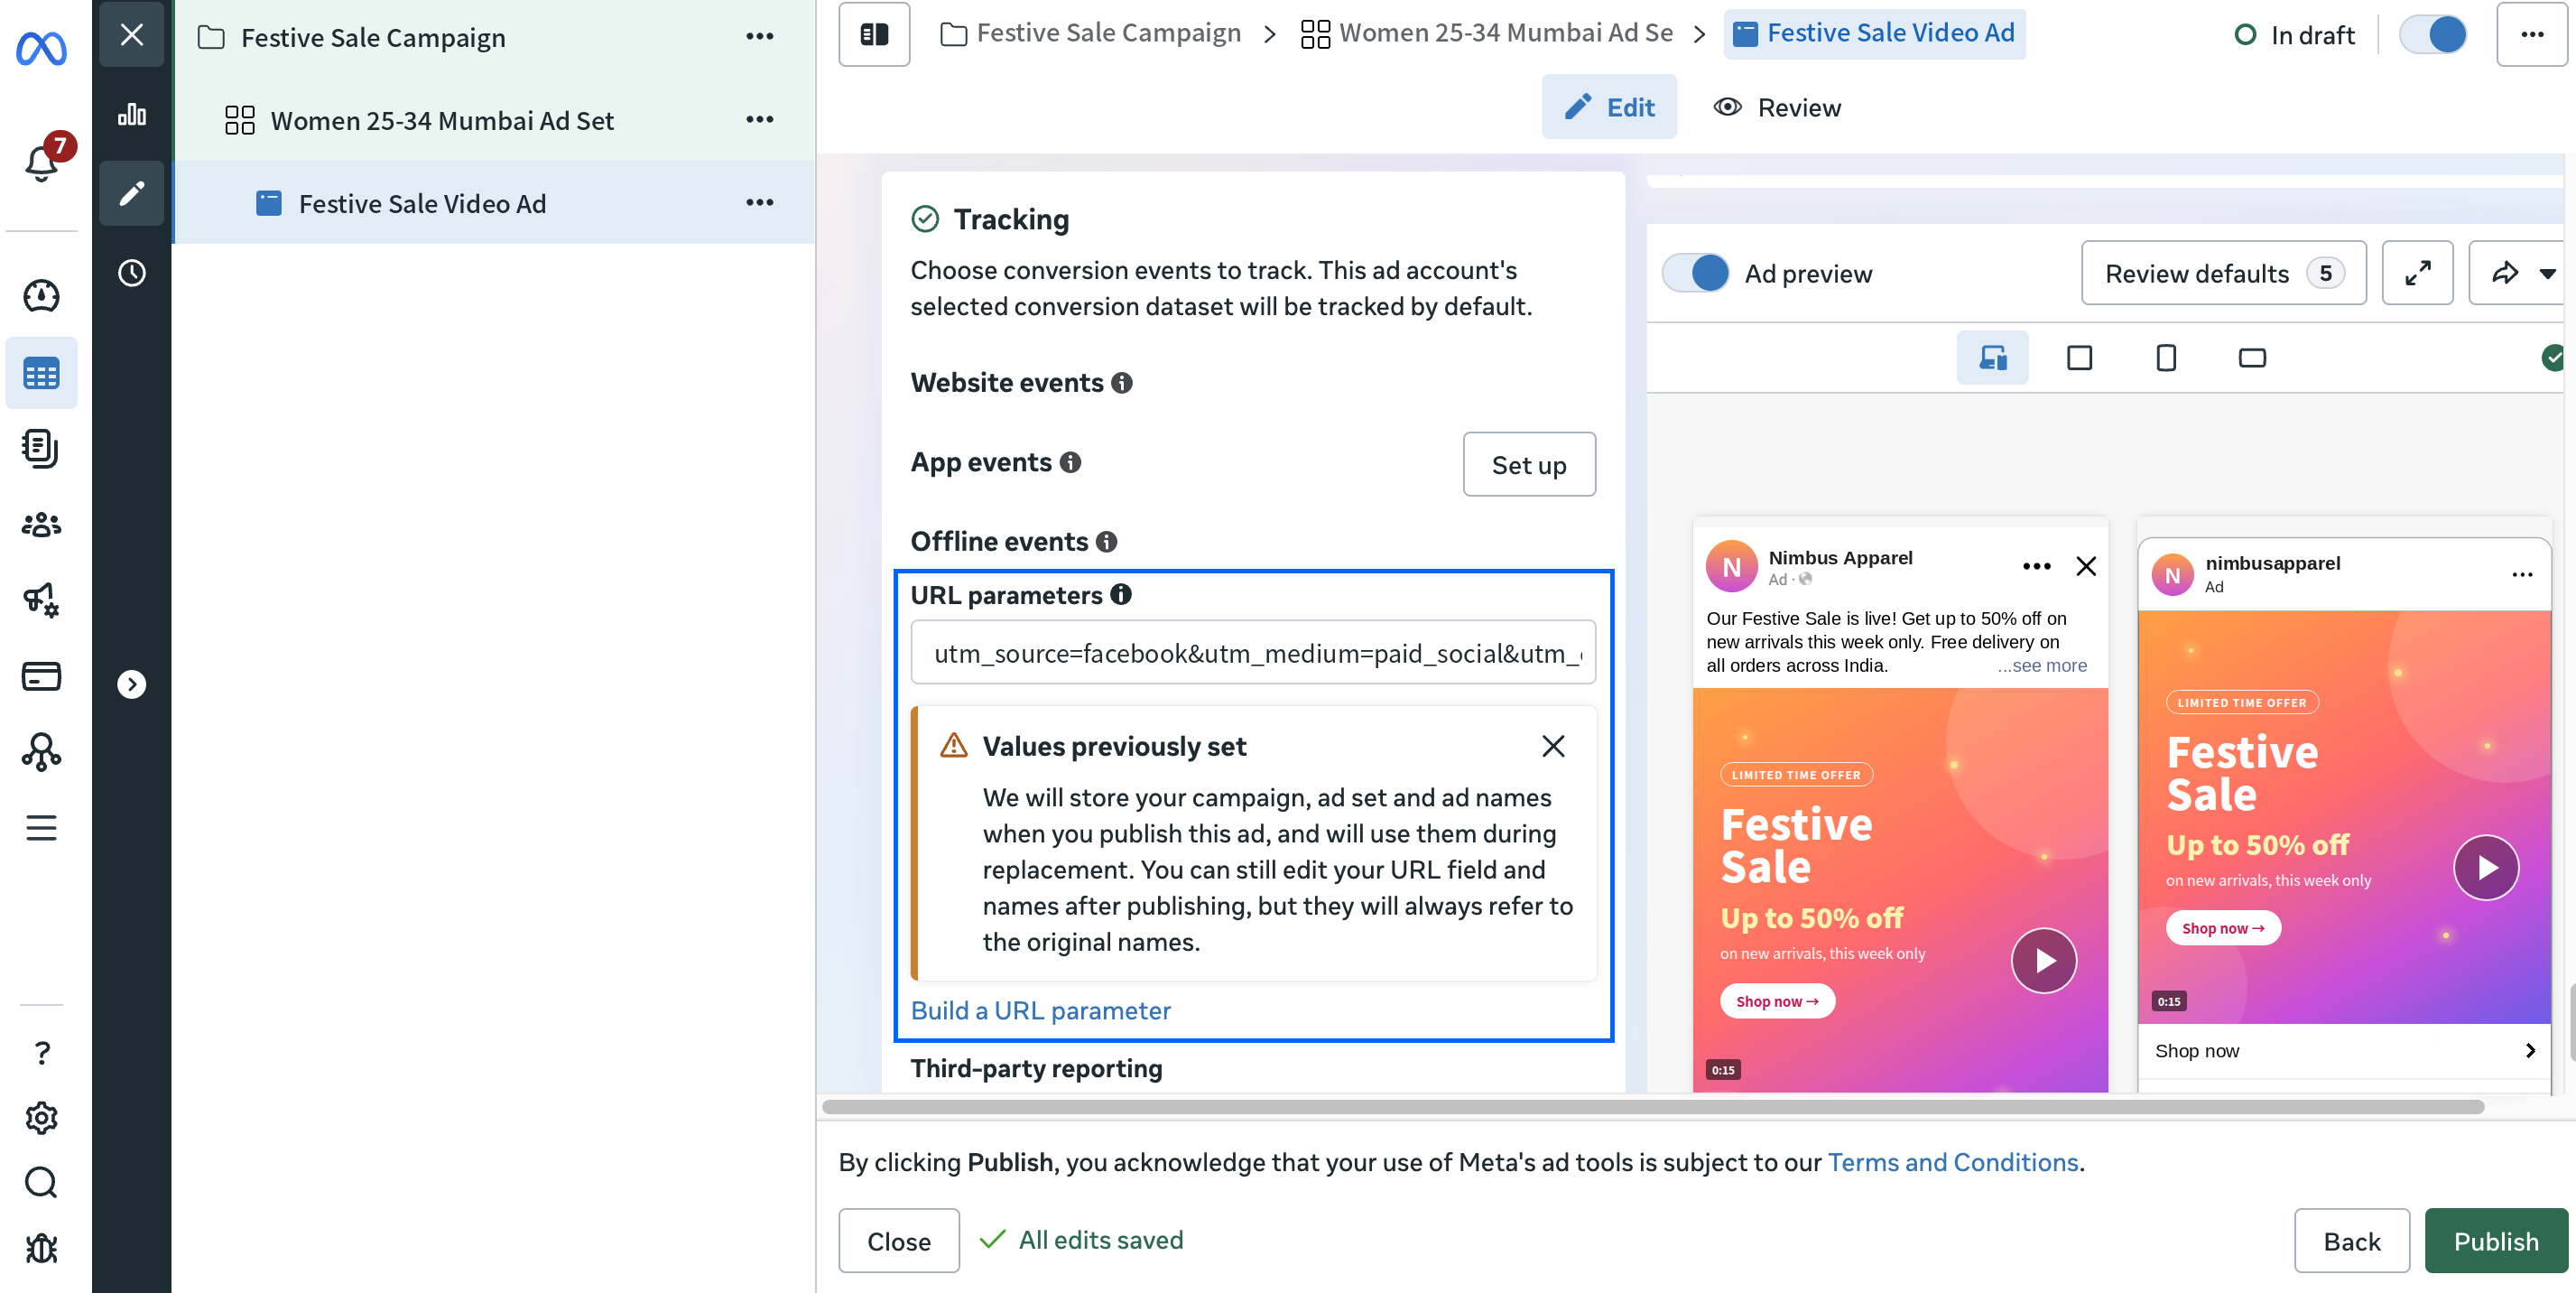
or click Build a URL parameter to use the guided builder.
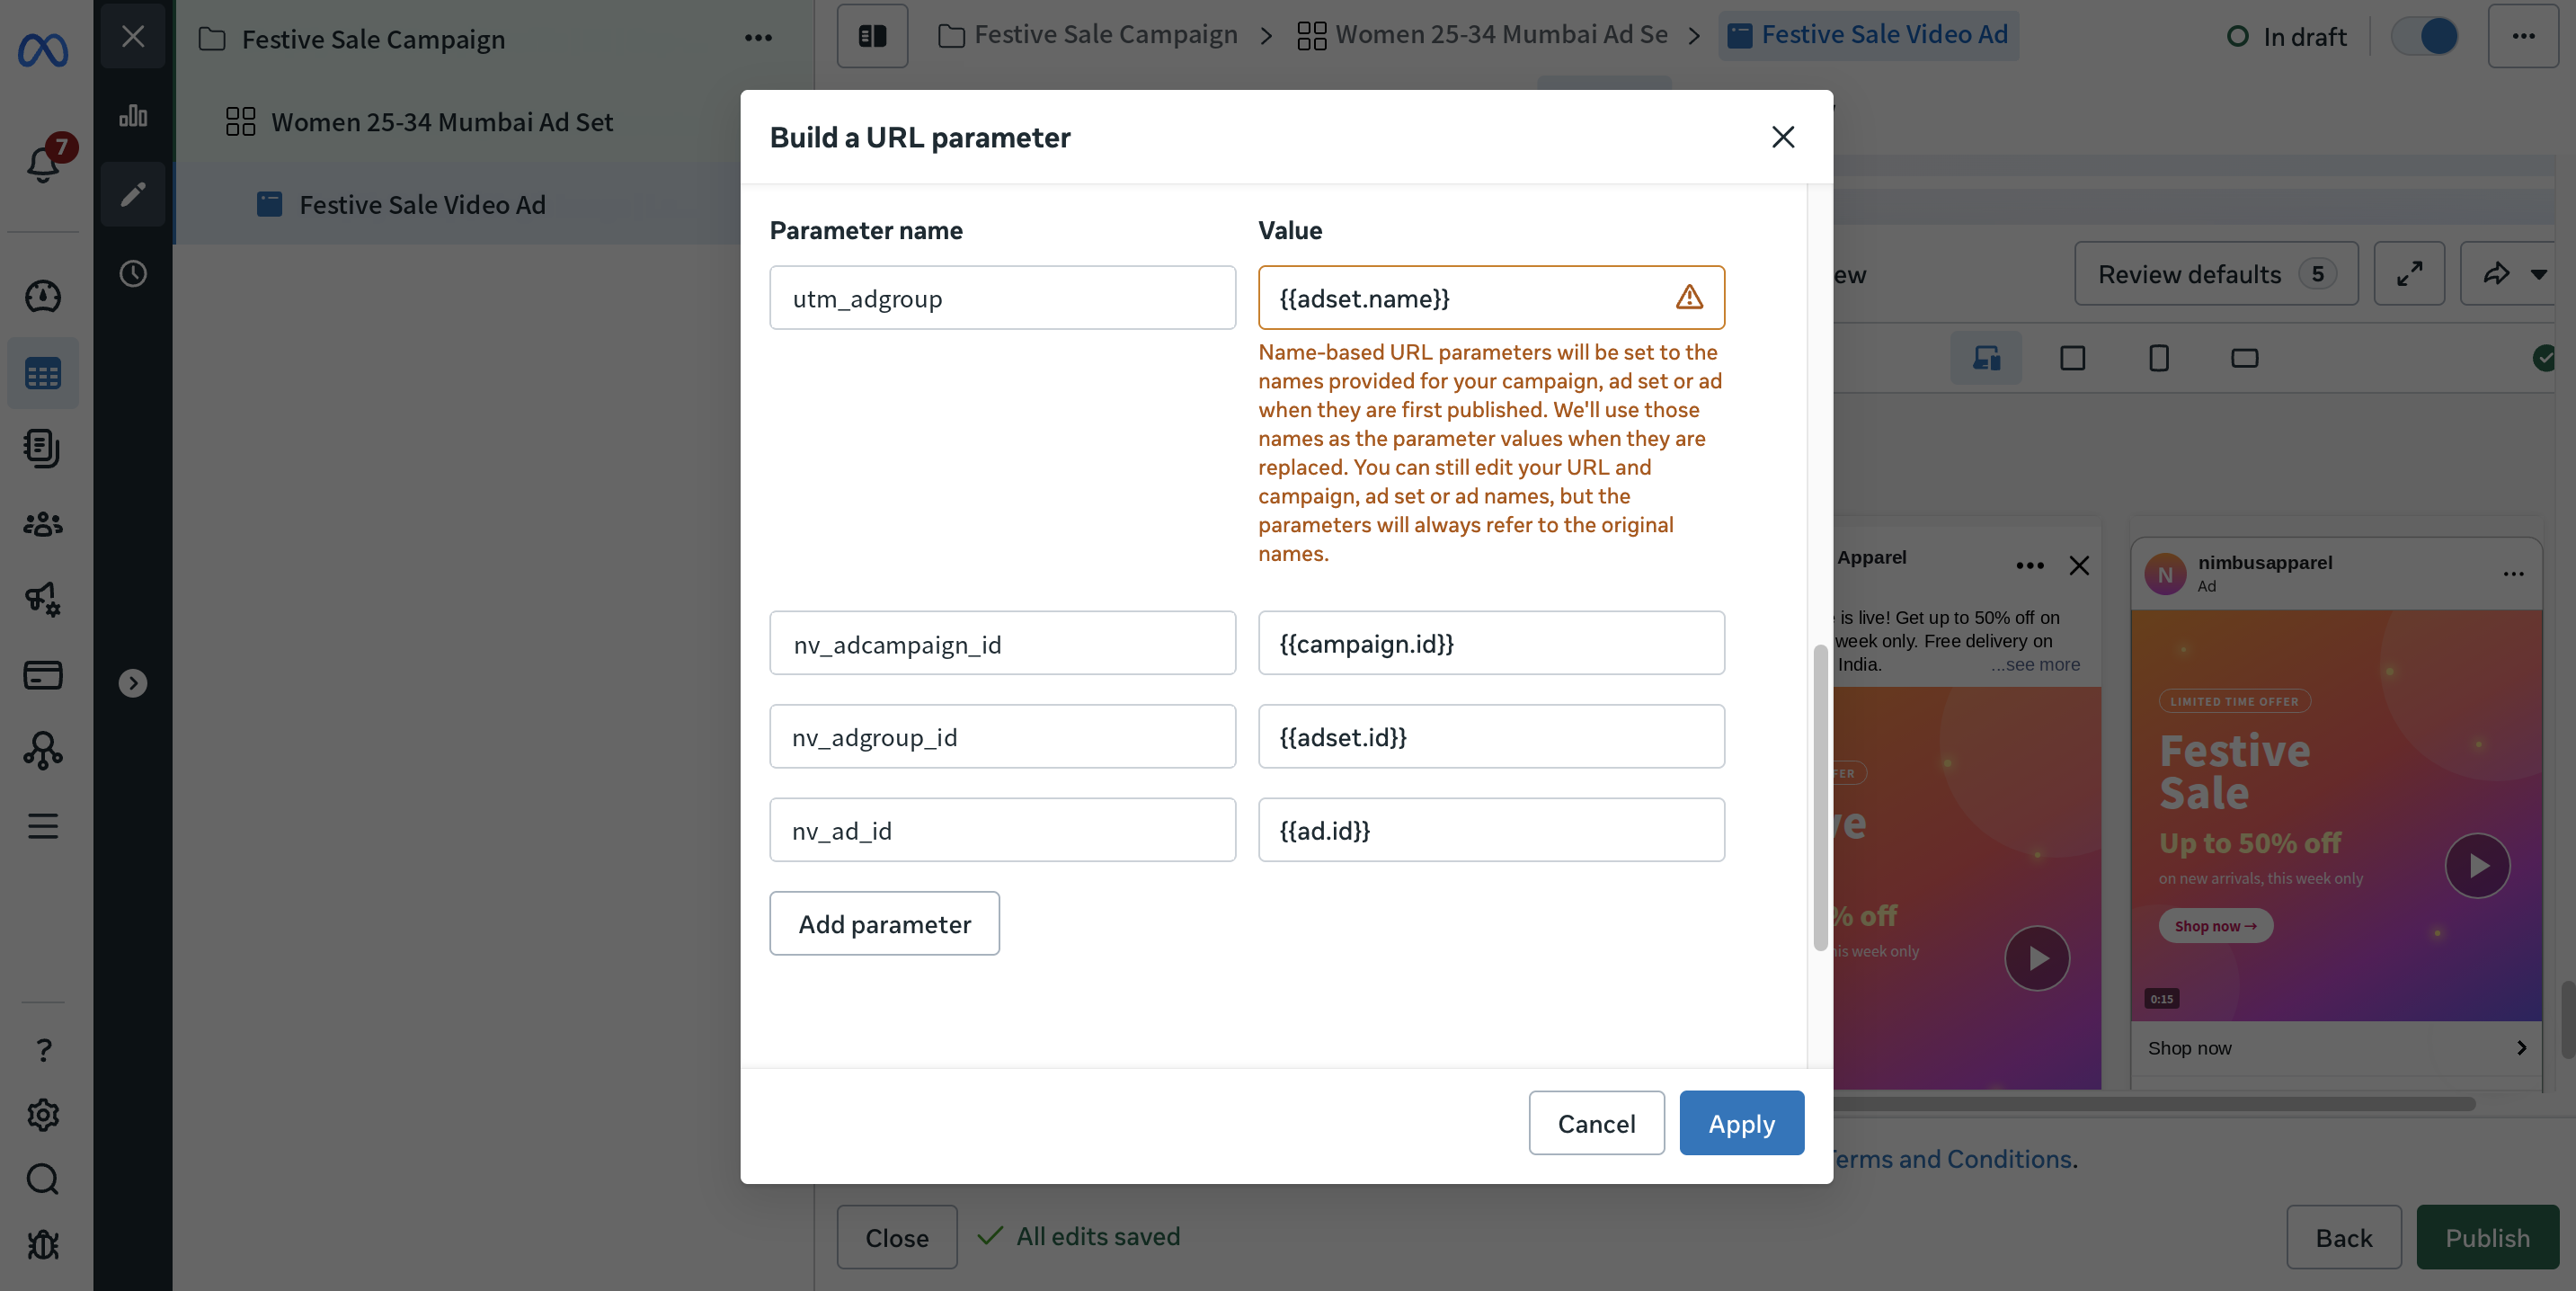
- Enter the parameters as one line, with no spaces: utm_source=facebook&utm_medium=paid_social&utm_campaign={{campaign.name}}&utm_content={{ad.name}}&utm_adgroup={{adset.name}}&nv_adcampaign_id={{campaign.id}}&nv_adgroup_id={{adset.id}}&nv_ad_id={{ad.id}}
- Publish the ad. Whatever sits in URL parameters is appended to the website URL, and it overrides a duplicate key already present there.
Each parameter and what it records:
- utm_source=facebook: the traffic source.
- utm_medium=paid_social: the traffic medium.
- utm_campaign={{campaign.name}}: the campaign name.
- utm_content={{ad.name}}: the ad name.
- utm_adgroup={{adset.name}}: the ad set name.
- nv_adcampaign_id={{campaign.id}}: the numeric campaign ID.
- nv_adgroup_id={{adset.id}}: the numeric ad set ID.
- nv_ad_id={{ad.id}}: the numeric ad ID.
When someone clicks the ad, the landing page opens with every macro filled in. A sample URL for Nimbus Apparel looks like this (the names and IDs are examples):
https://nimbusapparel.in/festive-sale?utm_source=facebook&utm_medium=paid_social&utm_campaign=Festive+Sale+Campaign&utm_content=Festive+Sale+Video+Ad&utm_adgroup=Women+25-34+Mumbai+Ad+Set&nv_adcampaign_id=120210123456789&nv_adgroup_id=120210987654321&nv_ad_id=120210111222333&fbclid=...
Meta adds fbclid to every ad click on its own, so do not add it to the field. Meta also updates its supported macros from time to time, so cross-check its reference before you set up your ads: Specifications for dynamic URL parameters.
Note
Meta's Advantage+ app campaigns send people straight to the app store with no landing page in between, so URL parameters do not apply. Installs from them are attributed by Meta as a self-reporting network (SRN), through your mobile measurement partner.
Part 2: Add ad macros in Google Ads
› Where: Google Ads > Admin > Account settings > Tracking, and the URL options of each campaign, ad group and ad
Google calls its macros ValueTrack parameters. Add them, together with your UTM keys, to the Final URL suffix. Google appends the suffix to the landing page URL of every ad click, so NVECTA can read on the landing page which source, medium, campaign, ad group and ad the visitor came from. The Tracking template is meant for third-party click trackers and is not needed here.
ValueTrack has macros for campaign, ad group and ad IDs, but none for their names, so the names come from you. Add the Final URL suffix once at account level, with placeholders (custom parameters) in place of the names, and then give each campaign, ad group and ad its name in its own settings. Google swaps each placeholder for that name on every click.
A click on the ad opens the landing page with every value filled in. A sample URL for Nimbus Apparel looks like this (the names and IDs are examples):
https://nimbusapparel.in/festive-sale?utm_source=google&utm_medium=cpc&utm_campaign=Festive_Sale_Search&utm_content=Kurta_Offer_Ad&utm_adgroup=Womens_Kurtas&nv_adcampaign_id=21584736920&nv_adgroup_id=16372819045&nv_ad_id=702918364512&gad_source=1&gad_campaignid=21584736920&gclid=...
Set up the suffix at account level
- Click the Admin icon in the left menu, then click Account settings and expand the Tracking section.
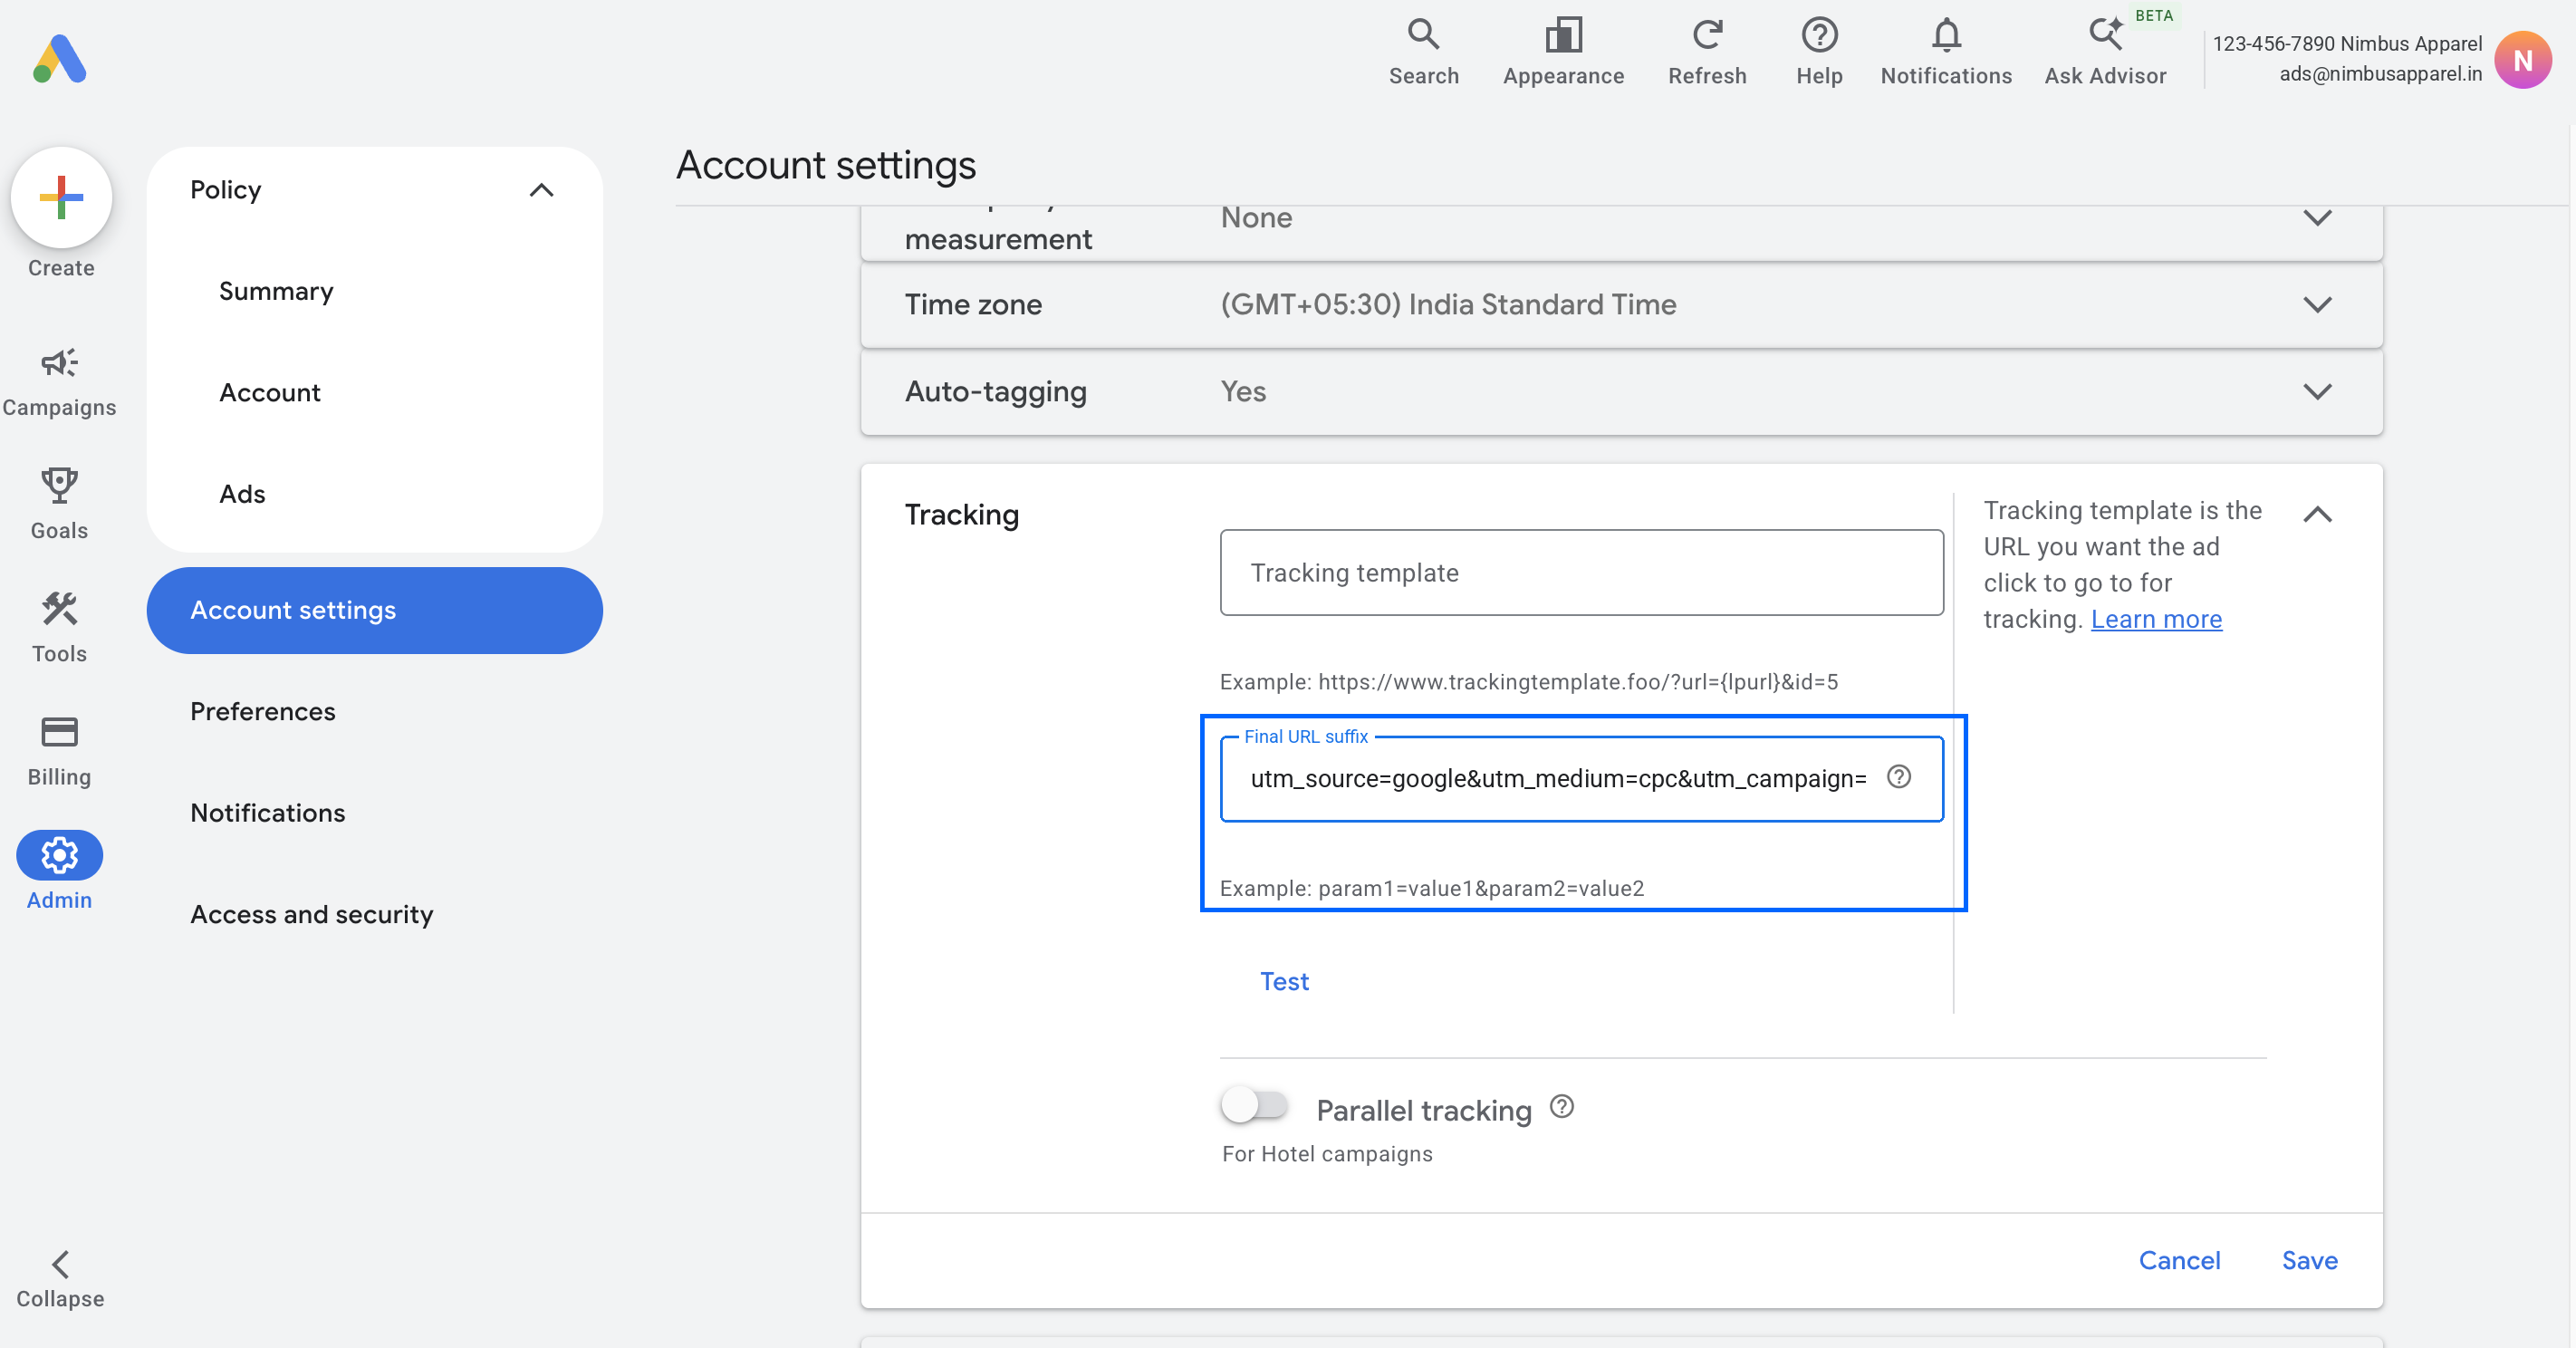
- In Final URL suffix, enter the parameters exactly as shown, as one line with no ? at the start and no spaces: utm_source=google&utm_medium=cpc&utm_campaign={_campaign}&utm_content={_ad}&utm_adgroup={_adgroup}&nv_adcampaign_id={campaignid}&nv_adgroup_id={adgroupid}&nv_ad_id={creative}
- If Tracking template holds an older value with UTM keys, clear it so the keys are not added twice. Then click Save.
Each parameter and what it records:
- utm_source=google: the traffic source. Type it as shown.
- utm_medium=cpc: the traffic medium. Type it as shown.
- utm_campaign={_campaign}: the campaign name, taken from the campaign's custom parameter.
- utm_content={_ad}: the ad name, taken from the ad's custom parameter.
- utm_adgroup={_adgroup}: the ad group name, taken from the ad group's custom parameter.
- nv_adcampaign_id={campaignid}: the numeric campaign ID, filled in by Google.
- nv_adgroup_id={adgroupid}: the numeric ad group ID, filled in by Google.
- nv_ad_id={creative}: the numeric ad ID, filled in by Google.
Google adds gclid, gad_source and gad_campaignid to ad clicks on its own when auto-tagging is on, so do not add them to the suffix.
Then give each campaign, ad group and ad its name as a custom parameter. In the Custom parameters section, Google shows {_ before the name box and } after it, so type only the name.
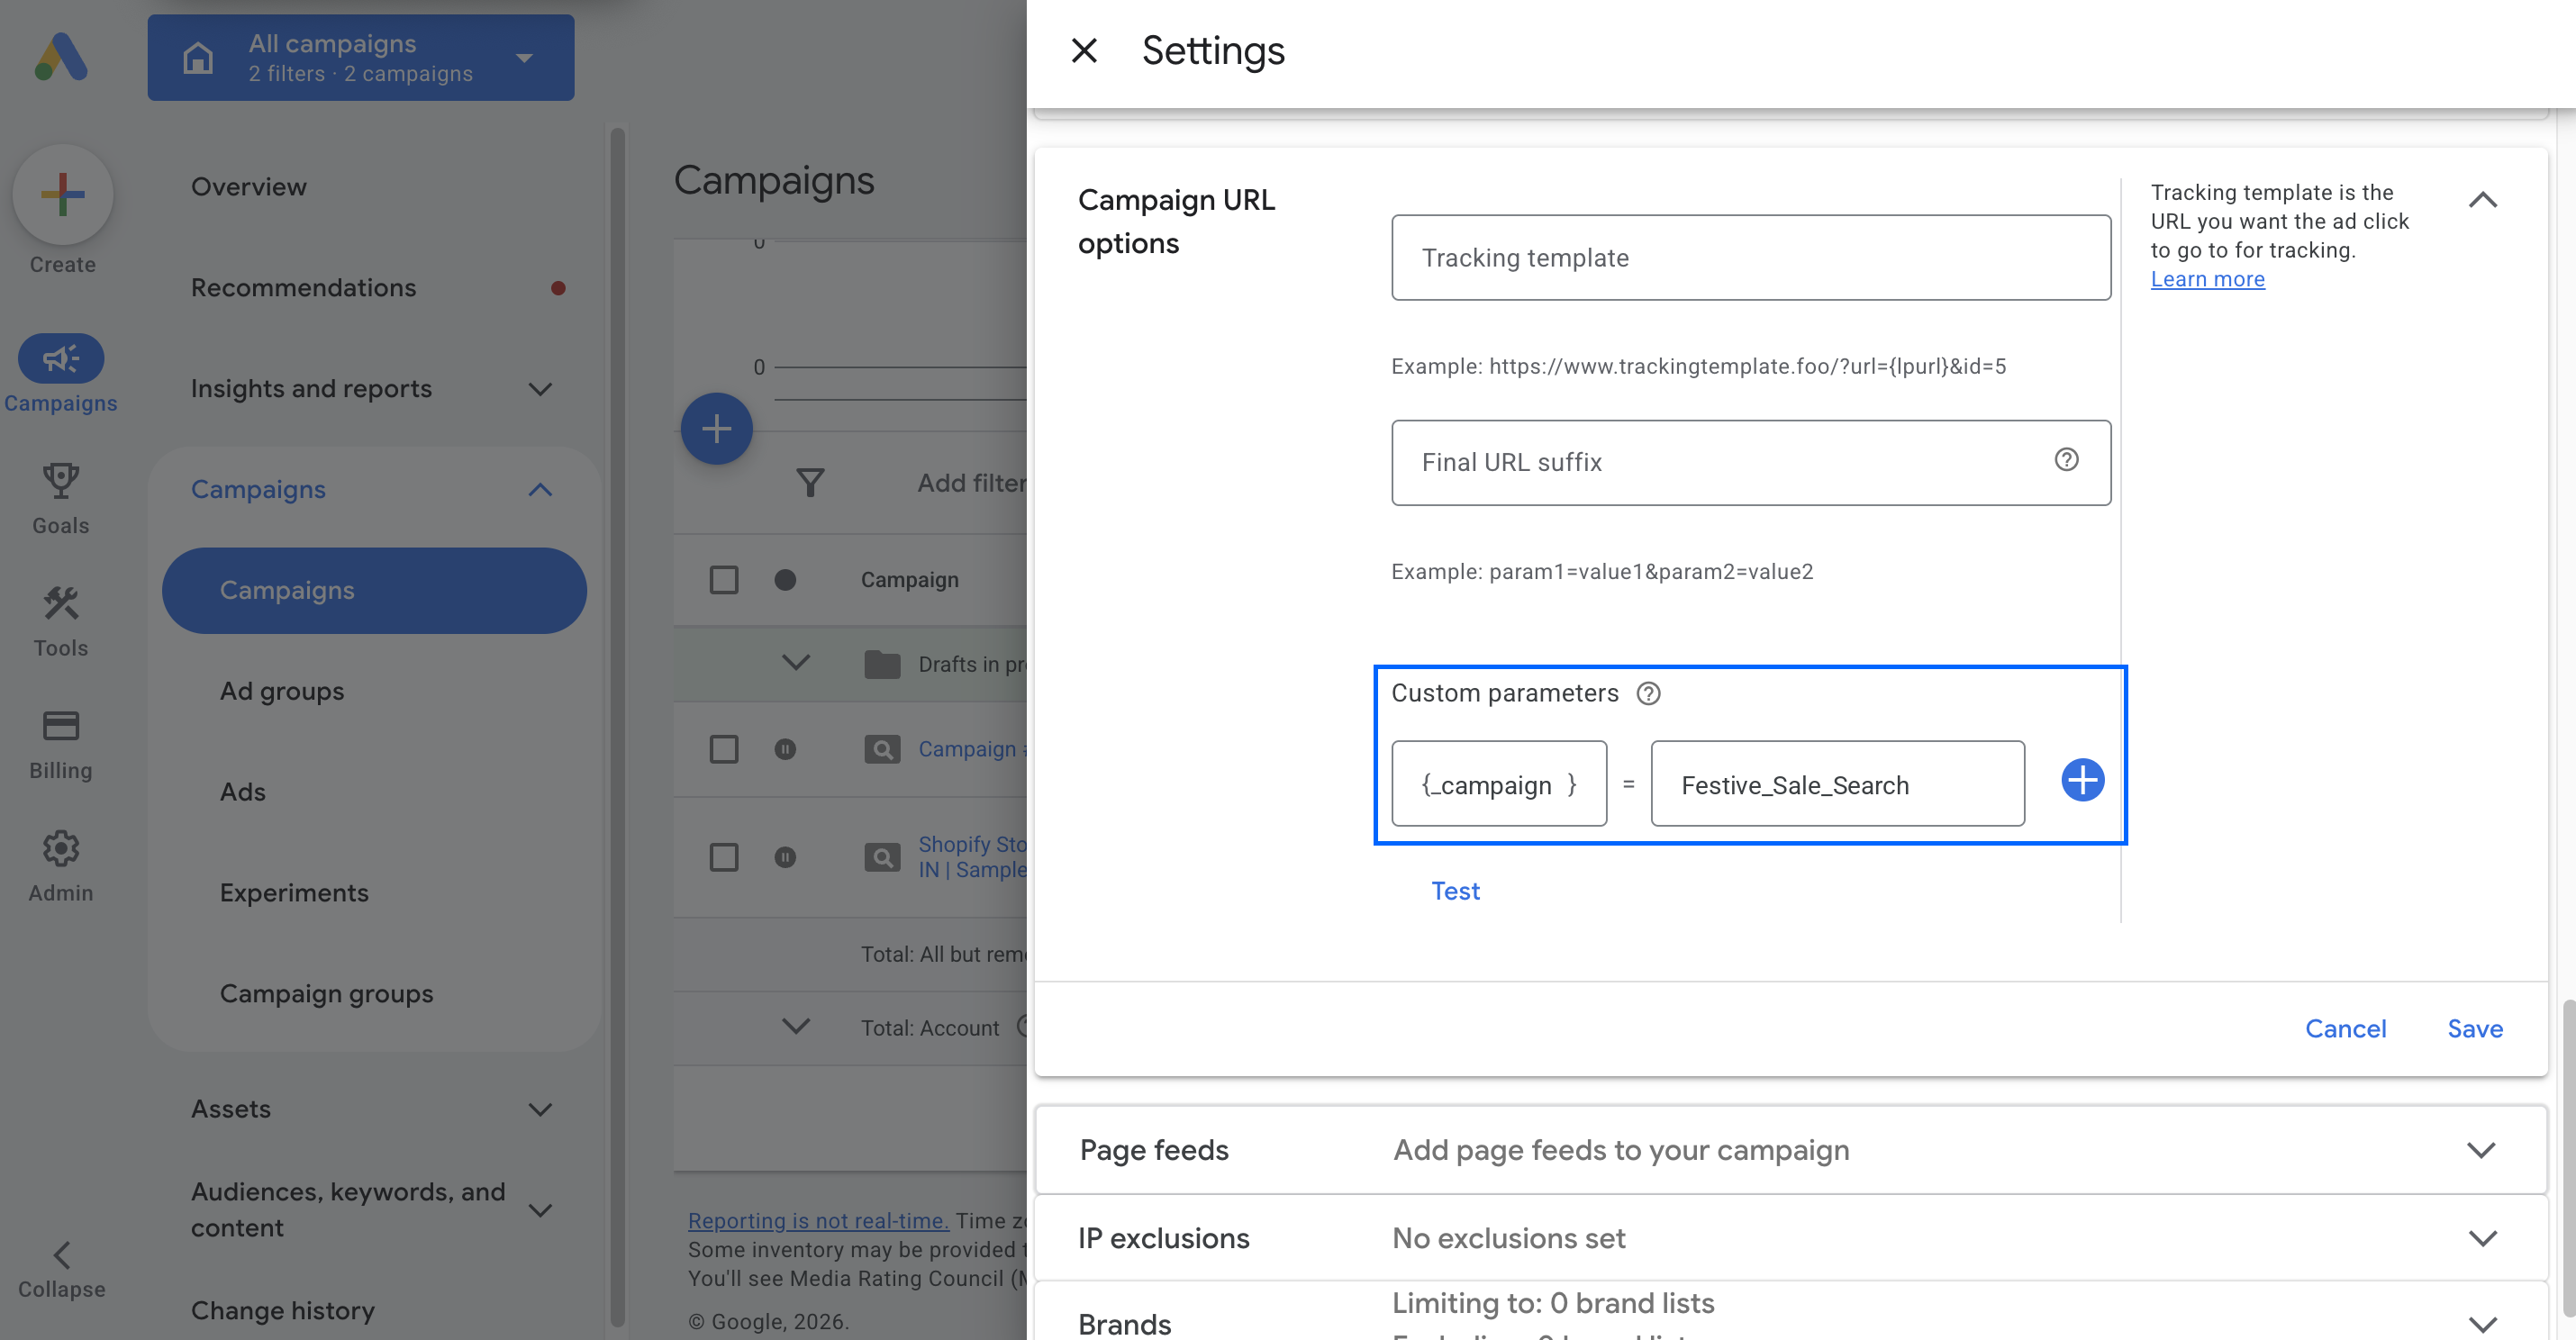
- Campaign: open Campaigns, select the campaign, then go to Settings > Additional settings > Campaign URL options > Custom parameters. Set the name to campaign and the value to your campaign name, for example Festive_Sale_Search.
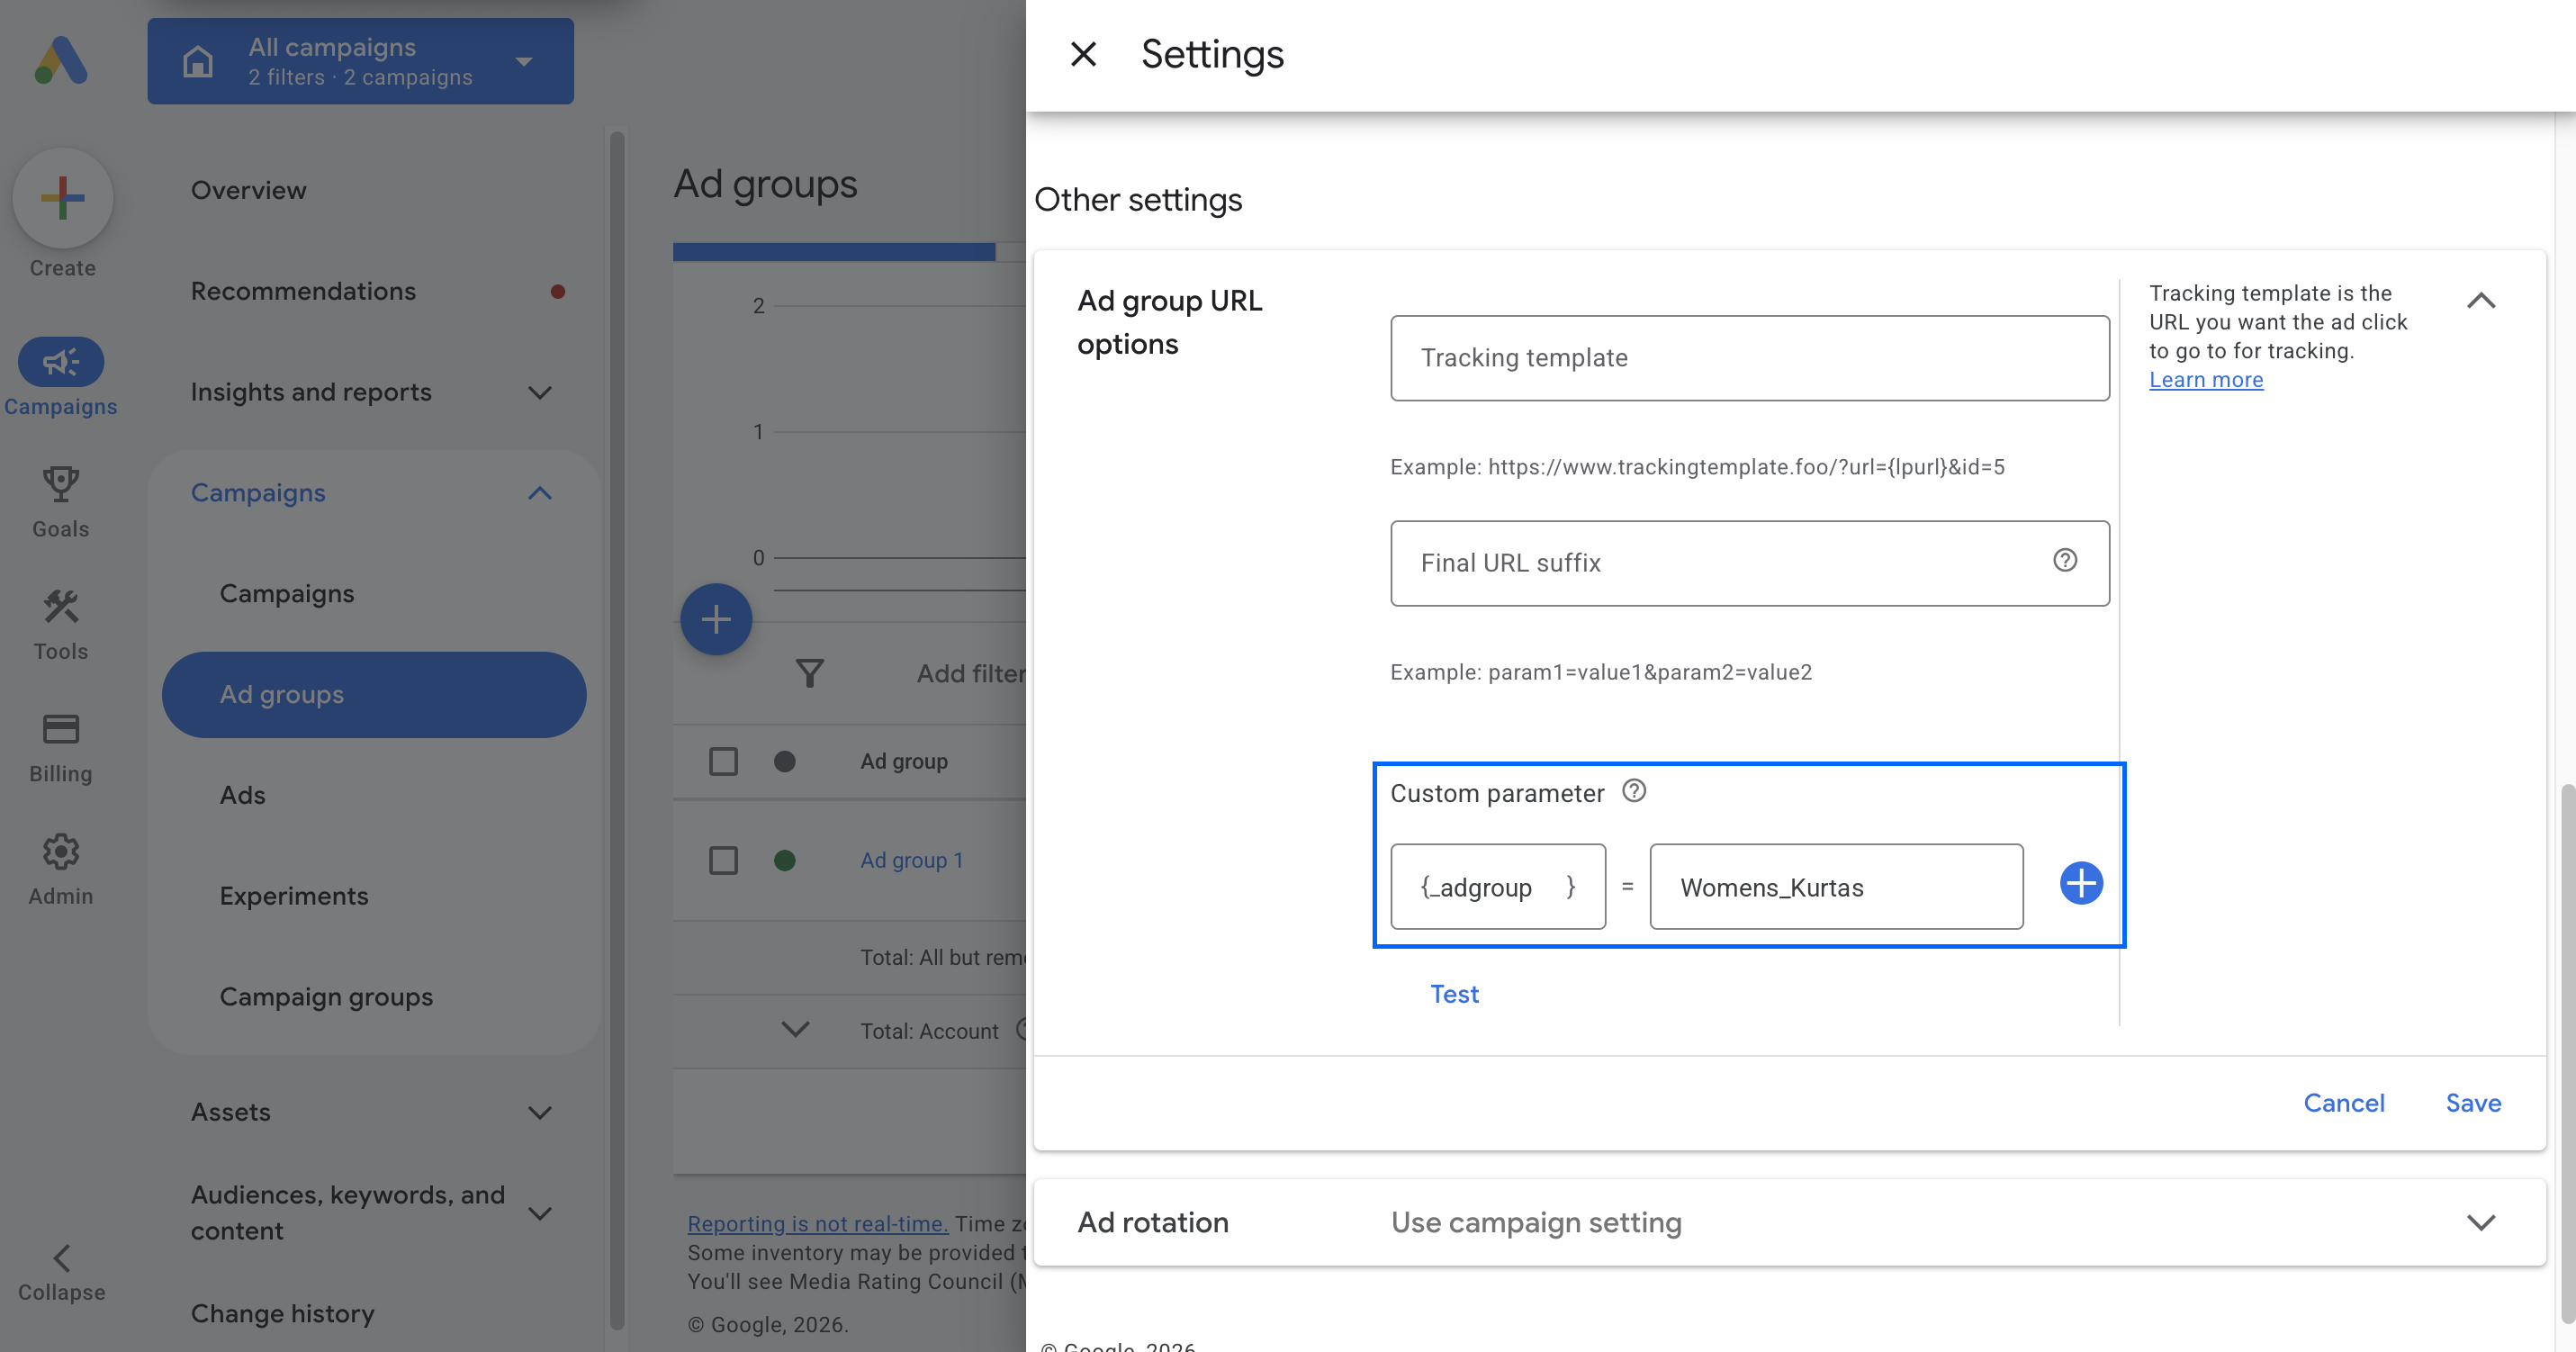
- Ad group: open Ad groups, select the ad group, then go to Settings > Ad group URL options > Custom parameters. Set the name to adgroup and the value to your ad group name, for example Womens_Kurtas.
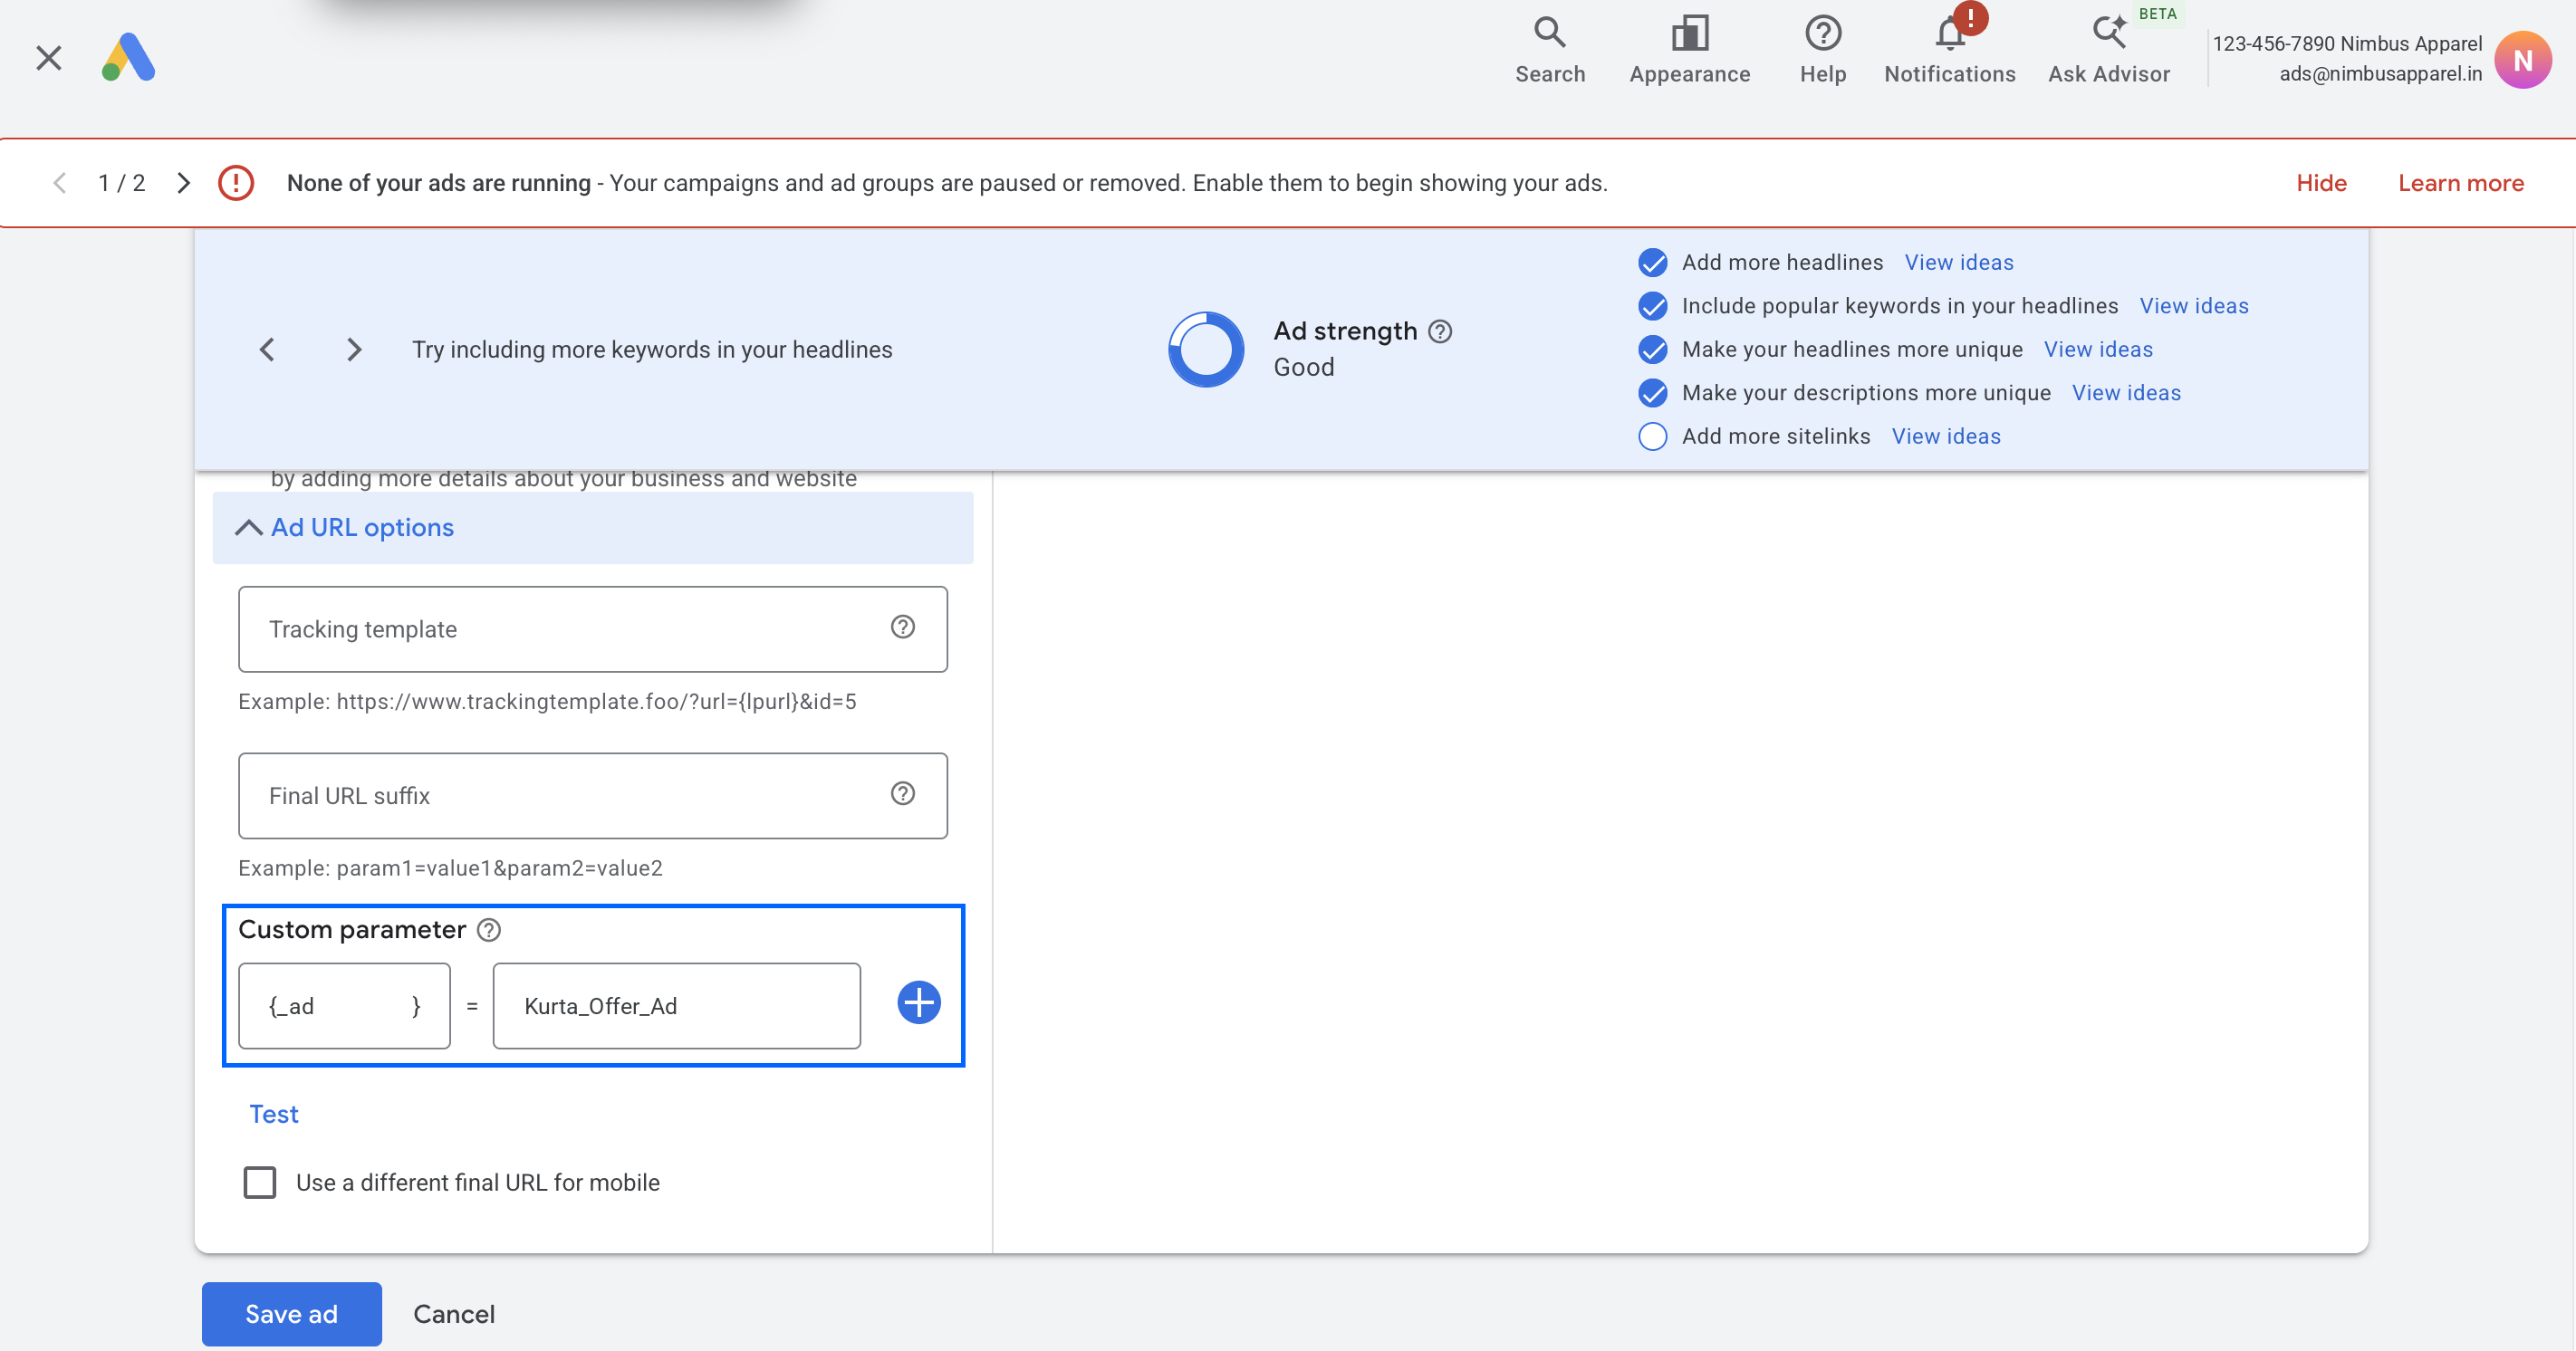
- Ad: open Ads, edit the ad, then go to Ad URL options > Custom parameters. Set the name to ad and the value to your ad name, for example Kurta_Offer_Ad.
Click Save at each level, and repeat for every campaign, ad group and ad you want named in NVECTA.
Note
Set a value on every campaign, ad group and ad. A level without a value passes no name, so its UTM key arrives empty or as the placeholder itself. Saving a custom parameter on an ad sends the ad for review again, while campaign and ad group changes do not. Performance Max campaigns have no standard ad groups or ads, so only the campaign value applies there.
Keep the Final URL suffix at account level only. Google uses the most specific suffix it finds, so a suffix added to a campaign, ad group or ad would replace this one and drop the placeholders.
Note
Example values: Festive_Sale_Search, Kurta_Offer_Ad and Womens_Kurtas are examples. Replace them with your own campaign, ad and ad group names.
Note
Google App campaigns send people straight to Google Play or the App Store with no landing page in between, so URL parameters do not apply. Installs from them are attributed by Google as a self-reporting network (SRN), usually through your mobile measurement partner.
To learn more in detail, go through Google's own references: Learn about final URLs and tracking templates and Create custom parameters for advanced tracking.
Naming rules that save rework
- Keep source and medium values lowercase: Google and google are counted as two separate values in reporting.
- Use one vocabulary across platforms: pick a single pair of source and medium values per channel and reuse it everywhere.
- Never repeat a key: a key in the base URL and the same key in the parameters field will fight each other, and only one survives.
- Respect the brace style: Meta uses double curly braces and Google Ads uses single ones, and a macro in the wrong style is passed through as plain text.
Part 3: Validate the macros on the NVECTA dashboard
› Where: Reports > Live Stats and Reports > Insights
Once the ads are live, check that the macro values reach NVECTA. Start with a quick check in Live Stats, which shows the values on individual visits within minutes, then use Insights to see what the macros add across all your ad traffic.
Both checks use the session start event, which NVECTA records when a visitor lands on your site. It carries the landing page URL, the UTM values and the ad IDs read from it.
Quick check in Live Stats
Live Stats covers the last 30 minutes and refreshes every 30 seconds, so run this check while your ads are receiving clicks. To test it yourself, click one of your live ads in a private browser window, so that the click starts a new session.
- Open Reports in the left navigation and click Live Stats.
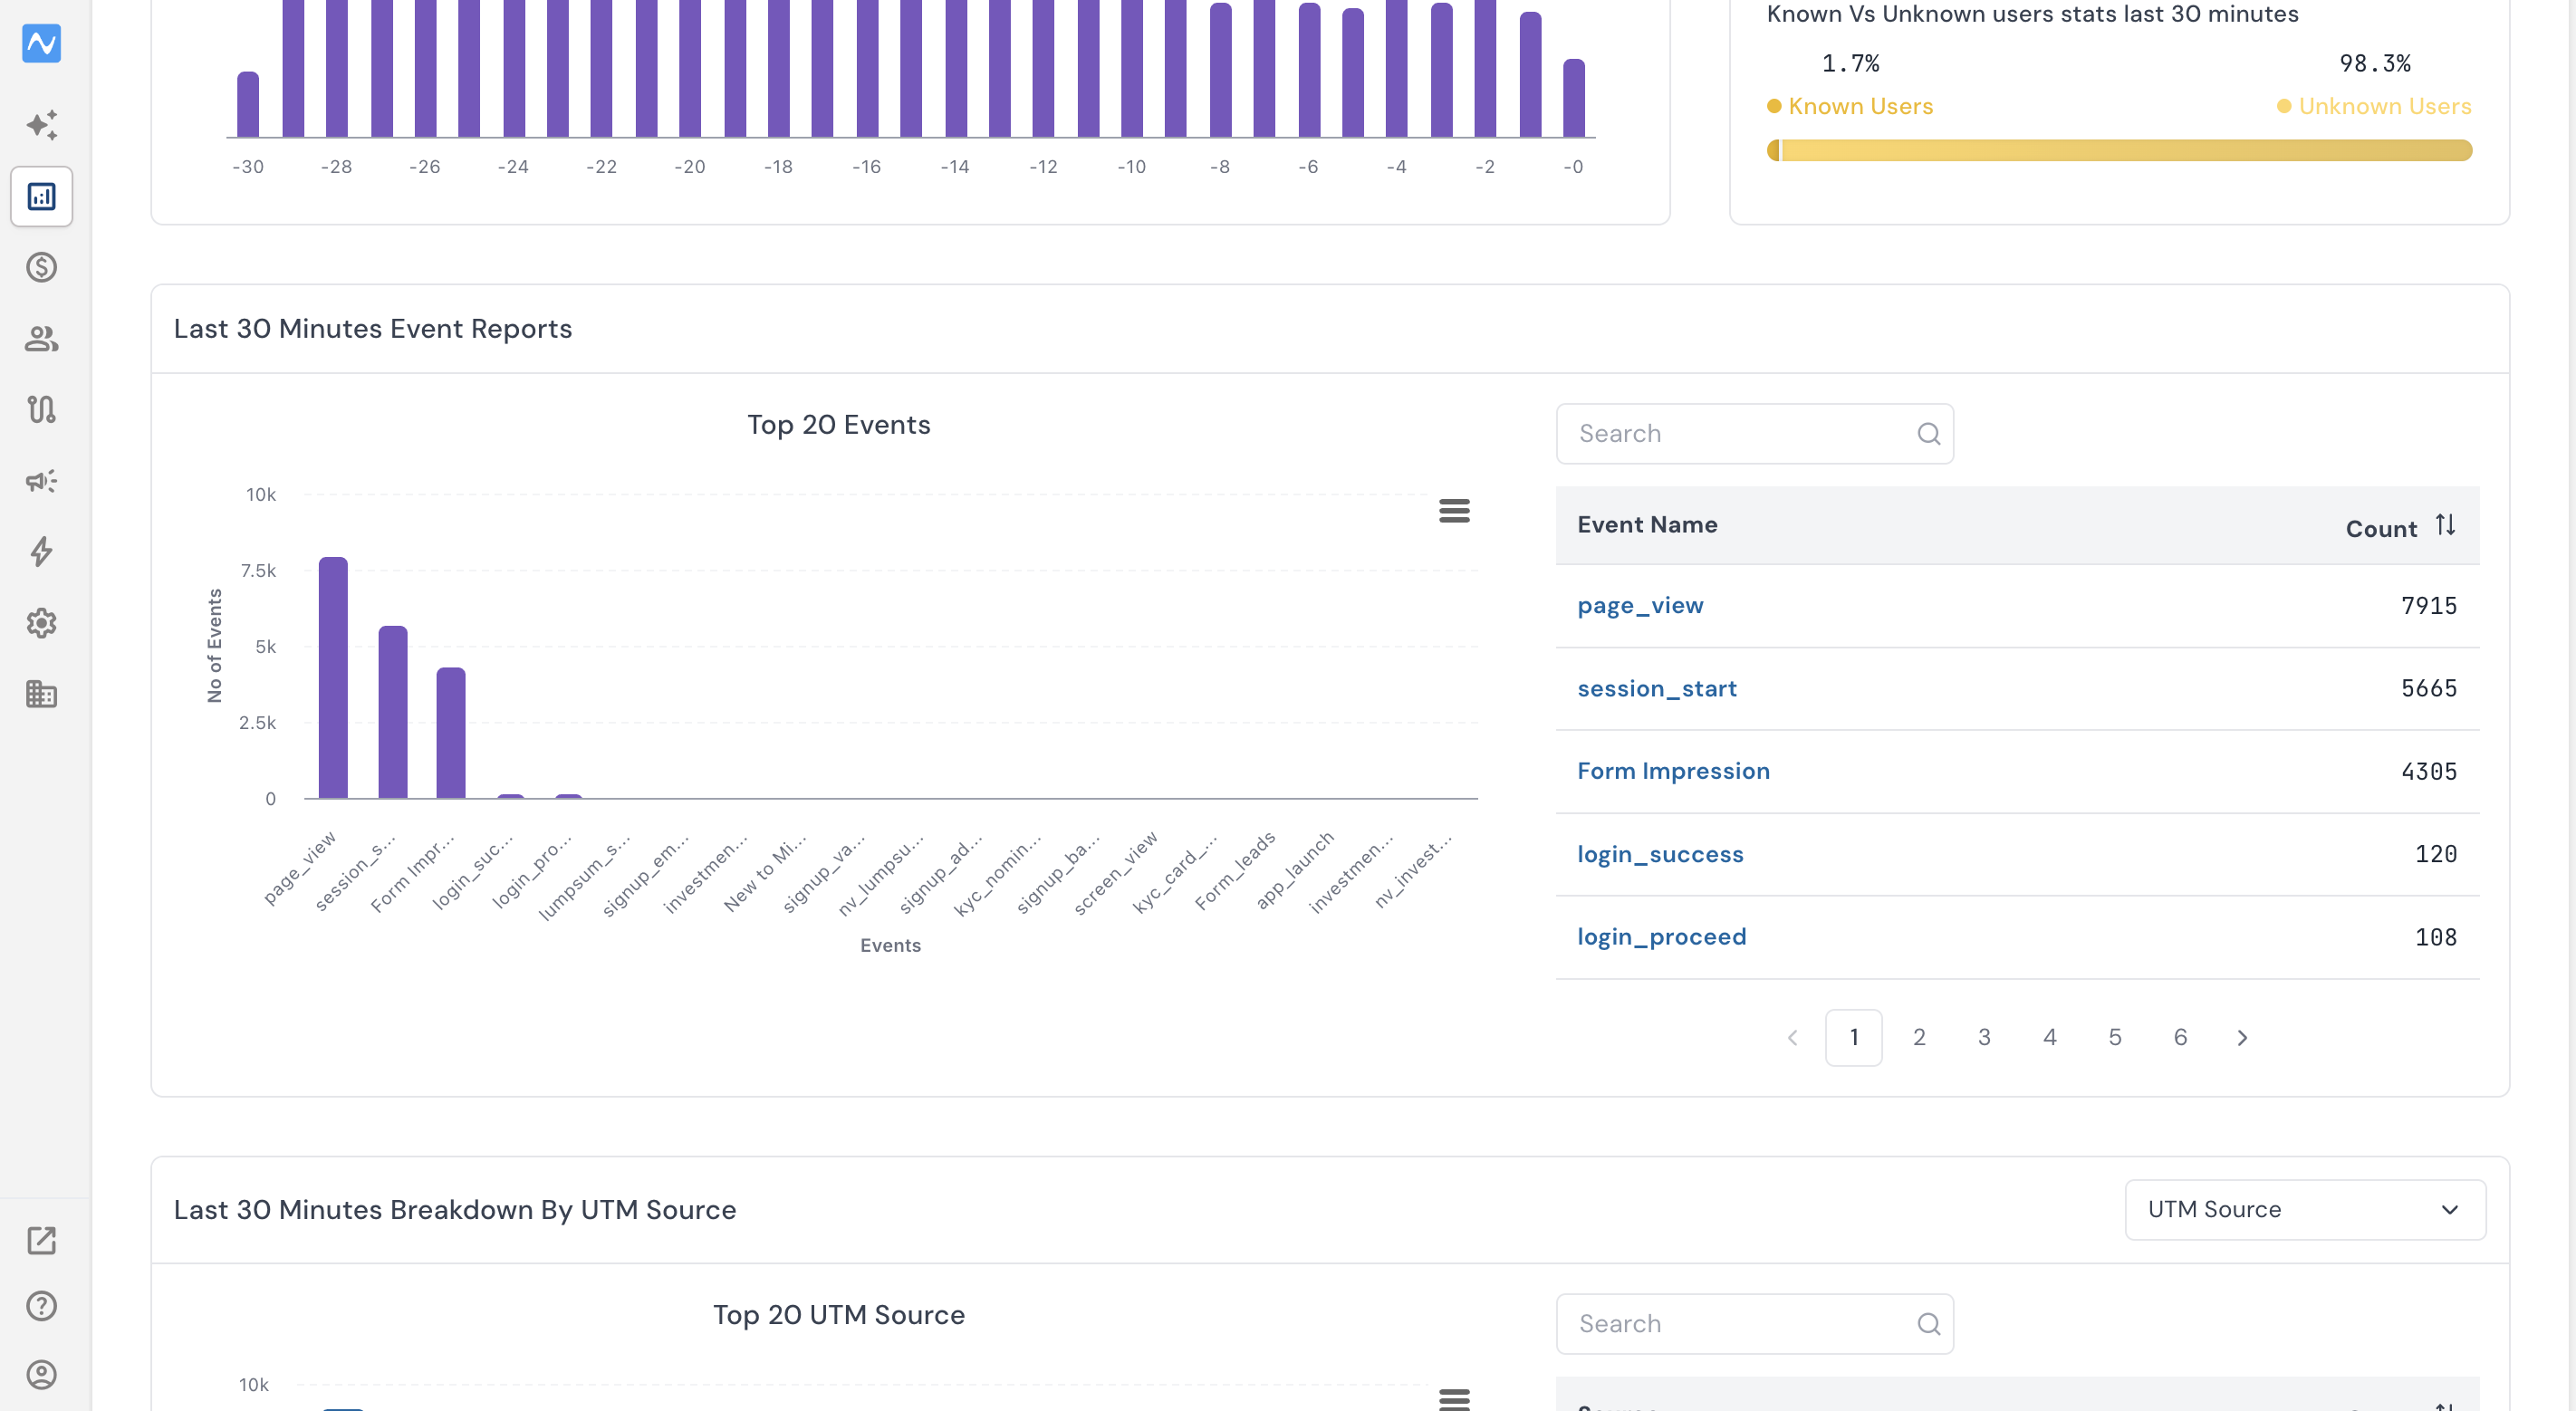
- Under Last 30 Minutes Event Reports, click session_start in the Event Name / Count table. The Event Logs window opens with one row per session start.
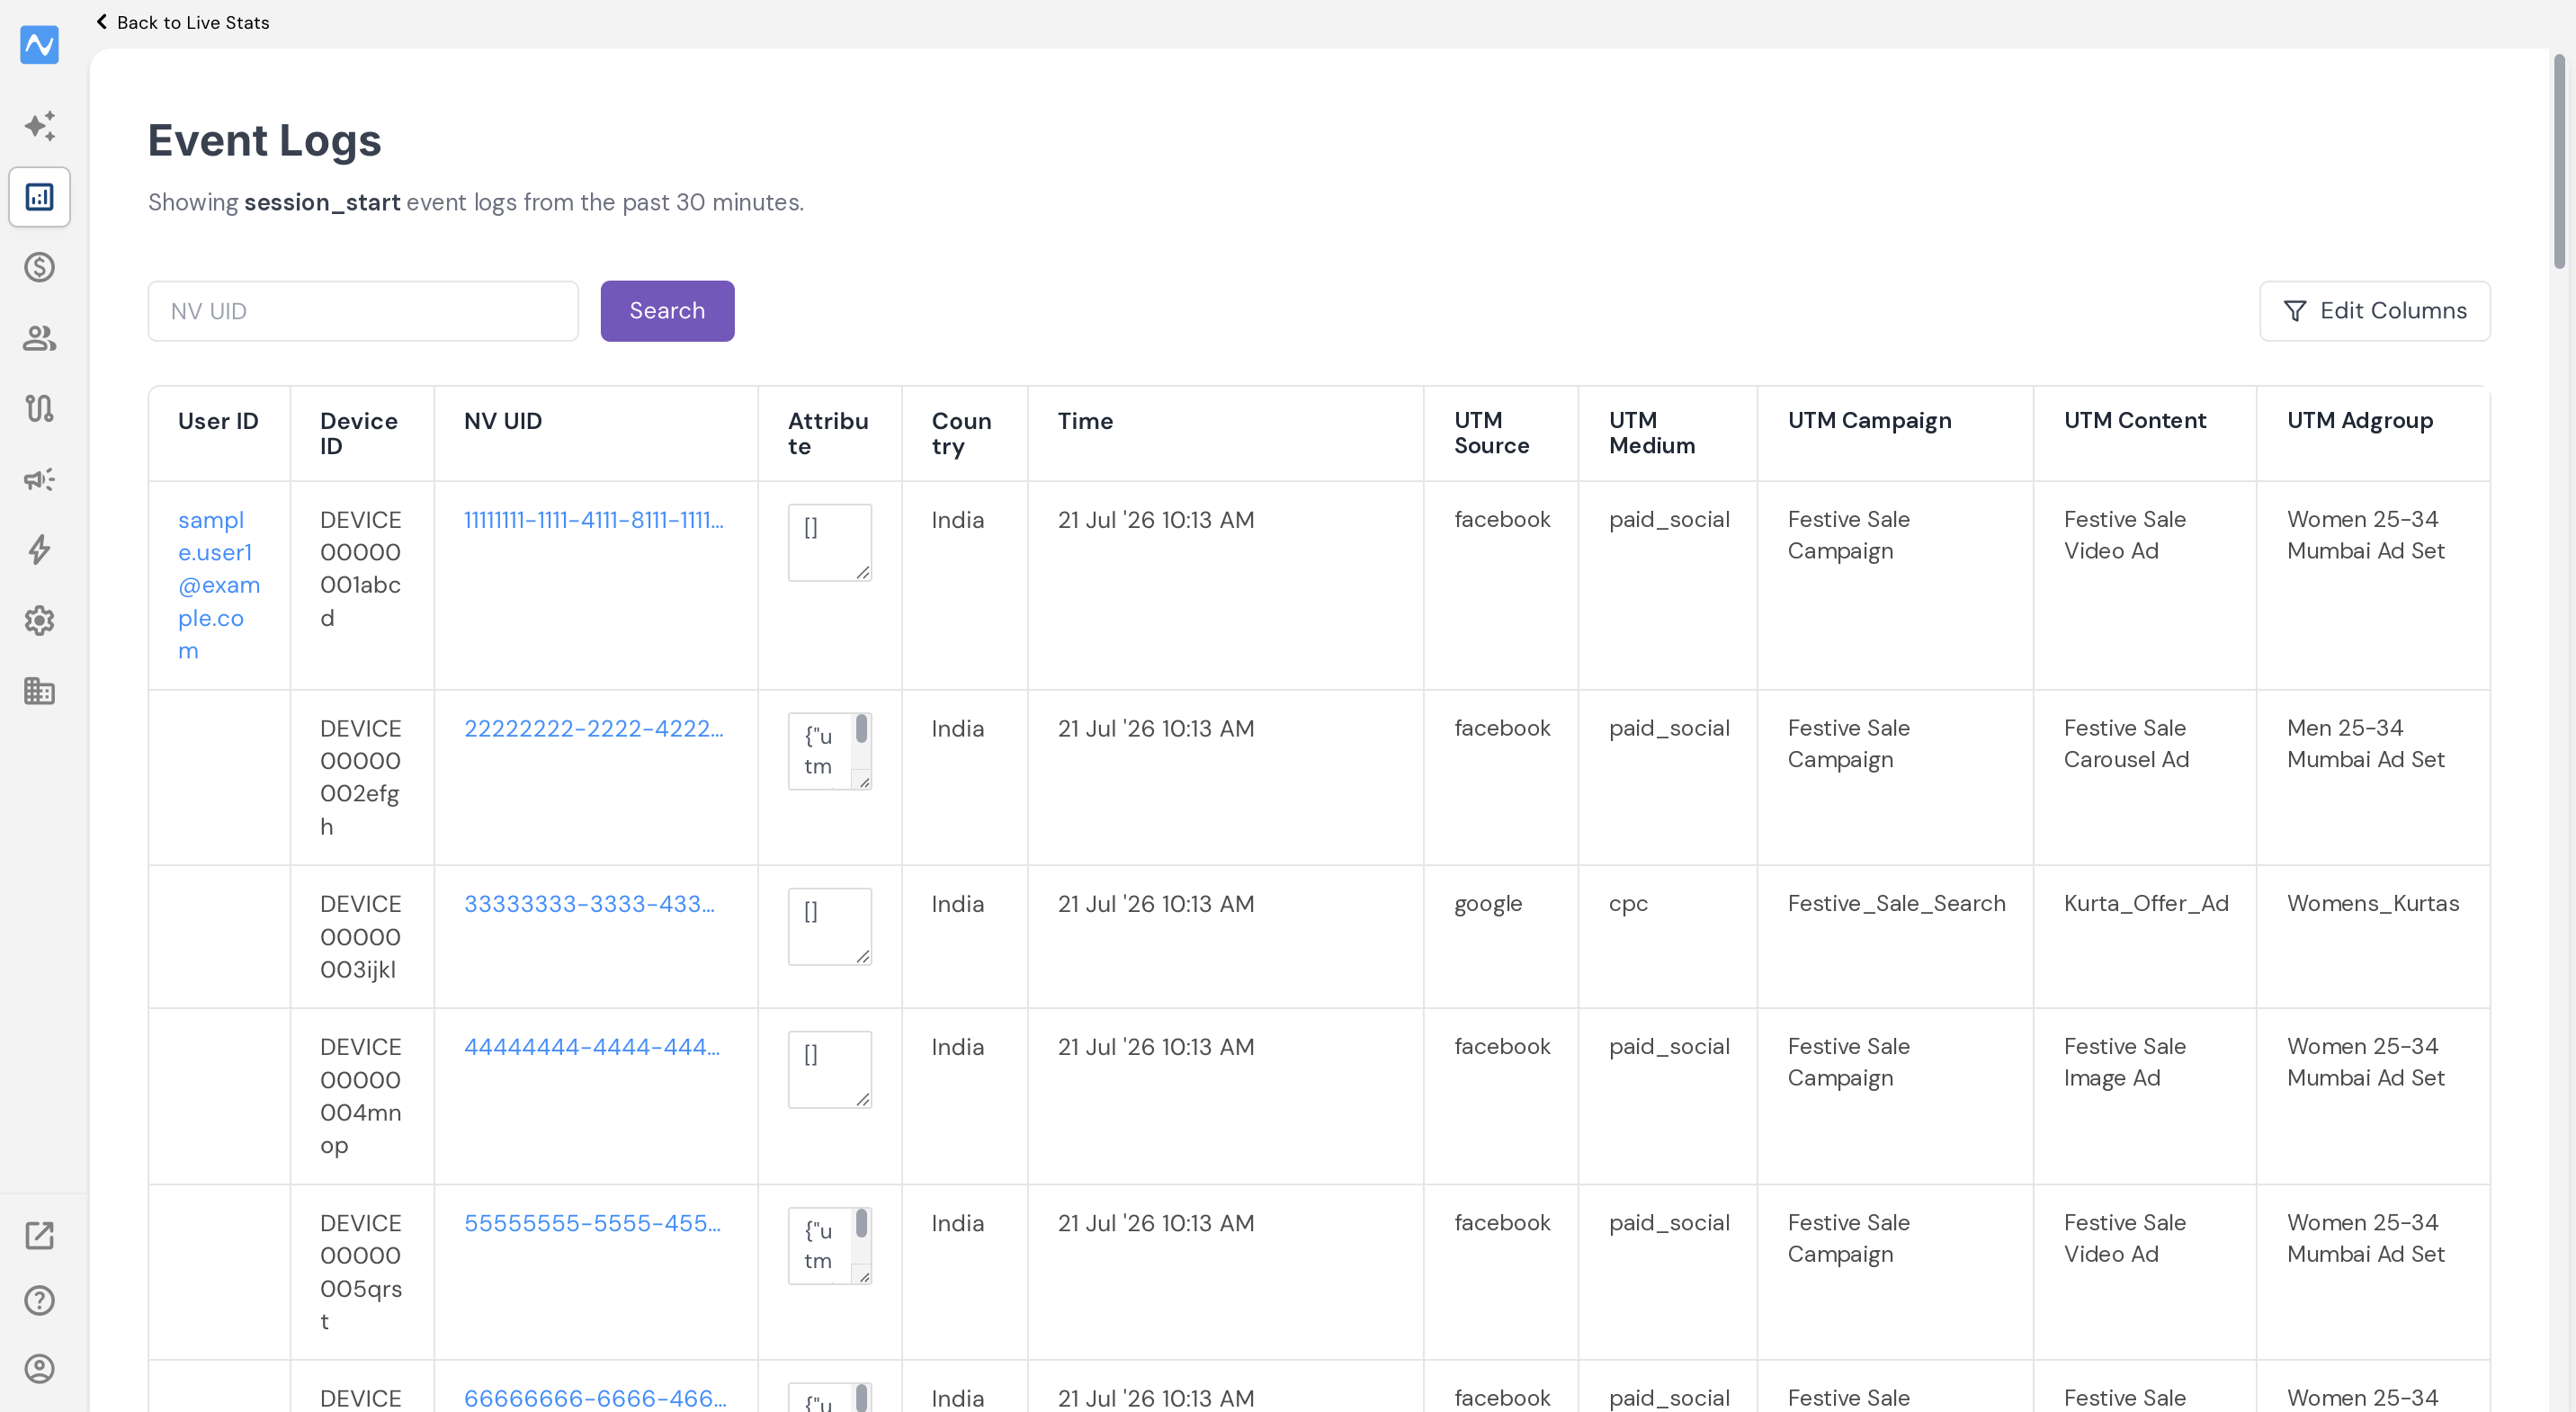
- Click Edit Columns, tick UTM Source, UTM Medium, UTM Campaign, UTM Content and UTM Adgroup under UTM, and Ad Campaign ID, Ad Group ID and Ad ID under Ad Params, then click Apply.
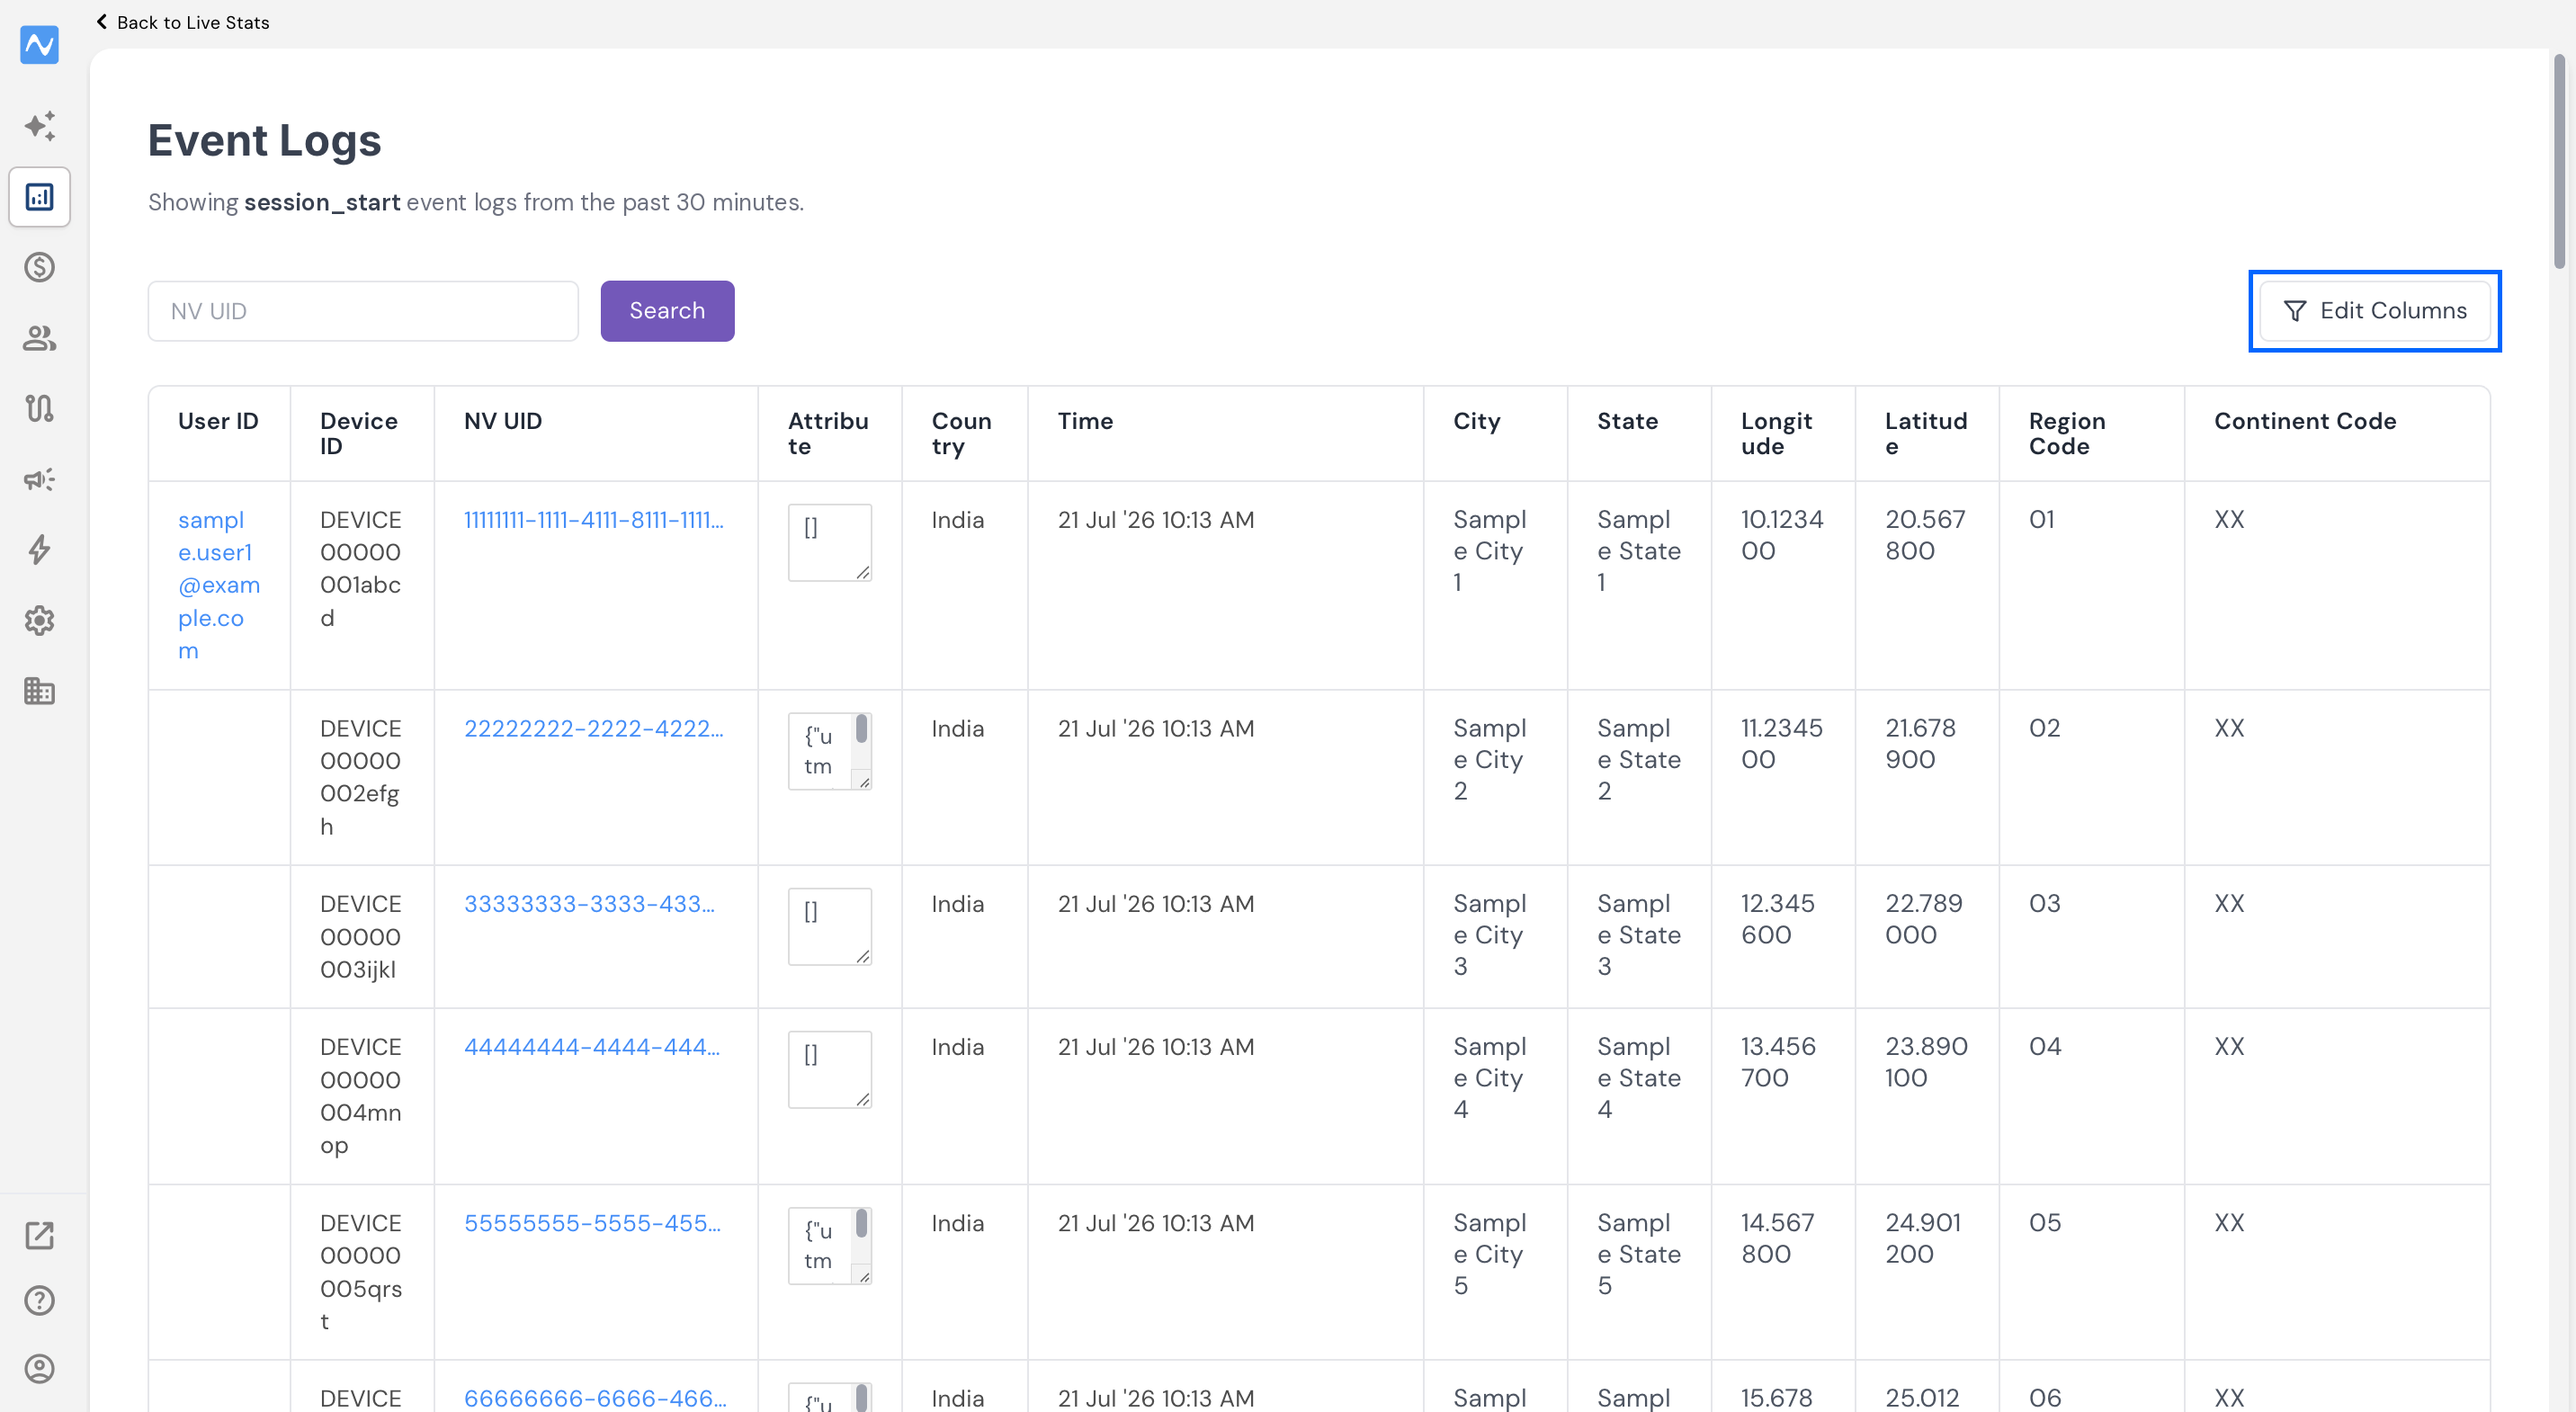
- Read the new columns on the rows from your ads. Readable names such as Festive Sale Campaign from Meta or Festive_Sale_Search from Google, and numeric IDs in the Ad Params columns, mean the parameters arrived. A value that still reads {{campaign.name}} or {_campaign}, or an empty cell, means they did not.
Detailed check in Insights
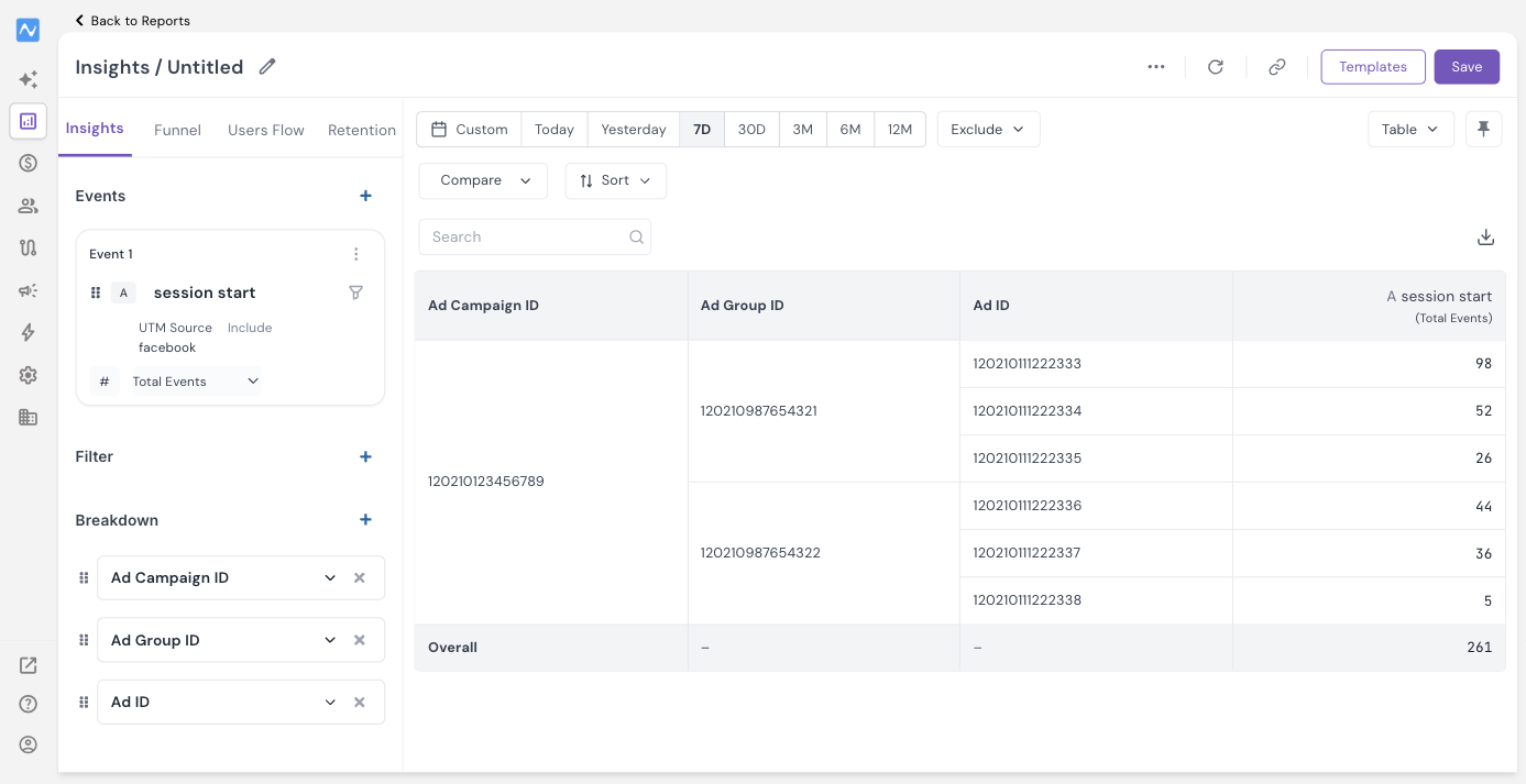
Live Stats confirms the macro values on individual visits. Insights lets you analyse them in depth: it counts every tagged visit over the dates you choose and splits the total by any parameter. The steps below break down the visits from your Meta ads by Ad Campaign ID, Ad Group ID (the ad set ID on Meta) and Ad ID at once, so each row shows one ad together with its ad set and campaign. You can also add your other NVECTA events to the same report, such as add to cart or order place, to compare your ad acquisition with what those visitors do next and more.
- Open Reports in the left navigation, then click Create New and choose Insights.
- In the Events panel, click Select Event under Event 1 and choose session start from the All Event list.
- Leave the metric on Total Events, or switch it to Unique Sessions or Unique Users when reach matters more than volume. Unique Sessions is the closest equivalent to a click count.
- Click the filter icon on the event row to open Add filter. Set Attribute to UTM Source, leave Condition on Include, select facebook under Value, then click Apply Filter, so that only visits from your Meta ads remain.
- Choose the window at the top of the report, for example 7D. A week gives each ad enough clicks to compare.
- Click + next to Breakdown and choose Ad Campaign ID. Click + again to add Ad Group ID, then once more to add Ad ID, and click Apply. Change the chart type at the top right from Line to Table. Each row is now one ad, with its ad set and campaign IDs beside it.
- Click Save if you want to keep the report and rerun it after the next launch.
For Google Ads, filter UTM Source on google and use the same three breakdowns. The rows show the campaign, ad group and ad IDs that Google fills in on every click.
If the numbers do not look right
| What you see | Likely cause | What to do |
|---|---|---|
| The filter returns no session start events | No tagged click has reached NVECTA yet, or the key you filtered on is not the key in the ad | Confirm the ad is serving, widen the date window, then re-check the parameter name in the ad platform |
| The value reads as the macro itself, for example {{campaign.name}} | Wrong brace style, or a macro that is not supported at that level, or a Google Ads custom parameter that is not set on that campaign, ad group or ad | Compare the string with the platform specification and correct the syntax. For Google Ads, add the missing custom parameter to that campaign, ad group or ad |
| Visits arrive but are attributed to direct or referral | Parameters dropped by a redirect between the ad and the landing page | Open the final URL yourself and check the parameters survive every hop. If the referral is a payment gateway, OTP or login domain that the visitor passed through, add it under Referral Exclusion so the ad keeps the credit |
| Google ads show no campaign values | The parameters are in the Tracking template instead of the Final URL suffix, or a campaign, ad group or ad has its own Final URL suffix that replaces the account one | Move them to the account-level Final URL suffix, and remove any suffix set on a campaign, ad group or ad |
| One campaign appears as two values | Inconsistent casing or naming between ads | Standardise the values in the URL parameters or Final URL suffix |
Where to check what
| Task | Where |
|---|---|
| Add macros for Meta ads | Ads Manager > ad level > Tracking > URL parameters |
| Add macros for Google ads | Google Ads > Admin > Account settings > Tracking > Final URL suffix, then Custom parameters on each campaign, ad group and ad |
| Connect the ad accounts to NVECTA | Settings > Channels > Remarketing Ads |
| Validate the tagged values | Reports > Live Stats > Event Logs for a quick check, then Reports > Insights, session start event broken down by Ad Campaign ID, Ad Group ID and Ad ID |
Conclusion
Ad macros are a one-time edit in each ad platform that pays off every time a campaign changes, because the campaign, ad group and creative details travel with the click instead of depending on someone remembering to tag a URL. Add them in Meta and Google Ads, then check the session start event in two places: Event Logs in Live Stats to confirm the values reach NVECTA within minutes of a click, and Insights to break your ad traffic down by campaign, ad set and ad ID in one table. Once the values show up, every session that starts from one of your ads carries its campaign and ad details, so NVECTA analytics can show which ad brought each visitor in.
Was this article helpful?
That’s Great!
Thank you for your feedback
Sorry! We couldn't be helpful
Thank you for your feedback
Feedback sent
We appreciate your effort and will try to fix the article