Quick summary
This article explains how to set up NVECTA as the mobile measurement partner (MMP) for your Google Ads and Meta app campaigns. The setup is the same for both ad networks except for one step: getting the ID that connects your ad account to NVECTA. You get a Link ID from Google Ads or an App ID from a Meta app, share it with the NVECTA support team, and then analyze the installs and in-app events your campaigns bring in, right inside NVECTA Insights.
Why app campaigns need a Link ID or App ID
For web campaigns, you add tracking macros to your ad URLs so NVECTA knows which campaign sent each visitor. App campaigns work differently: the ad takes users straight to Google Play or the App Store, so there is no landing page URL to carry those macros.
An ID from the ad network does that job for mobile. It connects your ad account with NVECTA, so installs and in-app events in your app can be attributed to the campaign that drove them:
- Google Ads: a Link ID that you create in Google Ads Data manager.
- Meta: the App ID of a Meta app that you create in Meta for Developers.
How the setup works
| Step | What happens | Who does it |
|---|---|---|
| 1 | Get your ID: create a Link ID in Google Ads, or create a Meta app and copy its App ID | You |
| 2 | Share the ID with NVECTA support | You |
| 3 | Add the ID to your NVECTA account from the backend | NVECTA support team |
| 4 | Analyze attributed installs and in-app events in Insights | You |
Google Ads and Meta at a glance
| Detail | Google Ads | Meta |
|---|---|---|
| ID you share | Link ID | App ID of a Meta app |
| Where you create it | Google Ads > Tools > Data manager | Meta for Developers > My Apps > Create App |
| Access you need | Admin access to the Google Ads account | A Meta for Developers account (log in with the Facebook account you use for Meta ads) |
| How many IDs | One Link ID per app and platform | One App ID for your Meta app |
| Ad Source value in Insights | Meta |
Before you begin
› For both ad networks:
- NVECTA SDK integrated: the NVECTA SDK is live in your app. If it isn't yet, follow the Android SDK integration or iOS SDK integration guide first.
› For Google Ads:
- Admin access in Google Ads: you have admin access to the Google Ads account that runs your app campaigns. Only an admin can create a Link ID.
› For Meta:
- Meta for Developers account: you can log in to Meta for Developers with the same Facebook account you use for Meta ads, or one that has access to your Meta ad account. The first time you open it, Meta asks you to create a Meta for Developers account in four short steps: Register, Verify account, Contact info and About you.
Step 1: Get your ID from Google Ads or Meta
This is the only part of the setup that's different for each ad network. Follow the section for the network you advertise on, or both sections if you run app campaigns on Google Ads and Meta.
For Google Ads: create a Link ID
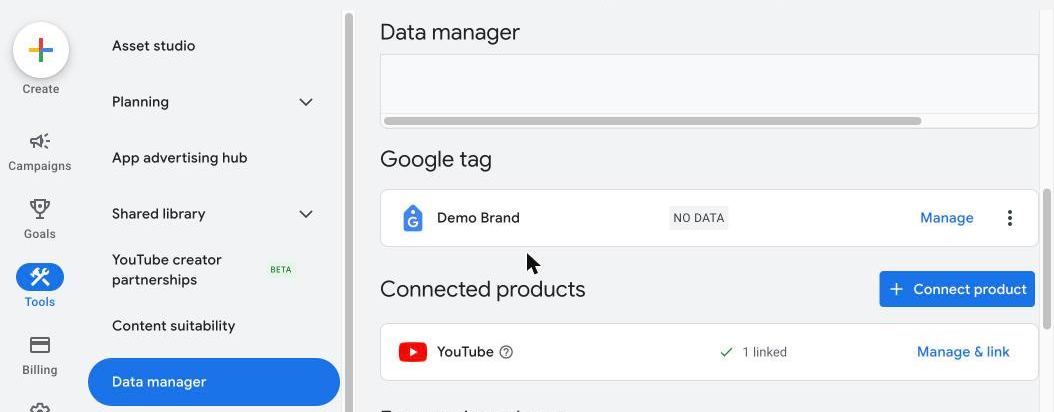
Where: Google Ads > Tools > Data manager > + Connect product > Third-party app analytics
- Sign in to your Google Ads account.
- Click Tools, then click Data manager.
- Under Connected products, click + Connect product.
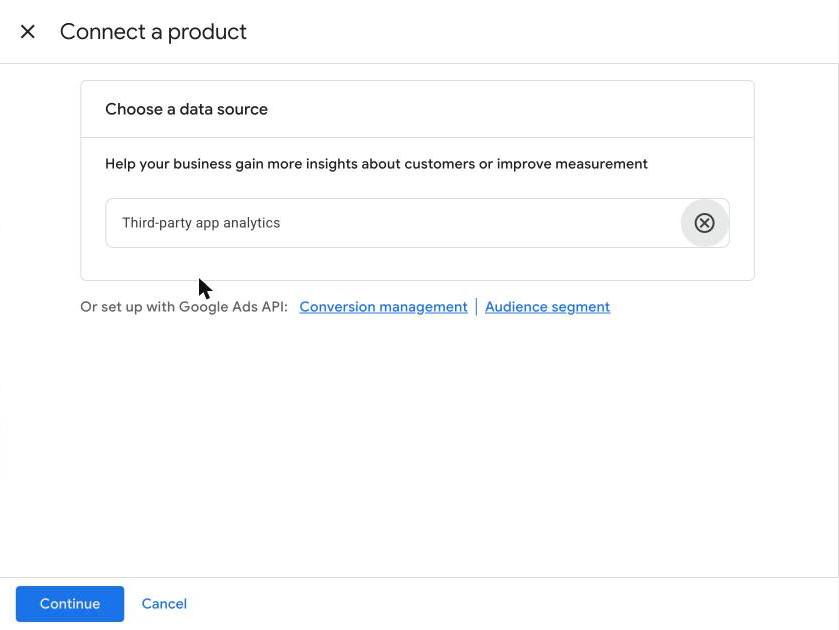
- In Choose a data source, search for Third-party app analytics, select it and click Continue.
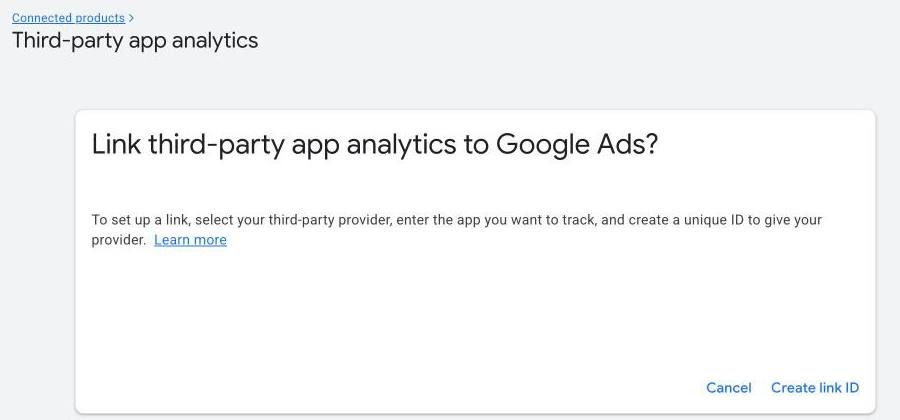
- On the Link third-party app analytics to Google Ads screen, click Create link ID. If your account already has a third-party app analytics link, click the + button to add another one.
- In the Create a new link to your provider window, open the App analytics provider dropdown and select Kochava.
- Under Select your mobile app's platform, choose Android or iOS.
- In Look up your app, enter your app name, package name or publisher, and select your app from the results.
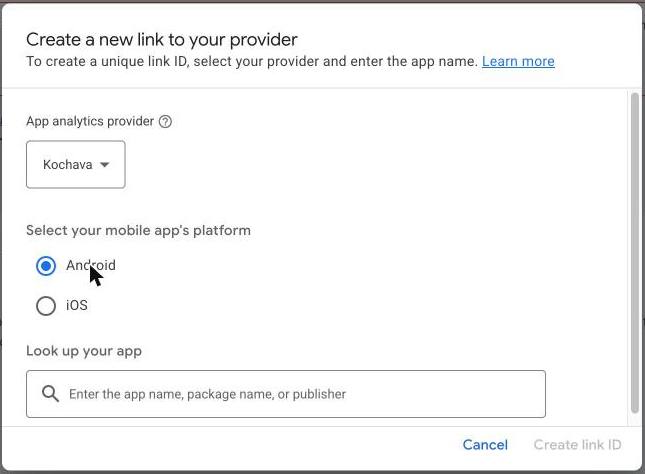
- Click Create link ID.
- Copy the Link ID with the copy button, then click Done. Keep the Link ID handy for Step 2.
› Keep these points in mind:
- One Link ID per app and platform: a Link ID covers one app on one platform. If your app is on both Android and iOS, create a Link ID for each platform and share both.
- Unverified status is expected: right after you create it, Google Ads shows the link as Unverified. The status changes once the Link ID is added on the NVECTA side and data starts reaching Google Ads.
- Don't regenerate the Link ID: regenerating it stops the old Link ID from working. If you do regenerate it, share the new Link ID with NVECTA support right away.
For Meta: create a Meta app and copy its App ID
Where: Meta for Developers > My Apps > Create App, then App settings > Basic for the App ID
- Go to Meta for Developers and log in with the Facebook account that has access to your Meta ad account.
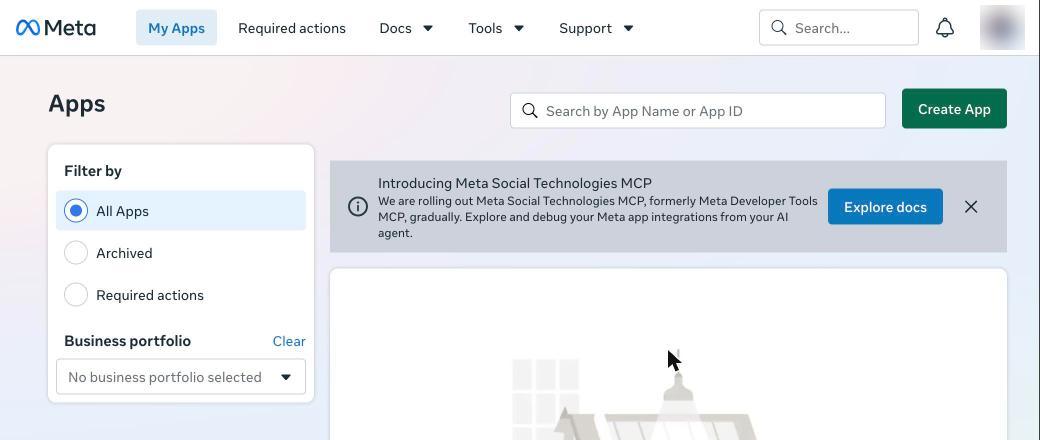
- On the Apps page, click Create App. If Meta shows a There's a new way to create apps with Meta message, click Create app to continue.
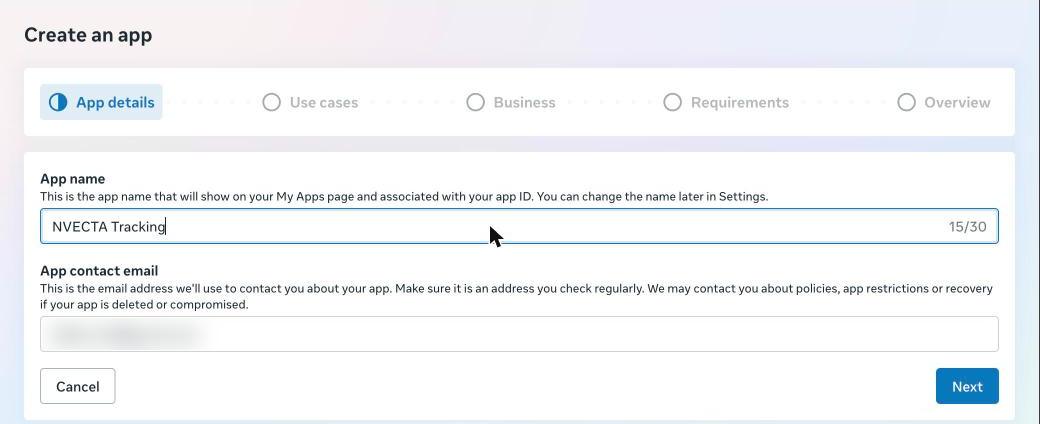
- On App details, enter an App name, for example NVECTA Tracking, check the App contact email, and click Next.
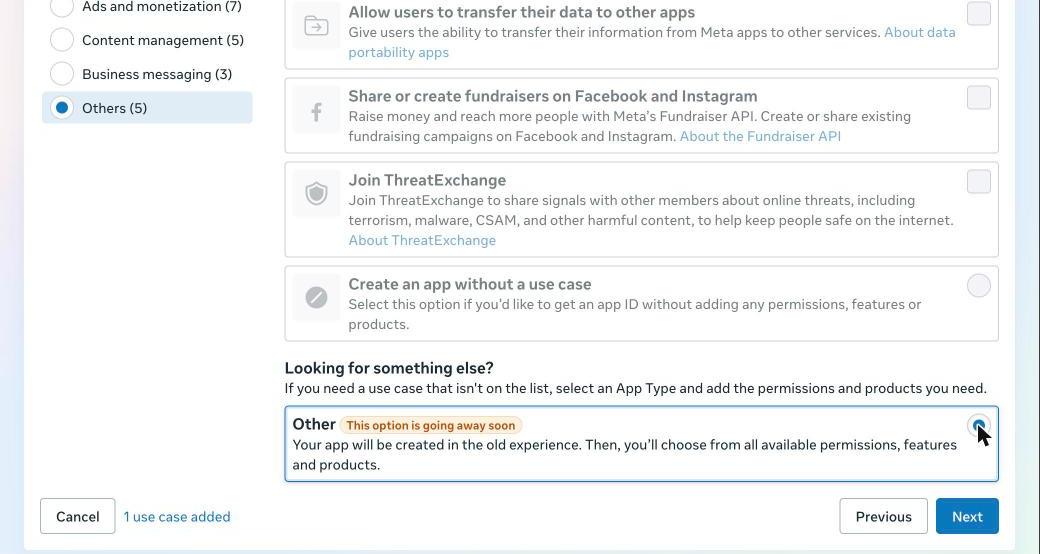
- On Add use cases, click Others under Filter by, scroll down to Looking for something else?, select Other and click Next.
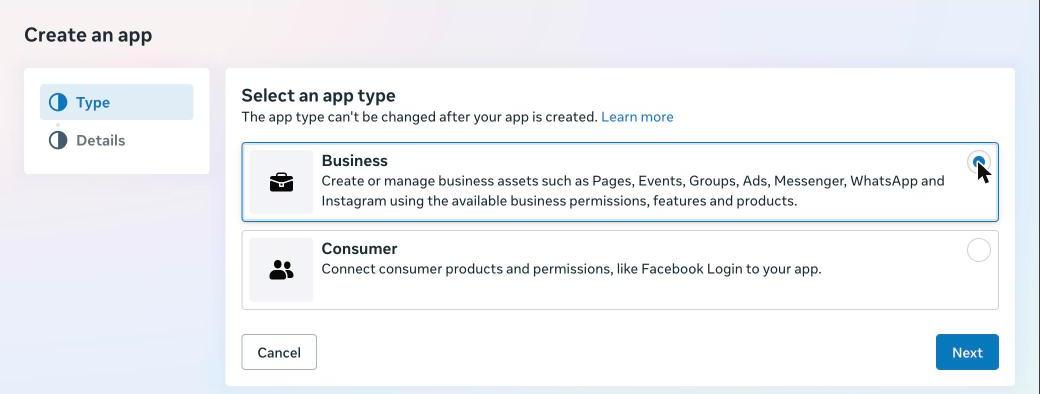
- Under Select an app type, select Business and click Next.
- On Details, review the app name and contact email. Business portfolio is optional, so you can leave it as No business portfolio selected. Click Create app.
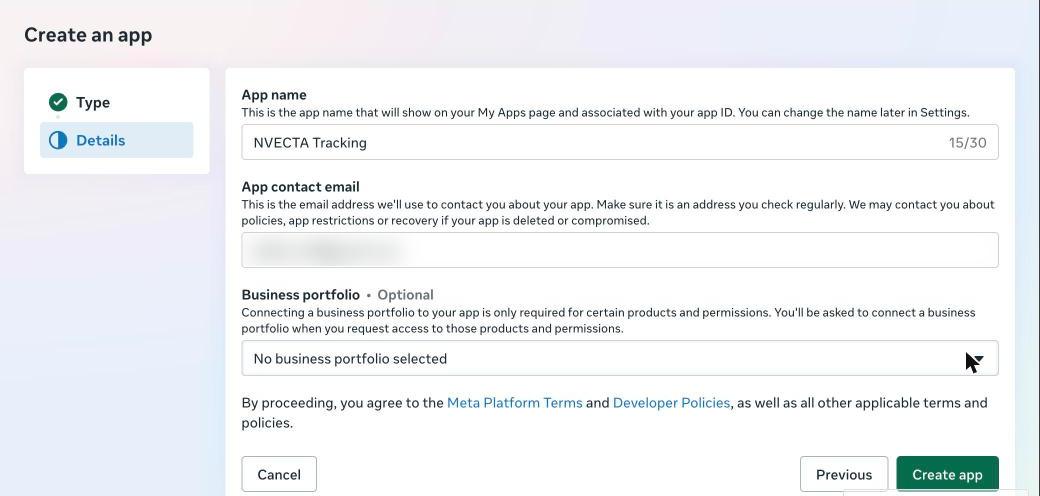
- If Meta asks you to re-enter your Facebook password, enter it and click Submit. Meta then opens your app's dashboard.
- In the left menu of your app's dashboard, click App settings, then click Basic.
- Copy the value in the App ID field. The same App ID also appears at the top of the dashboard. Keep it handy for Step 2.
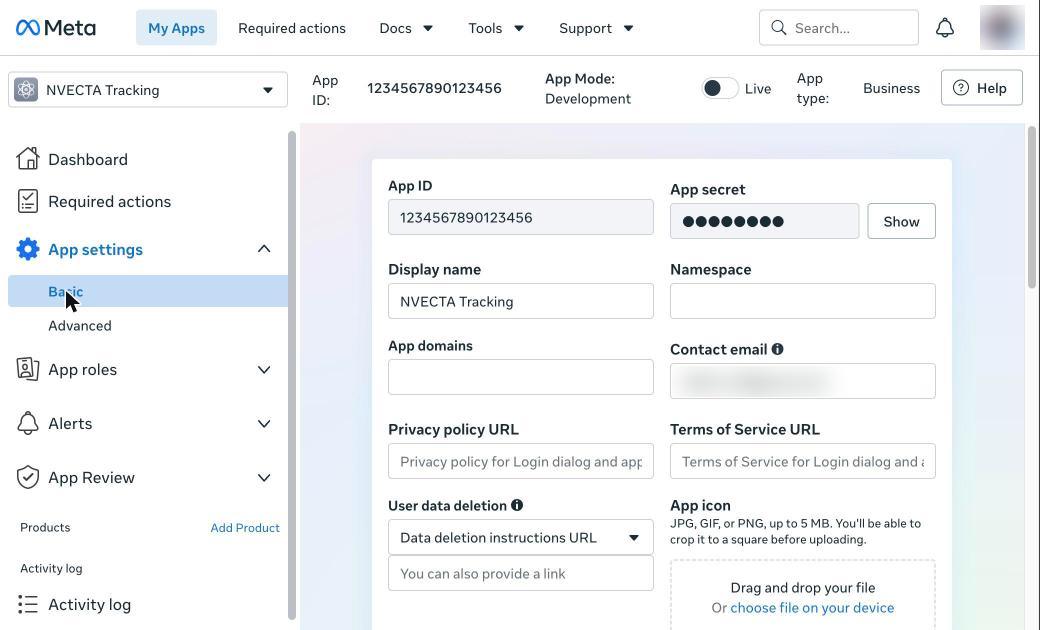
› Keep these points in mind:
- Share only the App ID: never share the App secret shown next to it.
- The Create App flow can change: Meta marks the Other option as going away soon and changes this flow from time to time. If you can't find Other or Business, contact NVECTA support before you continue.
Step 2: Share your ID with NVECTA support
Send your ID to the NVECTA support team by raising a support ticket. In your ticket, include:
- Your app name
- The platform: Android, iOS or both
- The ad network: Google Ads, Meta or both
- The ID: the Link ID for each platform (Google Ads) and the App ID (Meta)
The support team adds the ID to your NVECTA account from the backend, which creates the connection between your ad account and NVECTA. You don't need to change anything in your app.
Step 3: Analyze app installs in Insights
Where: Analytics > Insights > + Create New Report > Insights
Once the connection is live, installs and in-app events that come from your Google Ads and Meta campaigns carry their attribution in NVECTA. Attribution needs live ad traffic, so make sure your app campaigns are running. For Meta, wait two to three days after the integration goes live before you check. Then build an Insights report to see installs by source and campaign.
- Click Analytics, then click Insights.
- Click + Create New Report and select Insights.
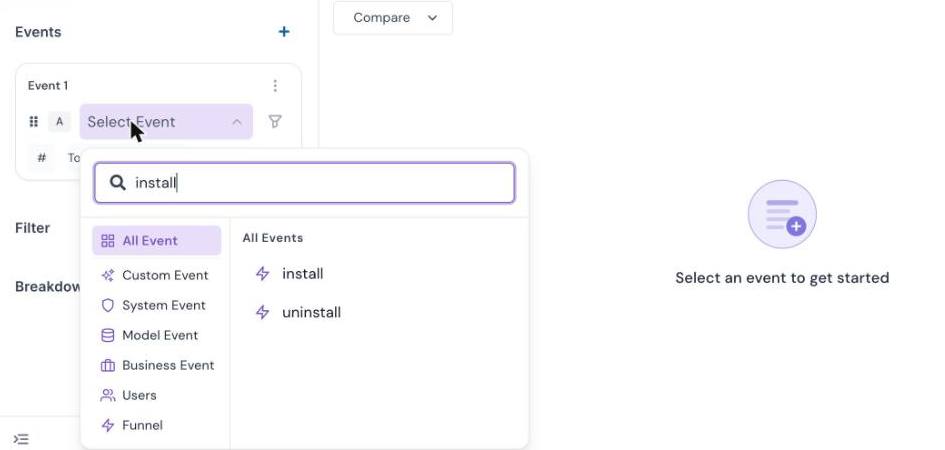
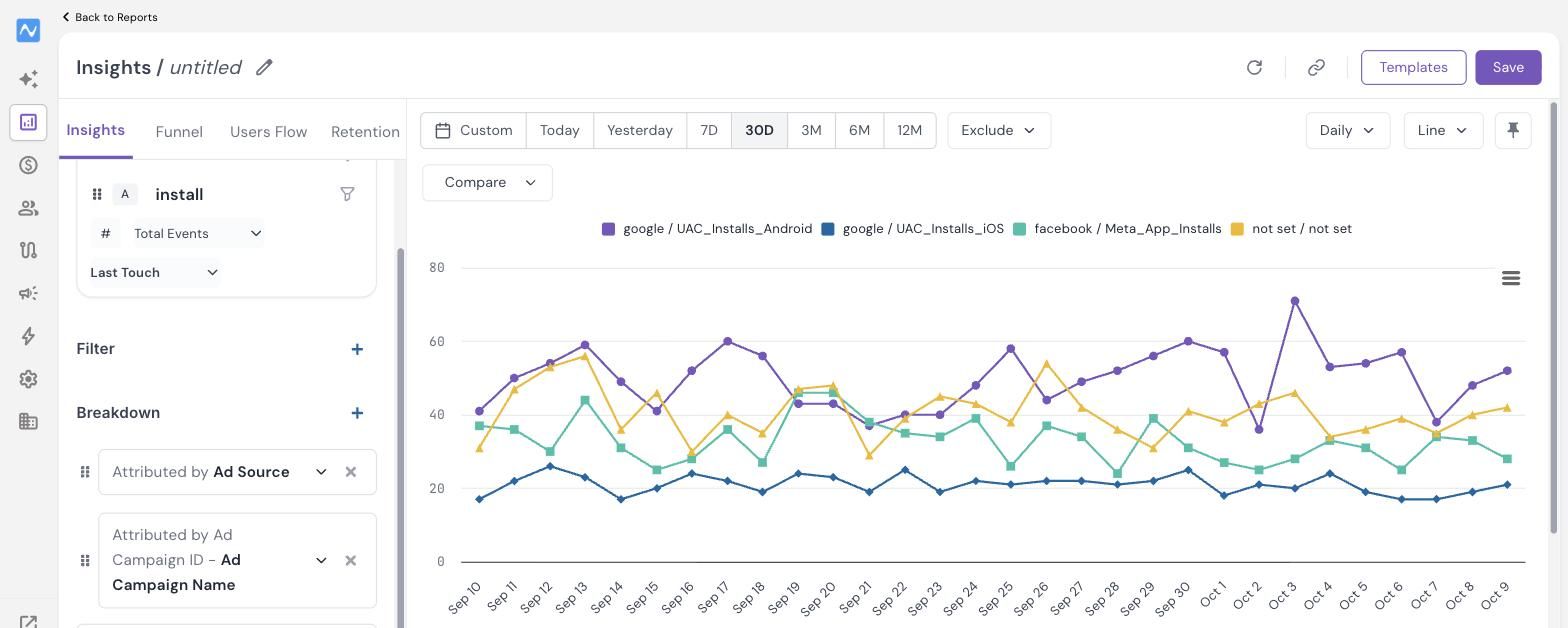
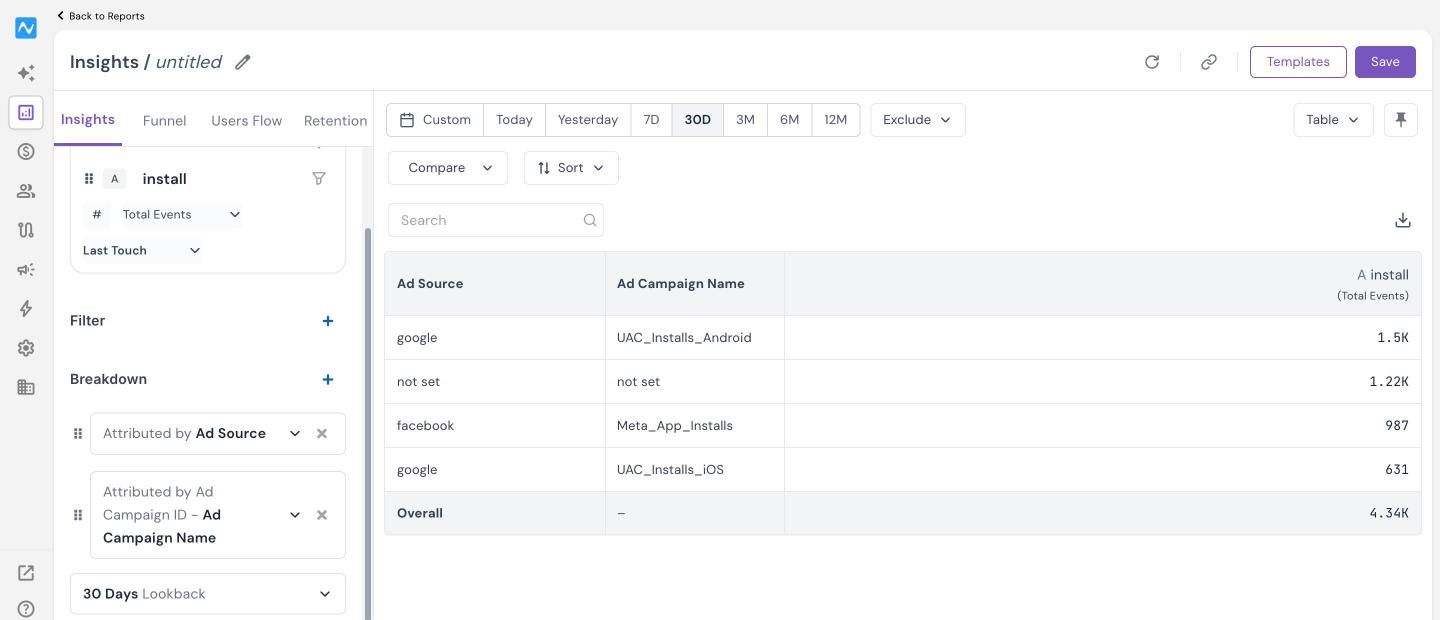
- Under Events, click Select Event, search for install and select it. Keep the metric as Total Events.
- Under Breakdown, click +, open Attributed By and select Ad Source.
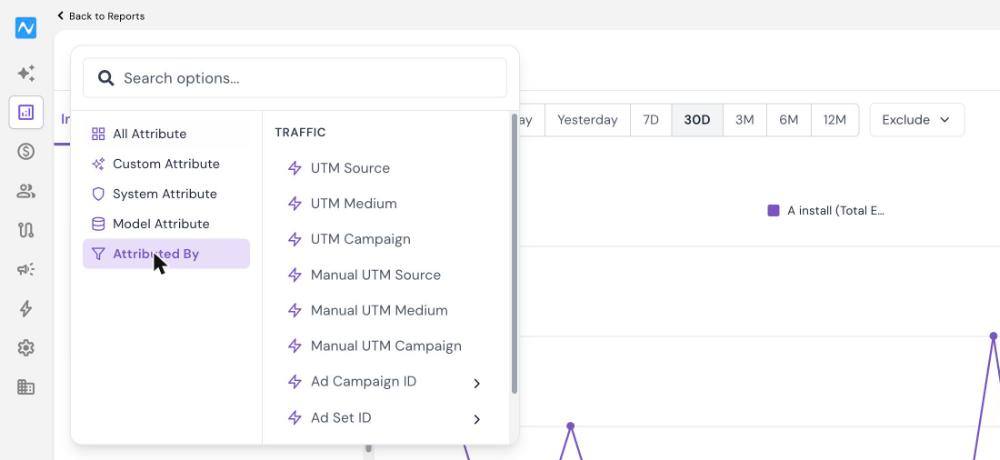
- Click + again, open Attributed By, point to Ad Campaign ID and select Ad Campaign Name (or Ad Campaign ID).
- Check the attribution settings. The attribution model under the event defaults to Last Touch and the lookback window to 30 Days Lookback. Change them if your funnel needs it.
- Click Apply and choose a date range that starts after the go-live date, for example 7D or 30D. To see one row per campaign, switch the view from Line to Table.
- Click Save and give the report a name, for example Google Ads app installs or Meta app installs.
If installs show Google or Meta as the Ad Source along with your campaigns, attribution is working. If nothing shows up after three days, raise a support ticket with your Link ID or App ID and a campaign ID you expected to see. For how NVECTA counts installs in the first place, see Understanding app install counts in NVECTA, Firebase and Google Play Store.
Which event and attribute to use
| What you want to see | Event and metric | Breakdown (Attributed By) |
|---|---|---|
| Installs from Google Ads or Meta compared with other sources | install, Total Events | Ad Source |
| Installs per campaign | install, Total Events | Ad Source, then Ad Campaign ID > Ad Campaign Name |
| Installs per ad set or ad | install, Total Events | Ad Set ID or Ad ID |
| In-app conversions per campaign | Your conversion event (for example, purchase), Total Events | Ad Source, then Ad Campaign Name |
| Revenue per campaign | Your purchase event, Sum of property set to your revenue property (for example, amount) | Ad Source, then Ad Campaign Name |
› A few tips:
- Show only one ad network: under Filter, click +, open Attributed By, select Ad Source and include the Google or Meta value.
- Try another attribution model: the attribution dropdown under the event offers Last Touch, First Touch, Participation, Linear and No Attribution.
Compare Google Ads and Meta with your other channels
Insights shows what your Google Ads and Meta app campaigns bring in. To see that next to what you spend on each network, and to compare them with your other ad channels, connect your ad accounts in NVECTA (Settings > Channels > Remarketing Ads; for Meta, use the Facebook tab) and set up ROAS analysis. The ROAS analysis recipe walks you through it.
Troubleshooting
| What you see | Likely cause | What to do |
|---|---|---|
| The link shows Unverified in Google Ads | The Link ID isn't added on the NVECTA side yet, or no app data has reached Google Ads. | Wait for NVECTA support to confirm the setup. Check that you shared the Link ID for the right app and platform. |
| No Meta installs after three days | The App ID isn't added on the NVECTA side yet, your Meta ads aren't delivering, or no one has installed the app from an ad yet. | Check that your ads are running, then raise a support ticket with your App ID and a campaign ID you expected to see. |
| Ad Source shows not set for installs | The install wasn't attributed to an ad: it was organic, it happened before the integration was live, or it falls outside the lookback window. | Choose a date range after the go-live date, or widen the lookback window. |
| Google Ads data shows for one platform only | Each platform needs its own Link ID. | Create a Link ID for the other platform and share it with NVECTA support. |
| You can't find Other or Business when creating the Meta app | Meta has changed the Create App flow. | Contact NVECTA support before you create the app. |
Conclusion
With your Link ID and App ID in place, NVECTA works as the measurement partner for your Google Ads and Meta app campaigns, and Insights shows which campaigns on each network bring in installs, in-app conversions and revenue.
Was this article helpful?
That’s Great!
Thank you for your feedback
Sorry! We couldn't be helpful
Thank you for your feedback
Feedback sent
We appreciate your effort and will try to fix the article