
Push Notifications
Web push notifications are clickable messages delivered to a subscriber's browser, even when they aren't on your site. Once a visitor grants permission, you can re-engage them with offers, updates, and reminders across desktop and mobile.
This guide covers integrating web push with NVECTA, configuring the permission prompt and targeting, and troubleshooting and testing your setup before you go live.
Set up web push
Web push relies on two things on your site: the NVECTA JavaScript snippet, and a browser-specific way to deliver notifications — a service worker file served from your root directory for Chrome (and other supported browsers), and APNS certificates for Safari.
1. Add the integration code
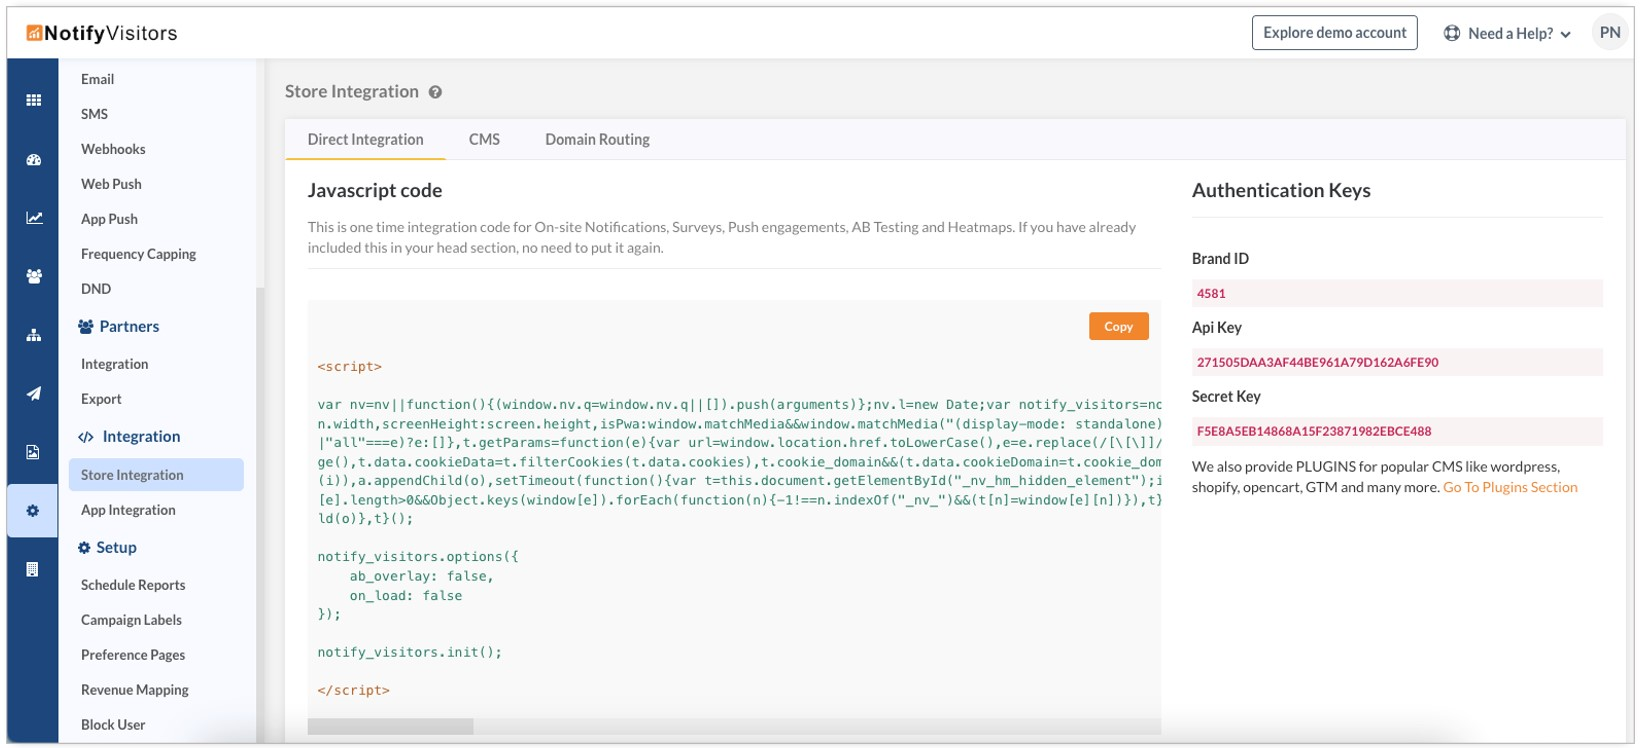
Go to Settings > Store Integration, copy the JavaScript snippet, and paste it into the of every page on your site. For details, see the web integration guide.
2. Download the service worker files
Go to Settings > Web Push. In the Integration tab, select the browsers you want push to run in, click Update.
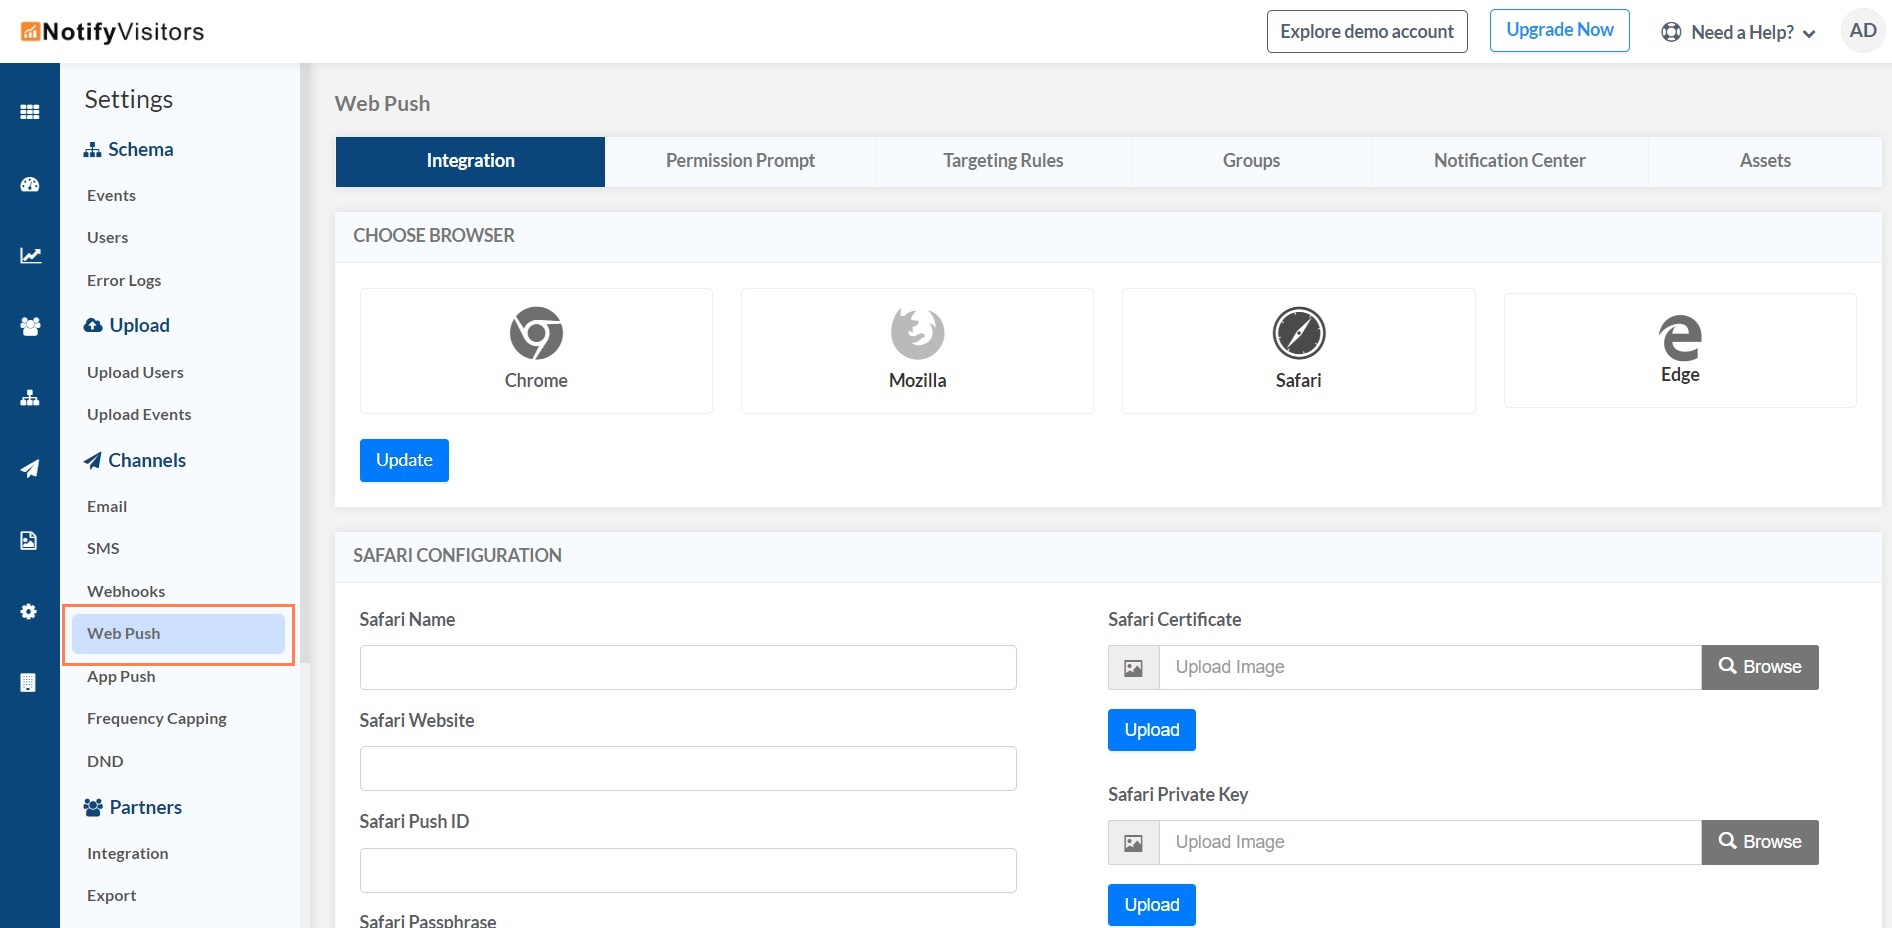
Then click Download Package to download the service worker files.
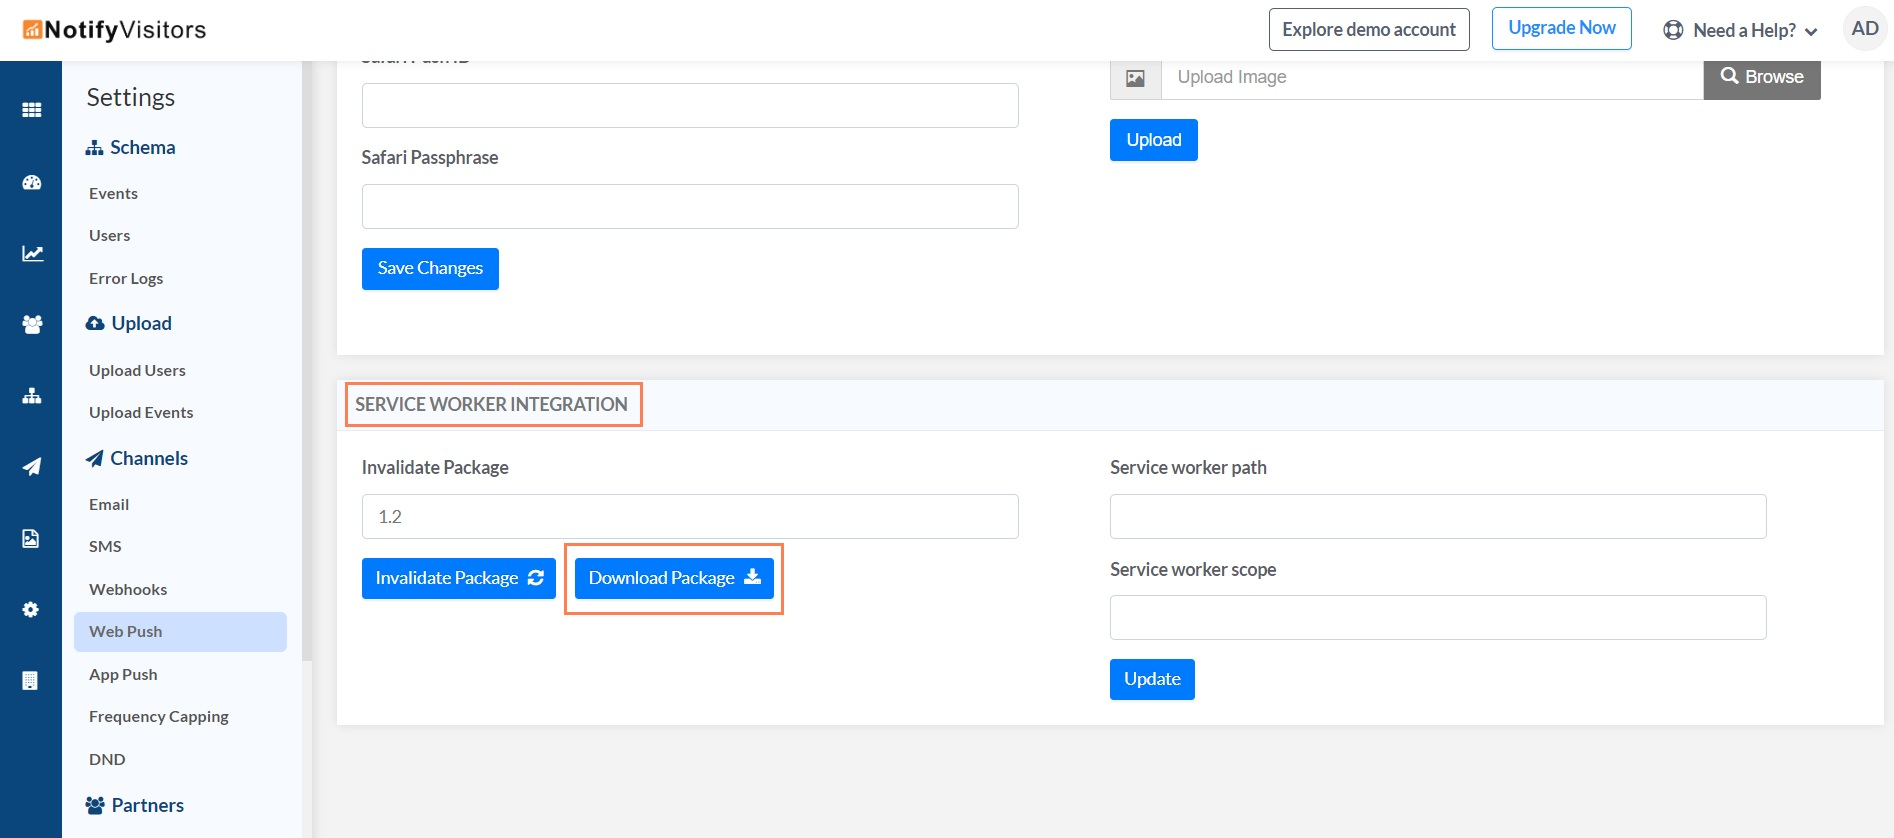
Extract the package.
- If you don't serve AMP pages, you can delete the amp folder (optional).
- A site can register only one service worker. If another vendor already installed a service worker on your site, the two files must be merged into one. To have us merge them for you, contact your assigned NVECTA client manager.
3. Place the files in your site root
Move the extracted files to the top-level root directory of your site. Every file must be publicly accessible. For example, if your site is https://www.example.com/, the following files should all be reachable after deployment:
https://www.example.com/service-worker.js
https://www.example.com/notifyvisitors_push/cache/offline.html
https://www.example.com/notifyvisitors_push/safari/click.html
4. Configure Safari
Safari requires certificates for web push. In Settings > Web Push > Safari Configuration, upload your Safari Web Push certificates (CK.pem and .p12).
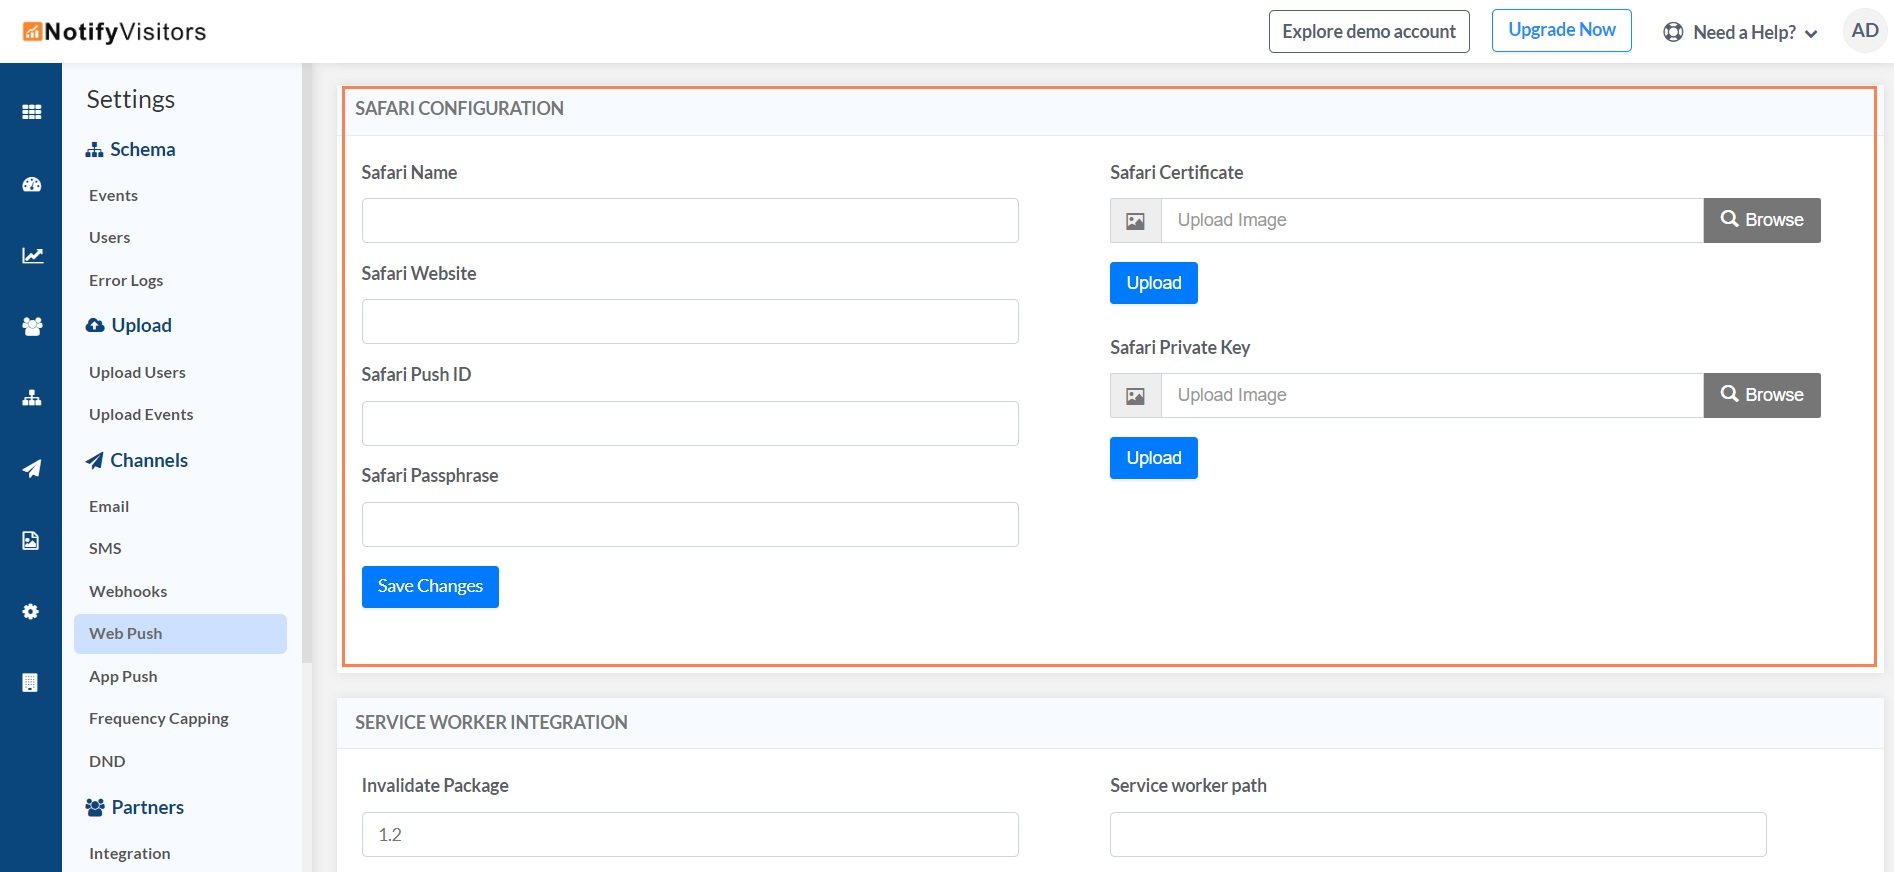
Click here for a detailed guide to set up the Safari web push certificate.
Note: Safari certificates are valid for one year. Renew them before they expire, or Safari push will stop working.
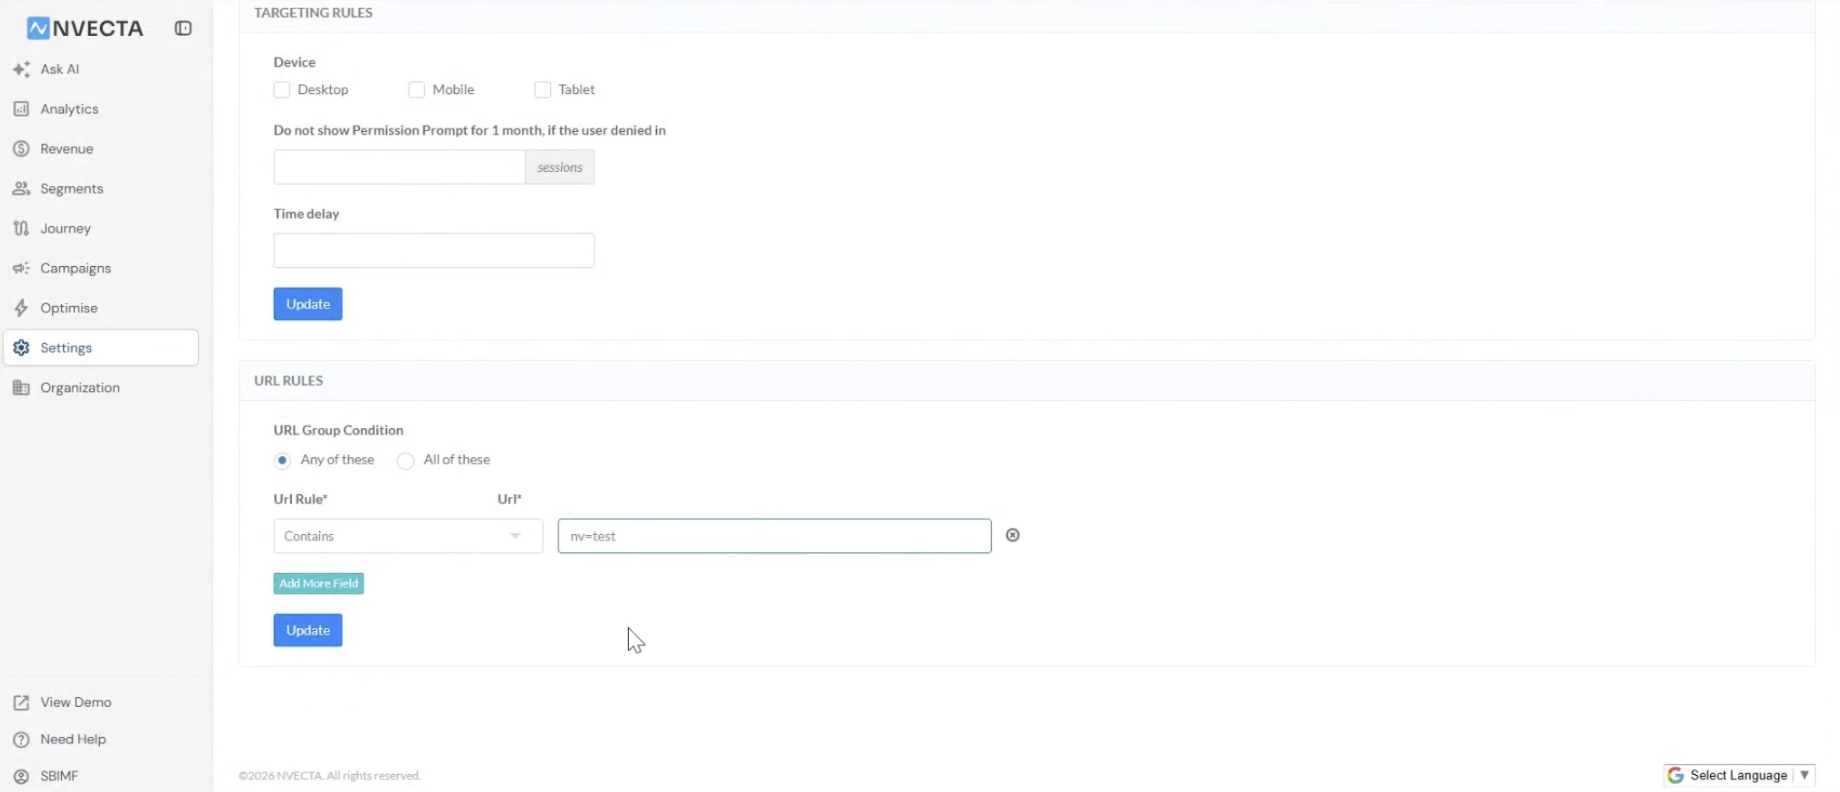
Test before you go live: Before you take the prompt live for everyone, set a targeting rule to show it only on a test URL (e.g. ?nv=test), so you can test it yourself without real visitors seeing it. See the Send test notifications section below, and only remove the test rule once your test pushes arrive as expected.
Configure the permission prompt
The permission prompt is how you ask a visitor for consent to send push notifications. There are two kinds:
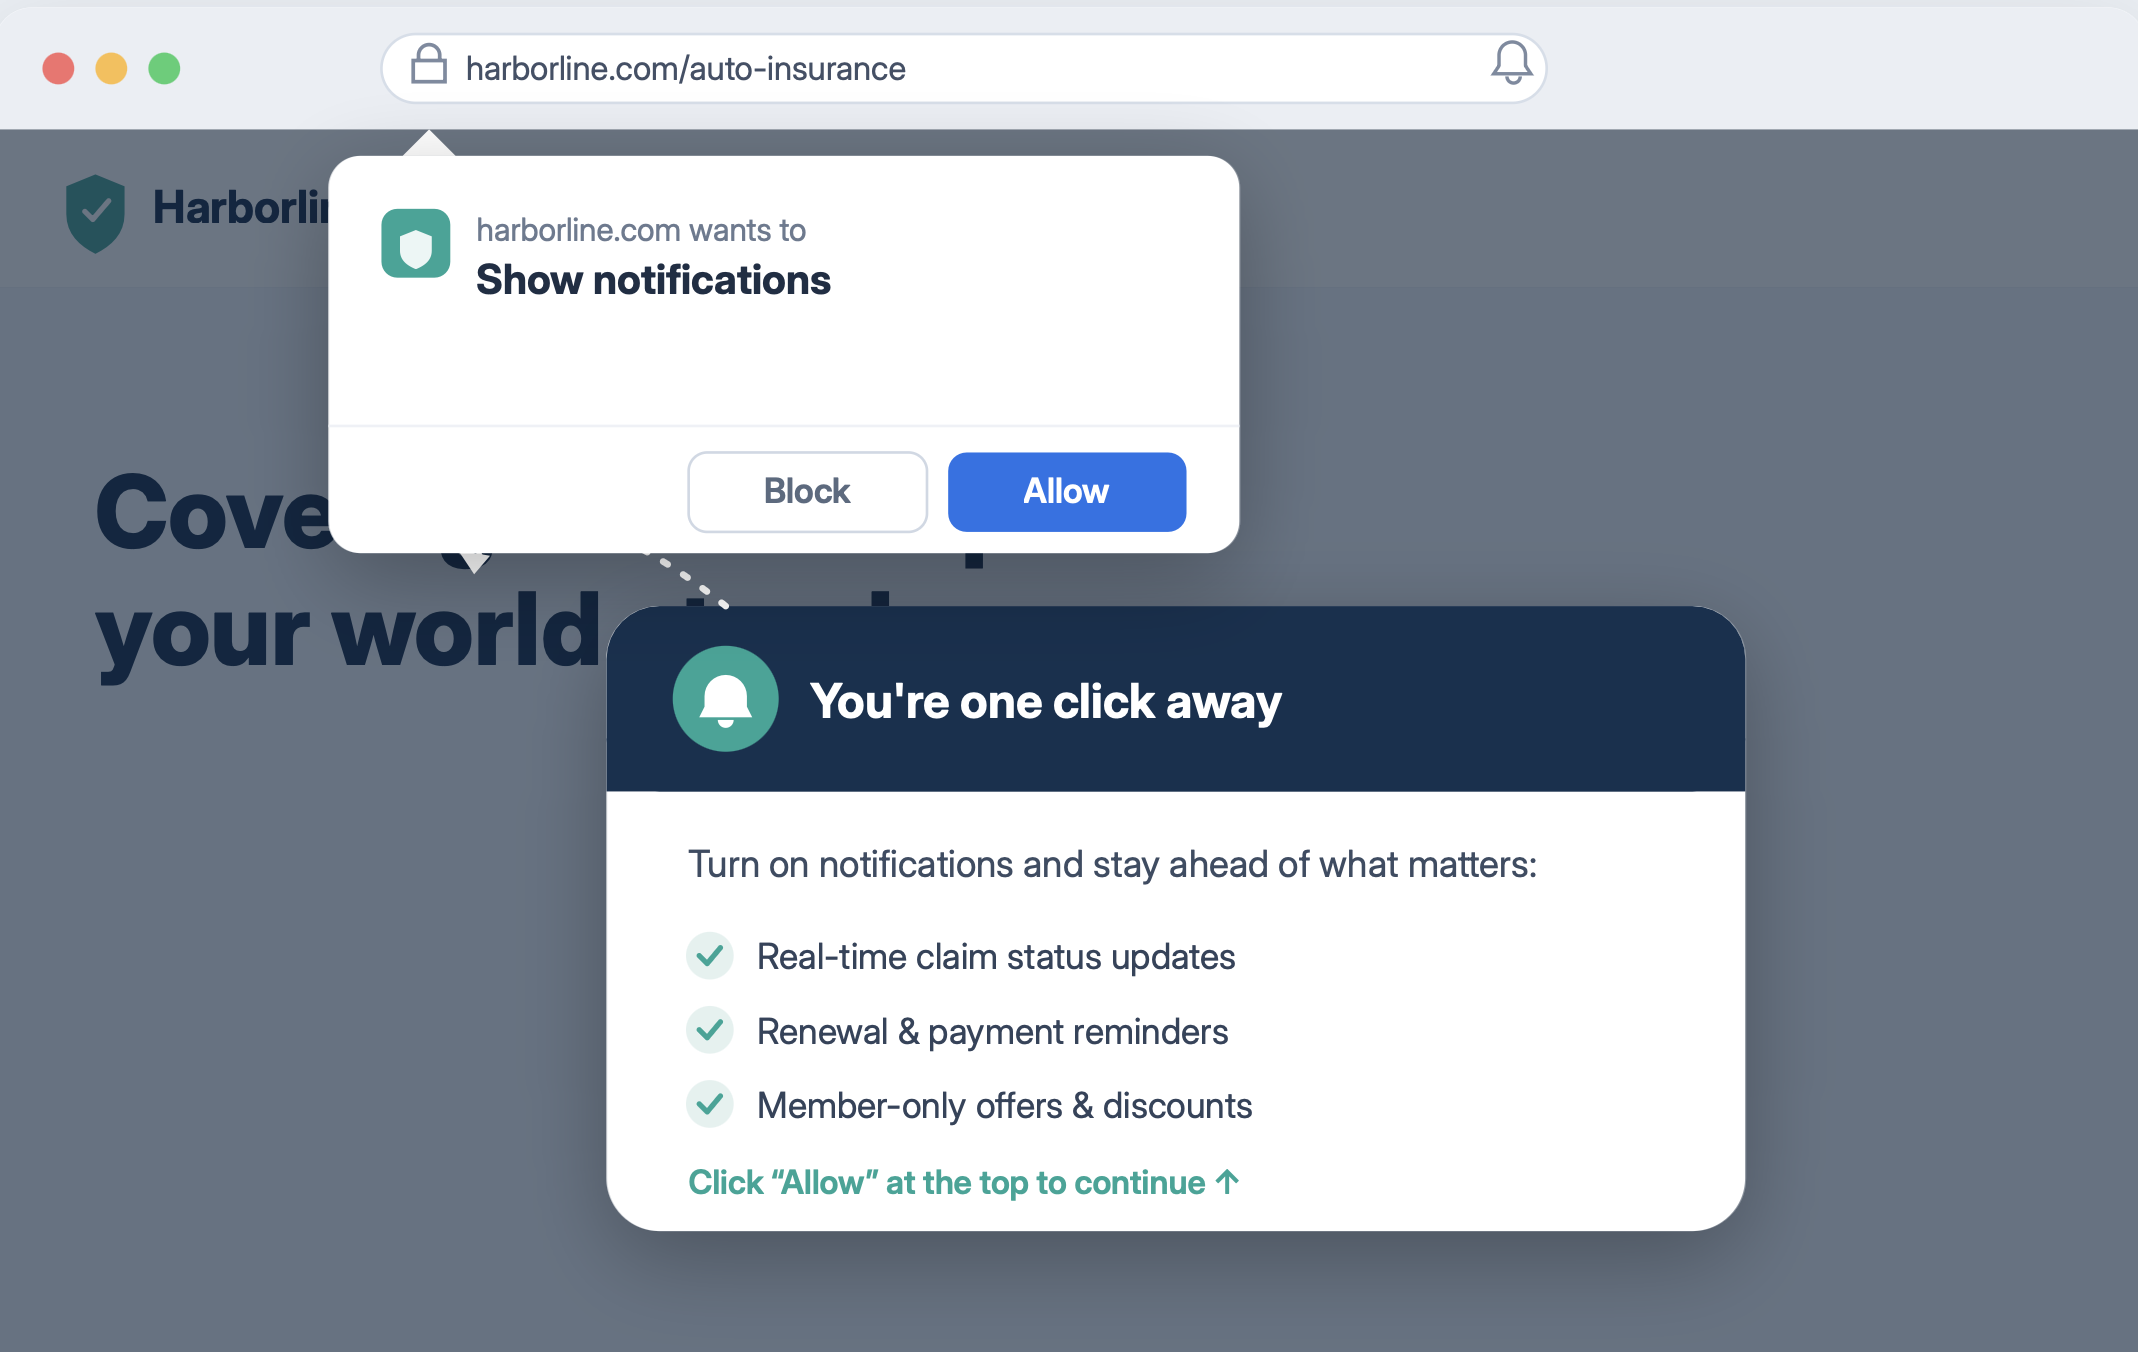
- Native prompt — the browser's own permission dialog (the small "wants to show notifications" box near the address bar).
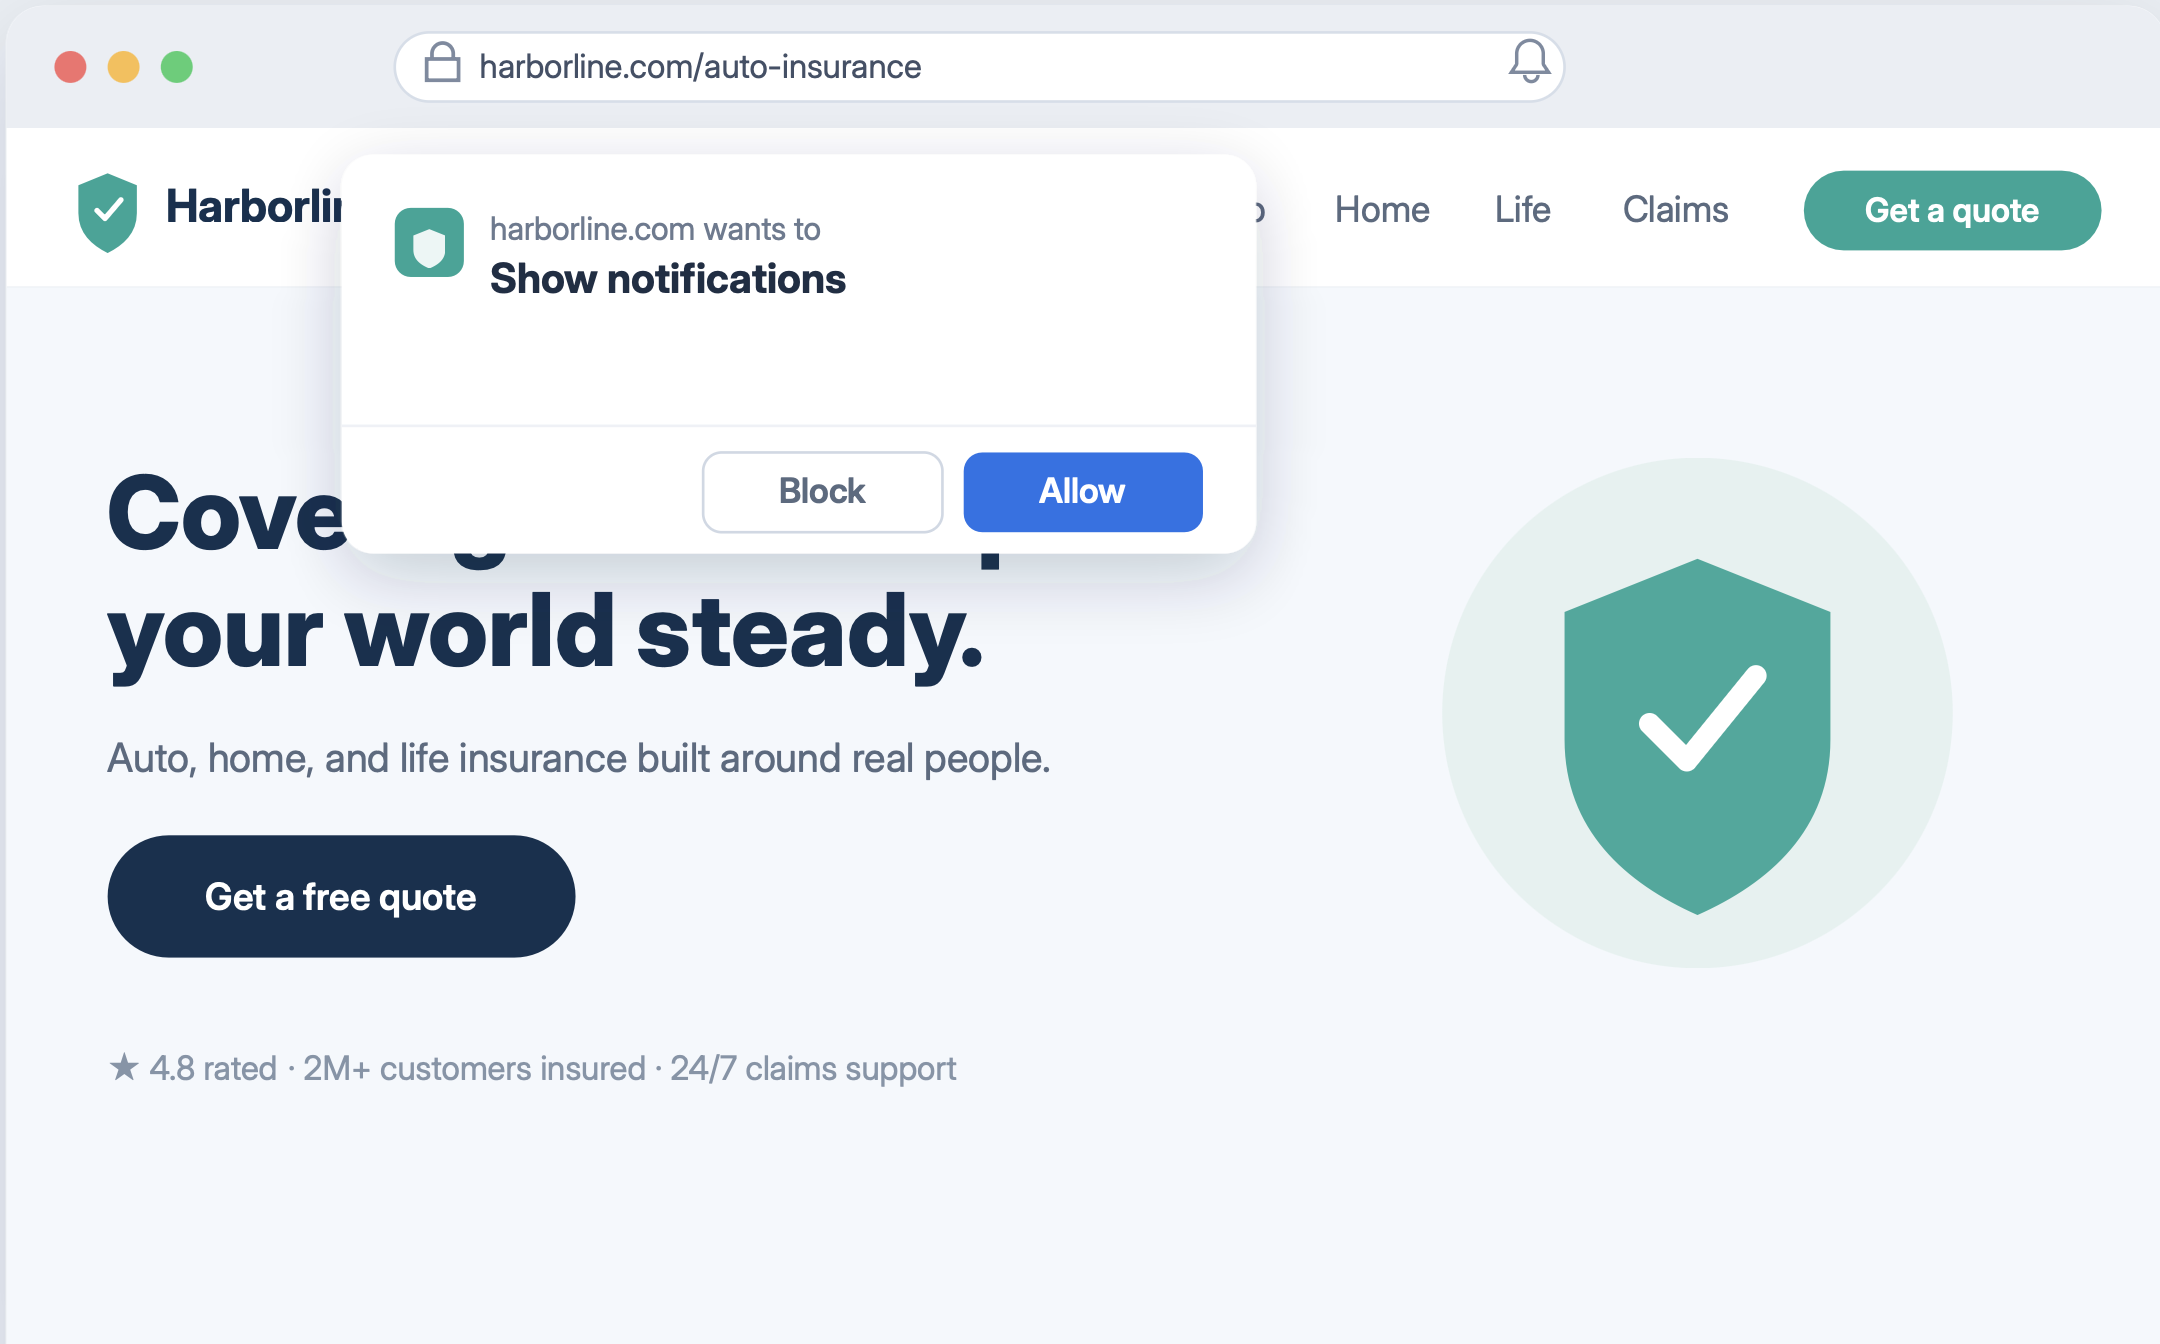
- Custom prompt — your own pop-up, styled to match your site, whose Allow button triggers the native prompt when clicked.
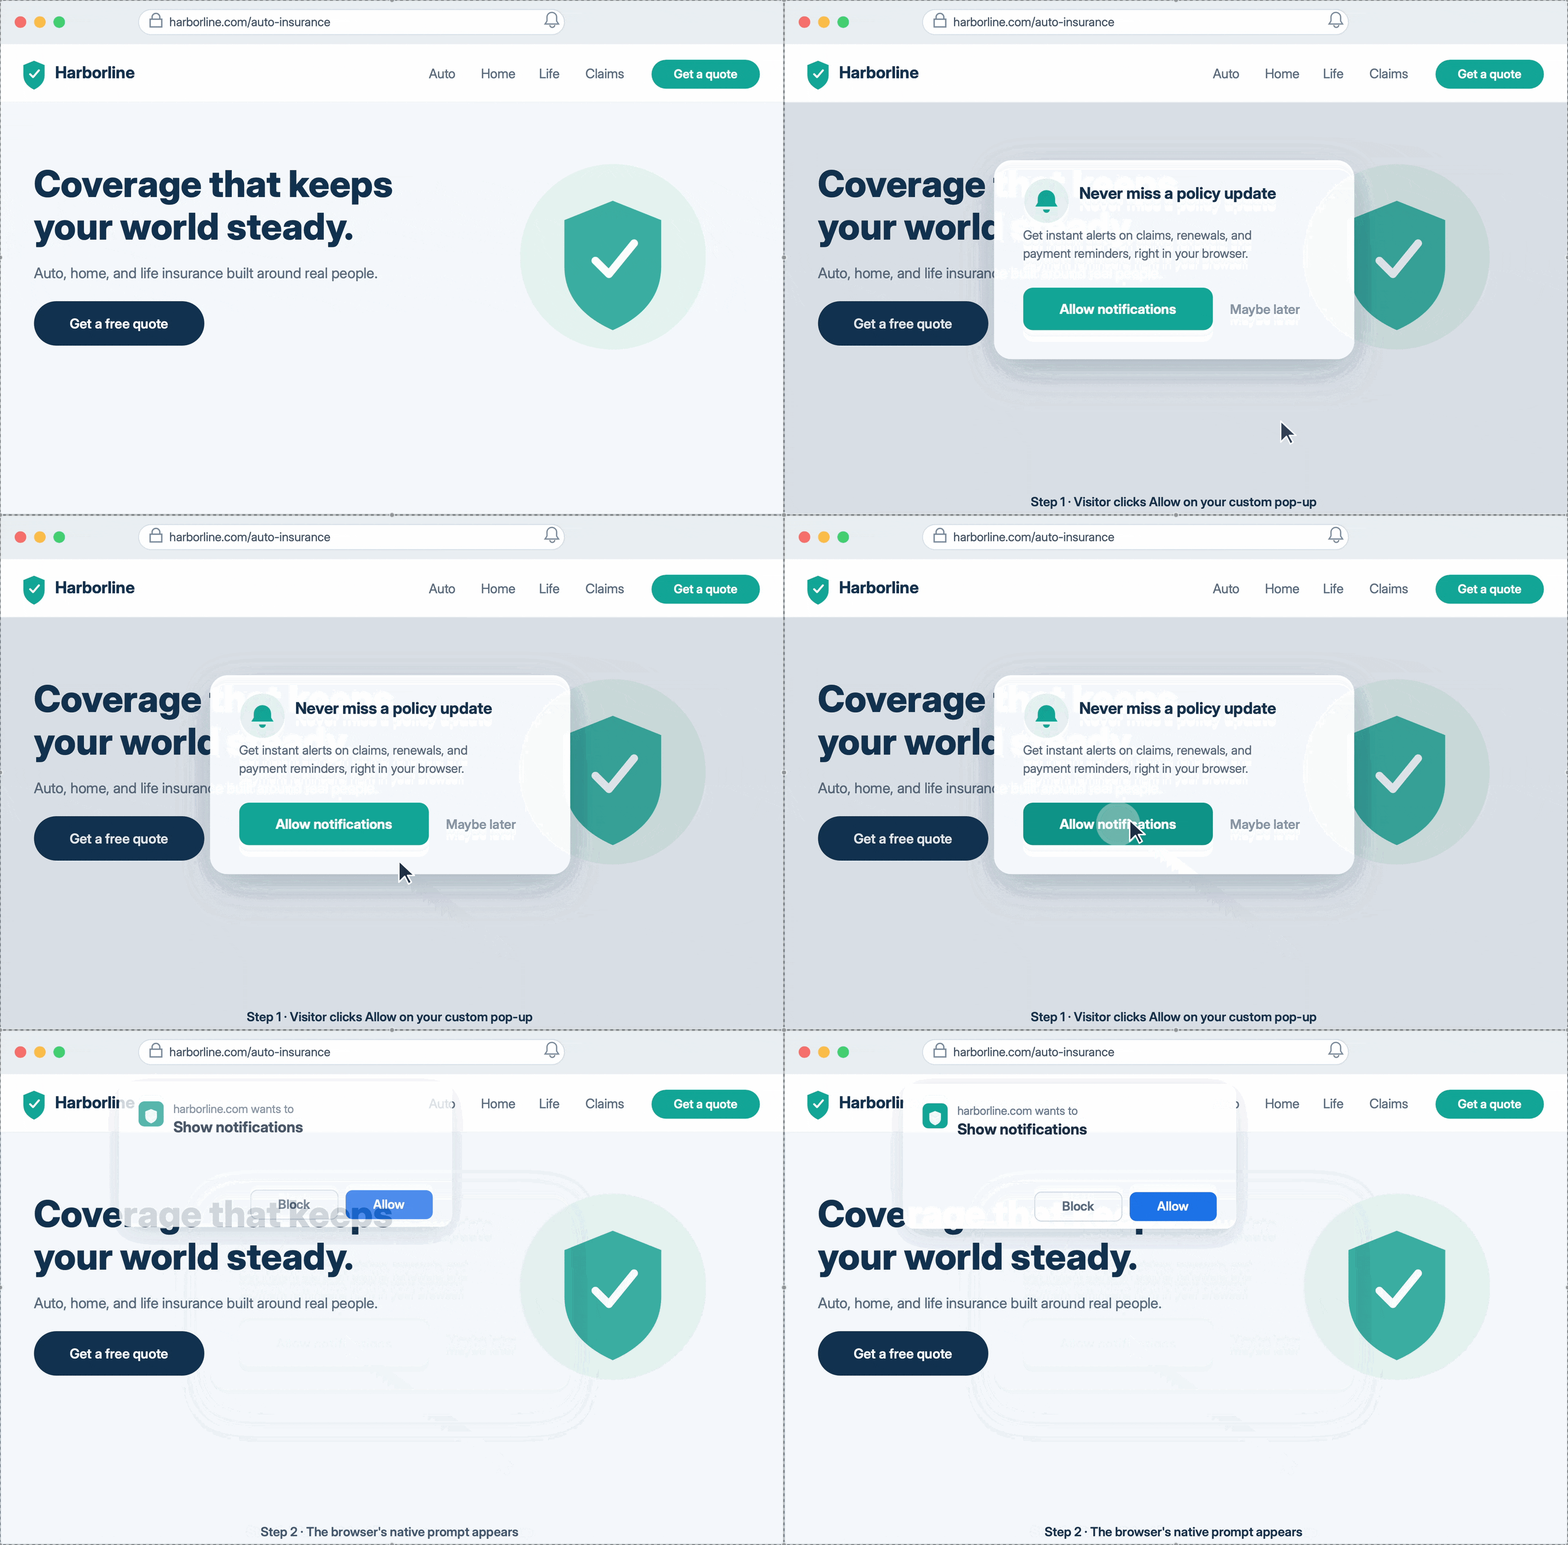
In most cases we recommend leading with a custom prompt, for two reasons:
- The native prompt is a one-shot. The browser's native dialog can only be answered once. If a visitor blocks it, your site notifications stay blocked and they'd have to turn them back on manually in browser settings. A custom prompt adds a step in front of it: you show your own pop-up first, and if the visitor dismisses it, you don't show the pop-up again — but because the native dialog was never triggered, the permission is still in its default state, so on a later visit the native prompt will still appear.
- Firefox and Safari won't show the native prompt on page load. Both require a user gesture (a click) before the native dialog can appear. Without one, Firefox shows only a small icon in the address bar and Safari shows nothing. Your custom prompt's Allow button supplies that click. Chrome does allow the native prompt on page load, but the one-shot problem above still applies.
The prompt is configured under the Permission Prompt tab, which has three sections: Configuration, Permission Box, and Rich Overlay Content.
1. Configuration
Controls when and how the prompt appears:
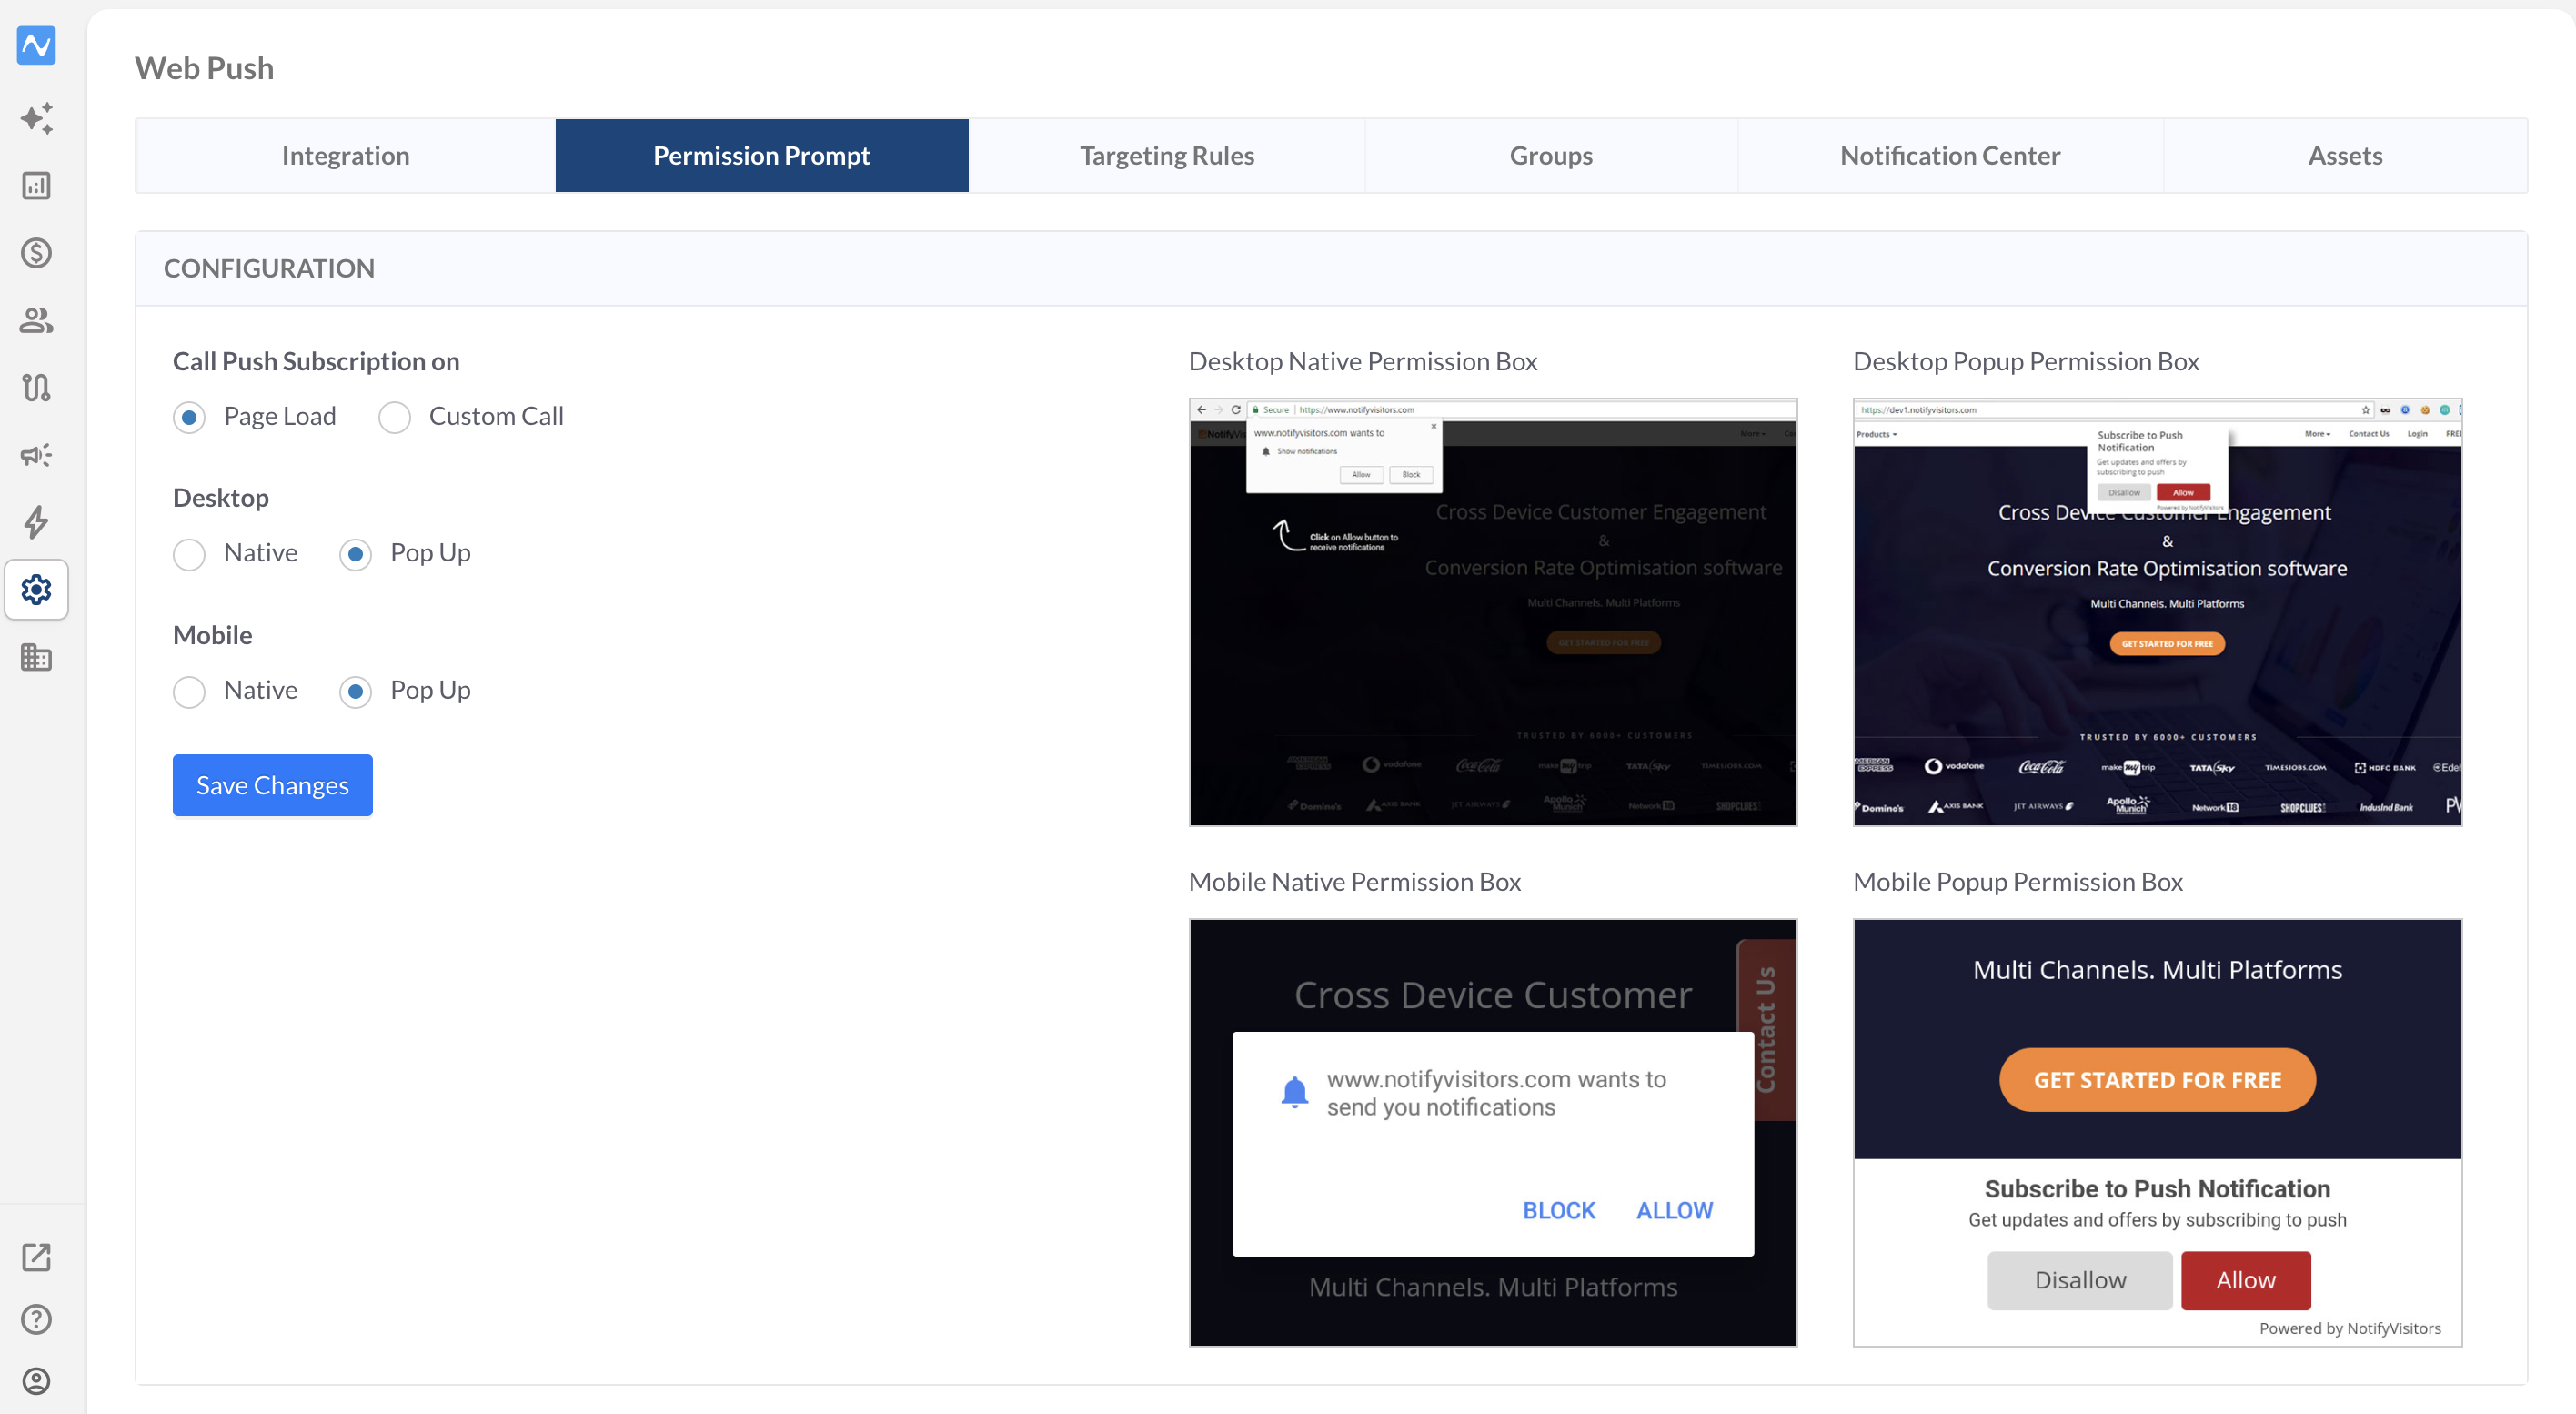
- Trigger — show it on page load, or hold it until the visitor performs an action (Custom Call), such as clicking a notification bell in your header.
- Prompt type — show your custom pop-up or the browser's native prompt, set independently for mobile and desktop.
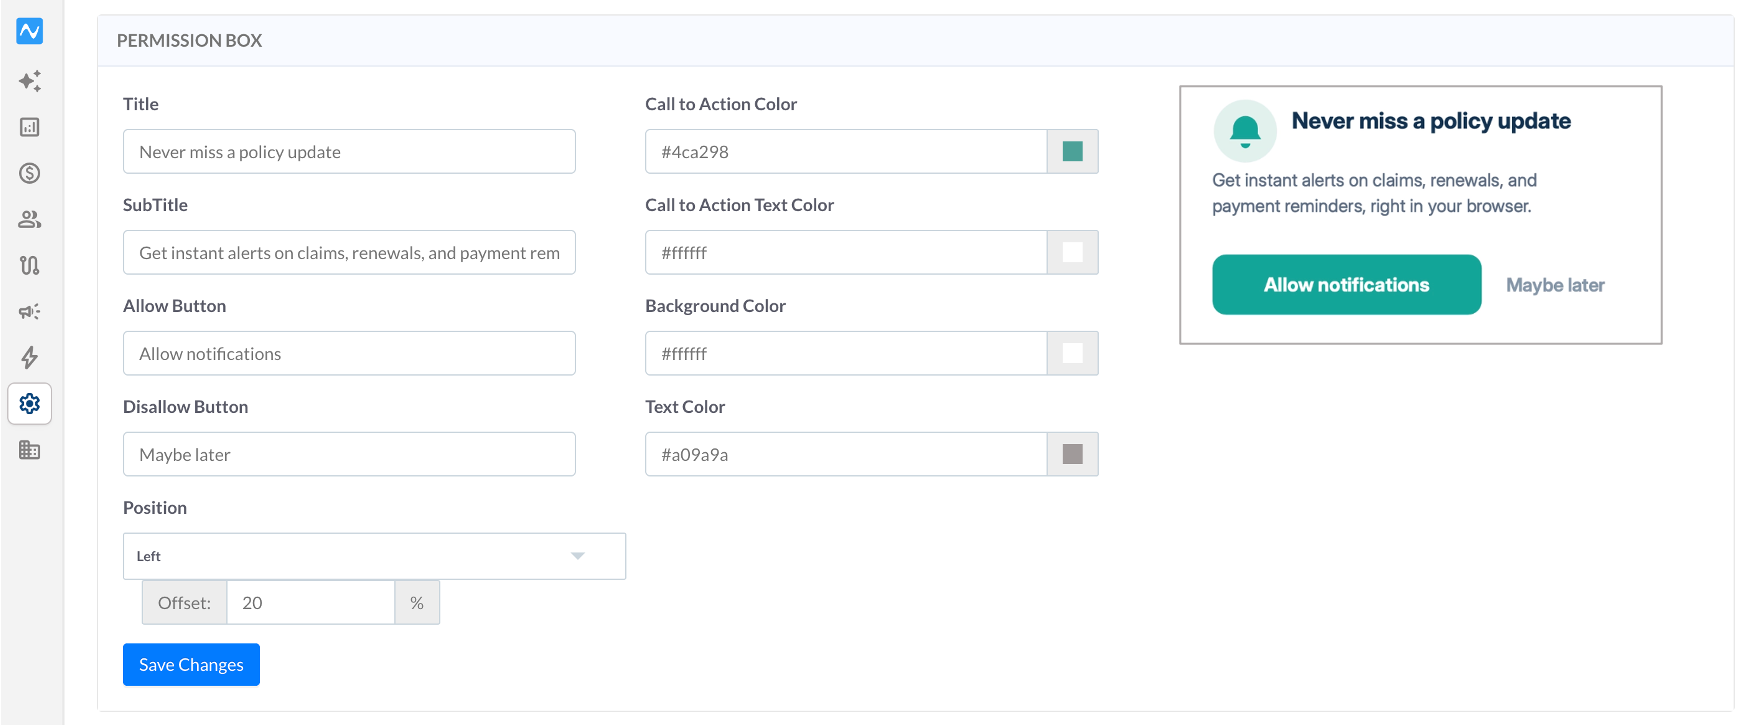
2. Permission Box
Customise the design and layout of your custom pop-up: the button text and styling, the heading and body copy, the background colour, and where the pop-up appears in the browser window.
3. Rich Overlay Content
A rich overlay is a larger, branded layer shown behind the native prompt. It adds context around the permission request; imagery, benefits, and a clearer call to action than the browser dialog gives on its own, and points the visitor toward the Allow button.
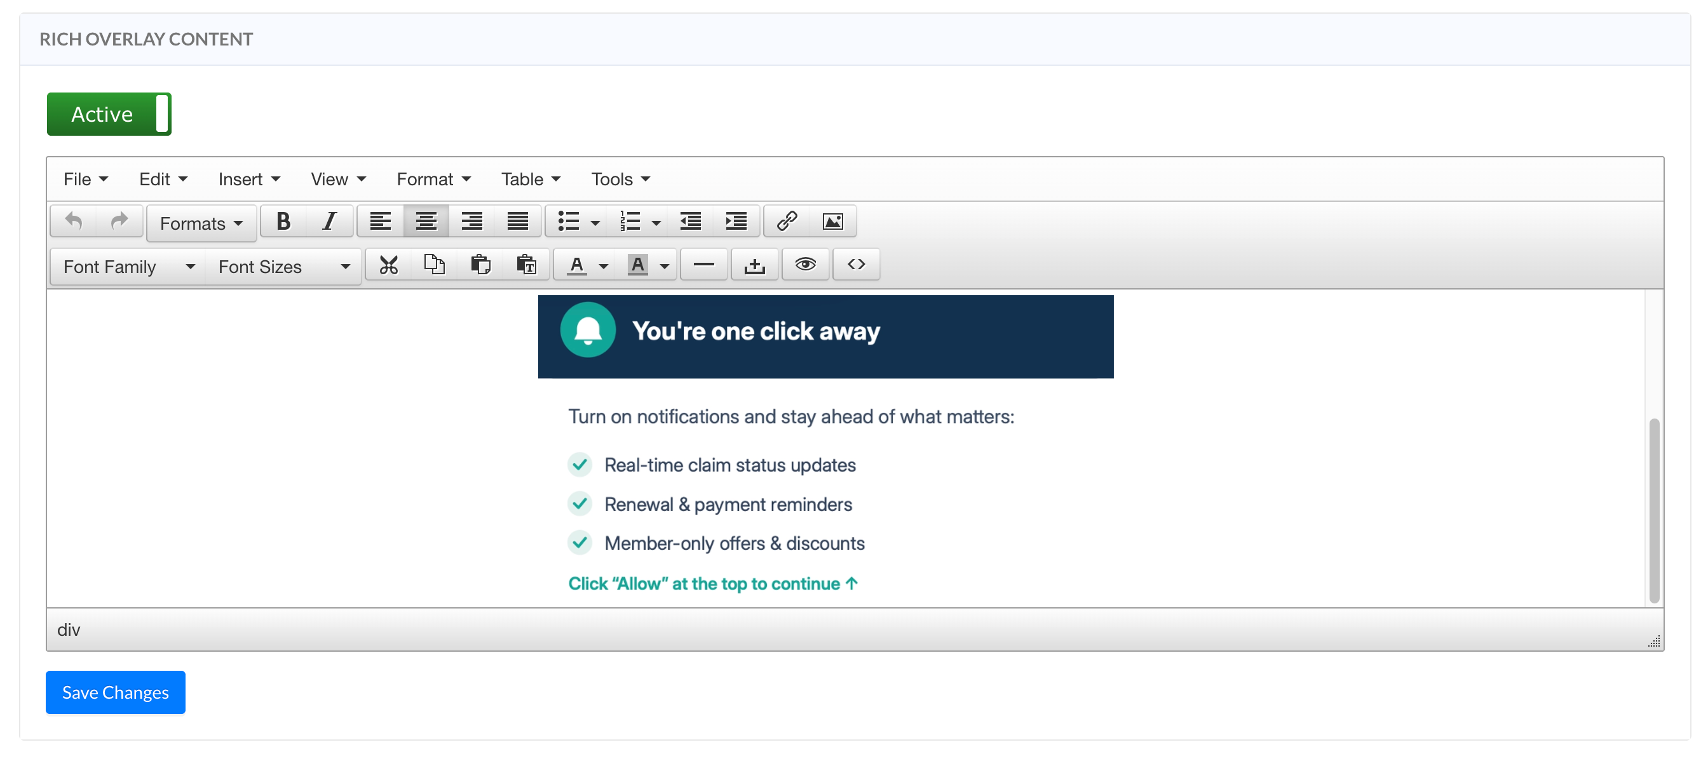
Toggle it Active, then build your overlay in the rich-text editor: add and format text, insert images and links, or switch to the code view (<>) to paste your own HTML. Click Save Changes when you're done.
Set targeting rules
Targeting is configured under the Targeting Rules tab, which has two sections: Targeting Rules and URL Rules.
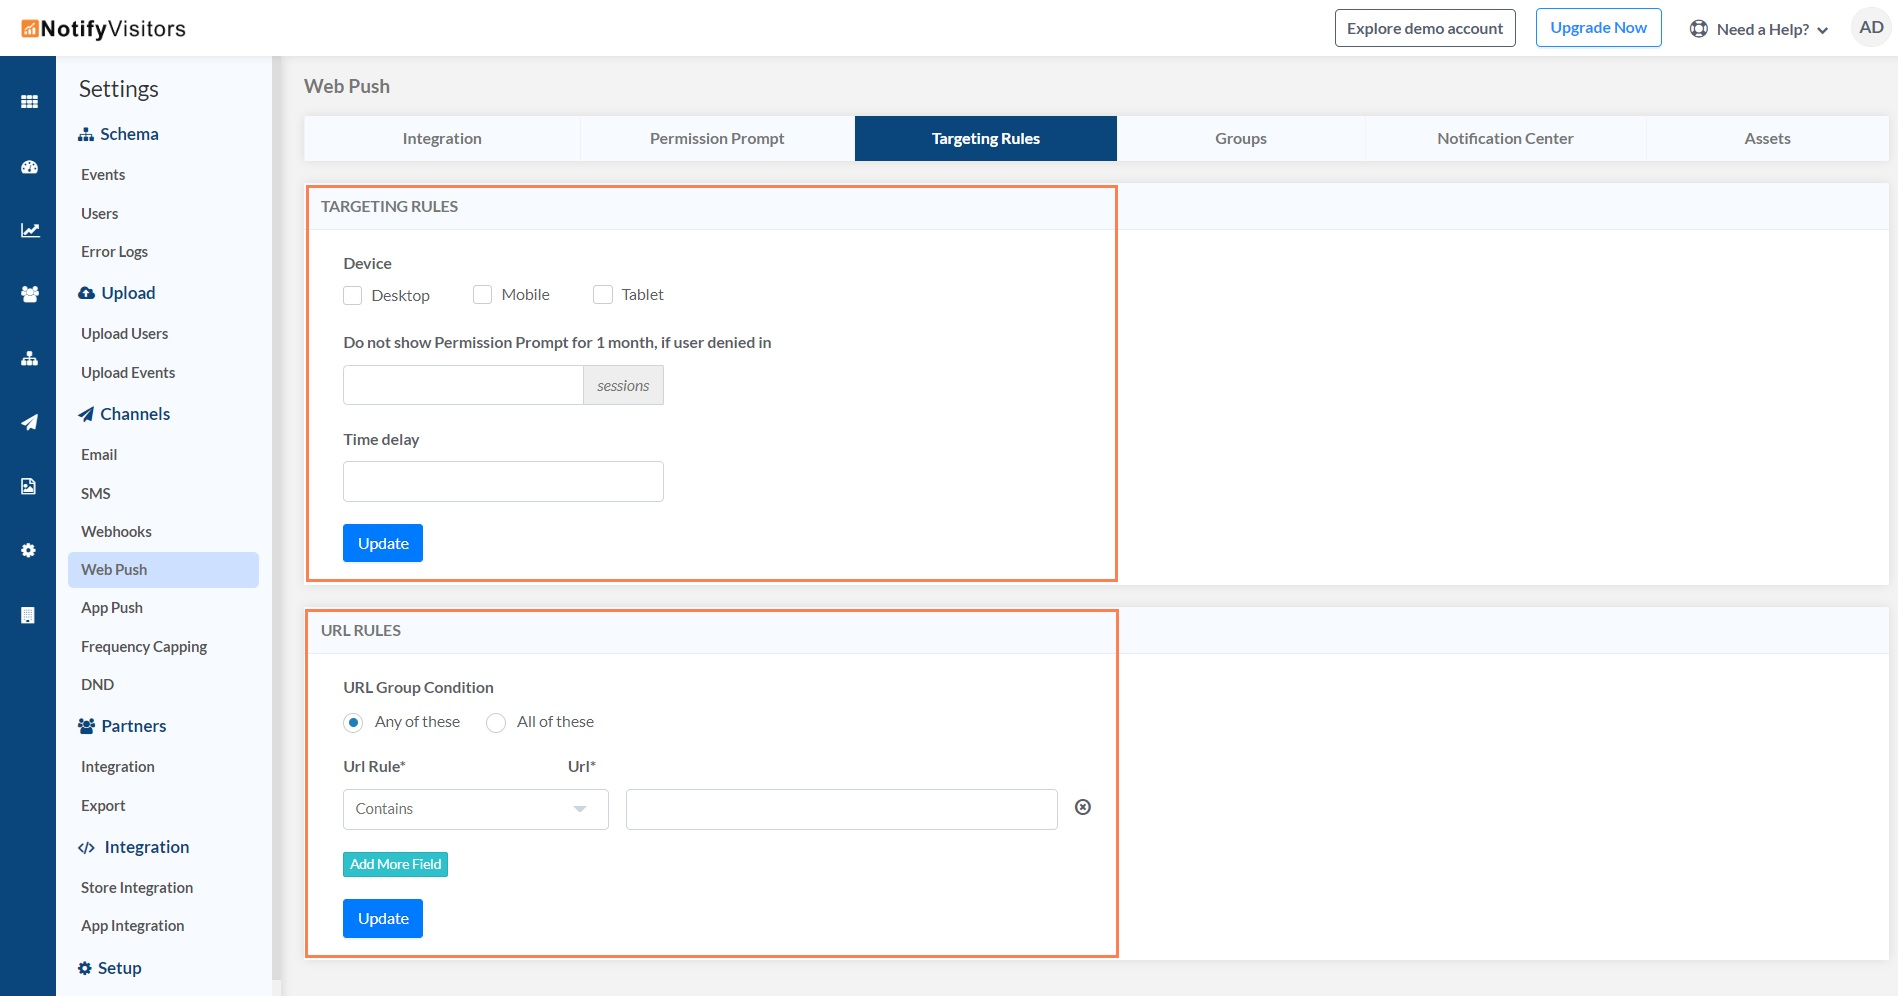
Targeting Rules let you choose which platforms to target (desktop, mobile, tablet), set a time delay before the prompt appears, and control whether to re-prompt visitors who have already declined.
URL Rules let you show the prompt only on specific pages. Define keywords and a matching condition; the prompt appears only on URLs that satisfy it. Add more keyword/condition pairs with Add More Field, and choose whether any or all conditions must match.
Send test notification
Run your test on the gated test URL first — the one you set up earlier (e.g. ?nv=test) — and only take the prompt live once everything works.
- Create a test subscriber. Open your site using the test URL (e.g. https://www.example.com/?nv=test) so the permission prompt appears only for you, not for real visitors, and click Allow to subscribe. You can find this subscriber's Subscription ID under Campaigns > Web Push > Logs.
- Check the subscriber count under Campaigns > Web Push > Subscriber analytics to confirm your subscription registered.
- Create a test campaign. Go to Campaigns > Web Push and create a new campaign. Choose Standard or Rich — test both, since they render differently — then fill in the required details such as Title, Message, and Call to Action URL, stepping through the Description, Media, and Advanced Options tabs with Save And Continue.
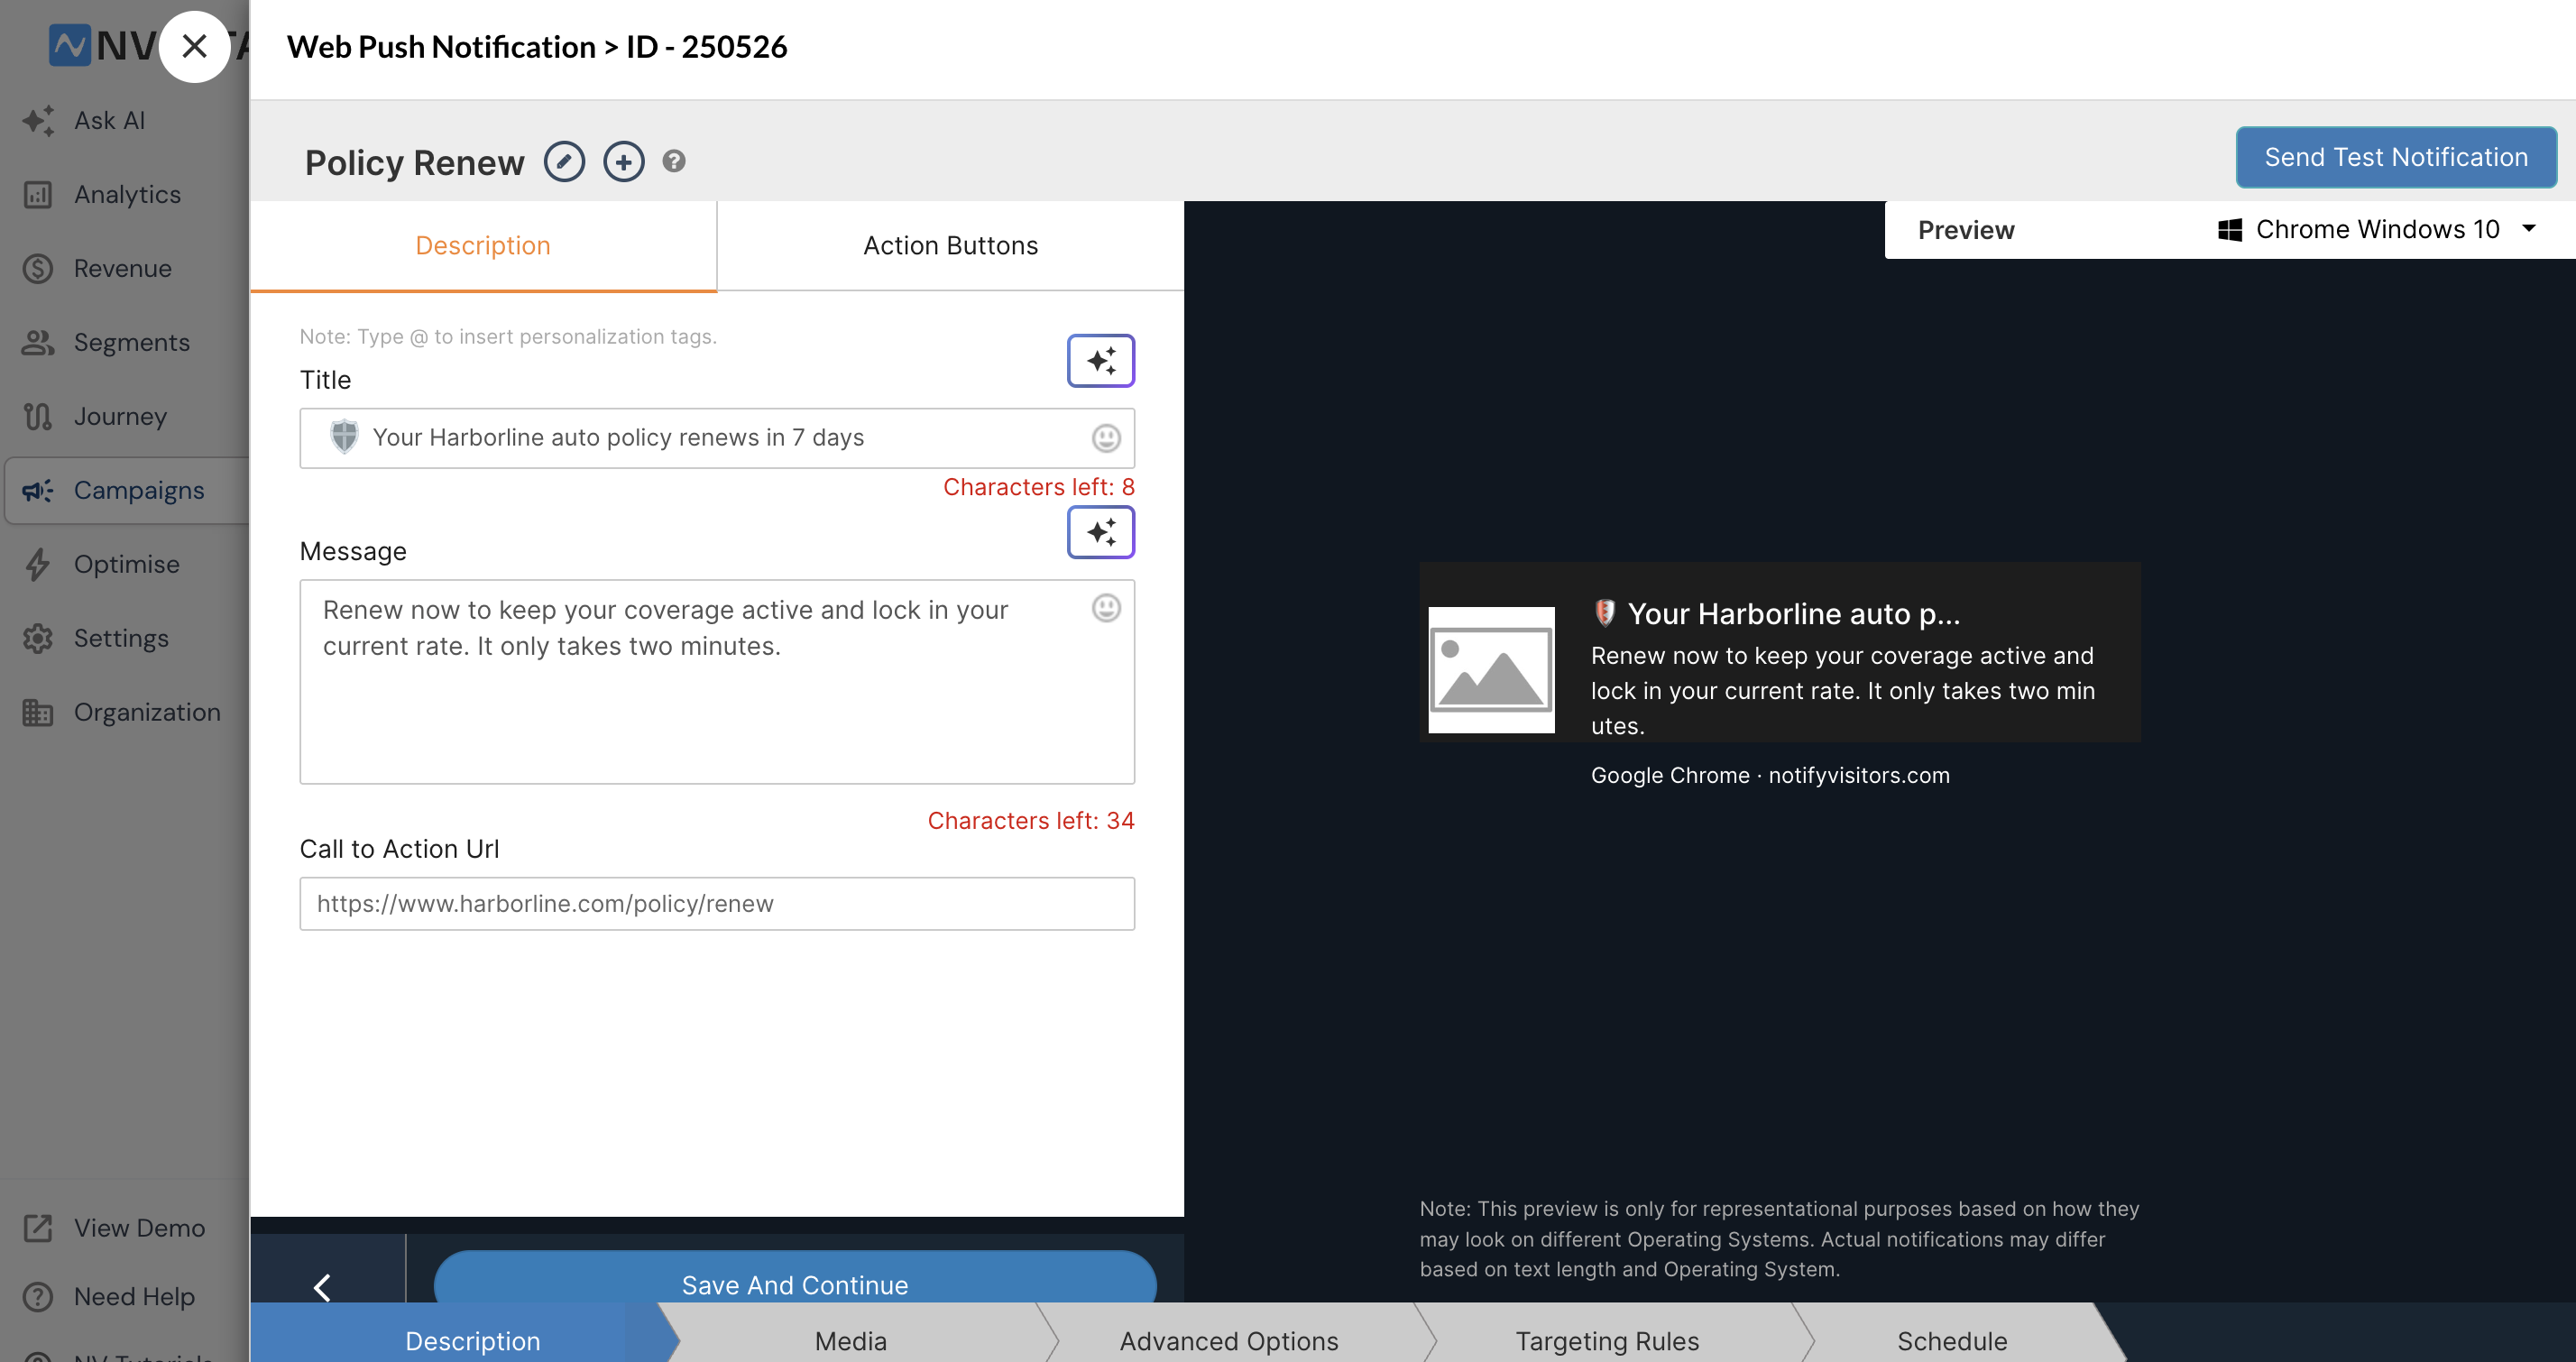
- Send the test. With the campaign open, click Send Test Notification (top right). Under Target, select the browser you subscribed with (e.g. Chrome), enter your Subscription ID, and click Send. To send to every test subscriber at once, tick Send to all Test Users instead.
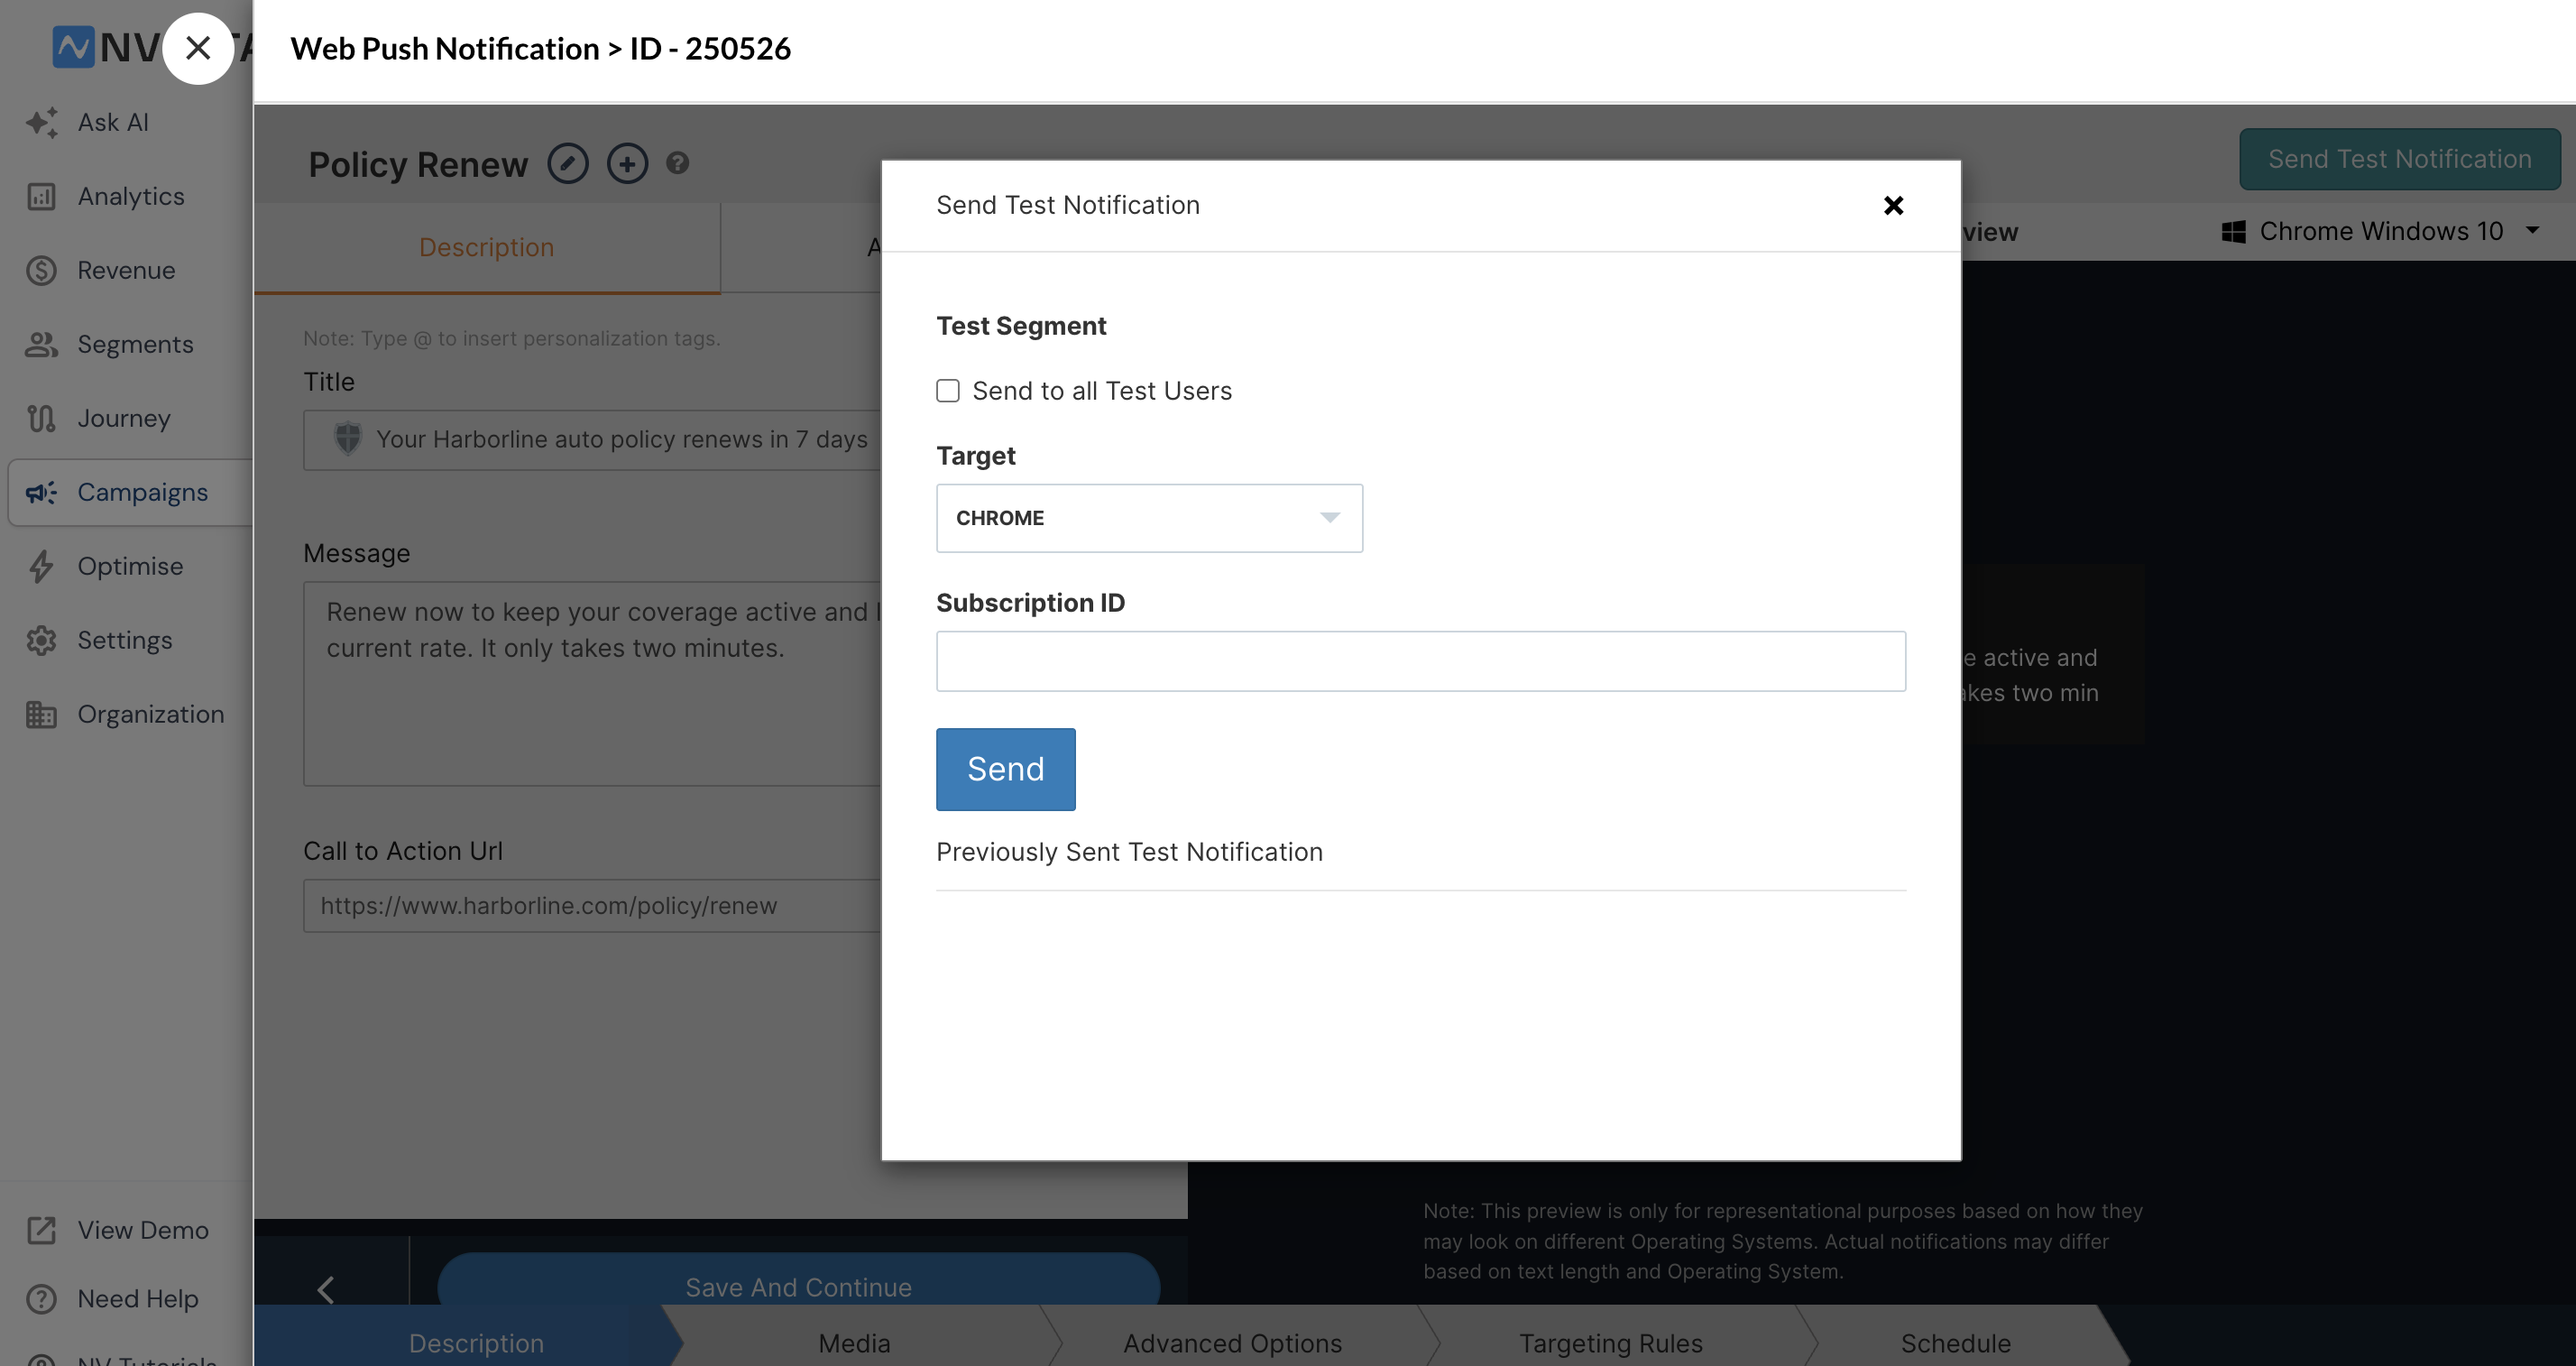
- Confirm delivery. In Campaigns > Web Push > Logs, check that the same Subscription ID you sent to has received the notification.
- Go live. Once your test pushes arrive as expected, remove the test URL condition from your Targeting Rules to take the permission prompt live for all visitors.
Troubleshooting
For a complete list of common issues and fixes, see the Web Push Troubleshooting guide. The most common checks are below.
Chrome
- Confirm the service worker is live. Open DevTools (Inspect > Application > Service Workers) to see the registered file, or visit it directly at https://yoursite.com/service-worker.js. If nothing loads at that path, either web push isn't enabled in the NVECTA dashboard or the file isn't placed correctly in your root.
- Check that browser notification permissions are enabled.
- If another vendor's service worker is present on the site, make sure you've installed the merged service worker.
Safari
- If the second permission prompt doesn't appear, re-check the uploaded CK.pem and .p12 certificates.
Conclusion
You've now installed the NVECTA snippet and service worker, configured the permission prompt and targeting rules, gated the prompt to a test URL, and confirmed delivery through your test subscriber. Once your test pushes arrive as expected, remove the test rule to begin reaching all visitors.
From here, you can fine-tune how subscribers experience your notifications — subscription groups, a notification center, and assets like a welcome push and custom icons. These are covered in a separate guide, Web Push: Additional Settings.
Updated 3 months ago